LOD Generation Guide
🌄 How to Generate LODs for Licentia NEXT
WHY YOU MIGHT NEED THIS?
You added or updated:
- worldspaces
- terrain mods
- grass mods
- tree mods
- city or landscape overhauls
Any of the above requires regenerating LODs to avoid visual glitches, missing terrain, or pop-in.
This Guide makes an assumption that you have familiarity with MO2, basic modding and computer skills.
These are the general steps to regenerate LODs for Licentia NEXT:
- xLODGen + ACMOS
- Grass Cache
- TexGen + DynDOLOD
- Final cleanup
🕐 Total time: ~2–3 hours, depending on your PC.
Step 1️⃣ — General Preparation
This block applies to everything below, so read carefully!
🕐 Expected time to prepare everything is just ~5 minutes!
-
Create a folder at the root of your drive (i.e.
Cdrive), let's call it_DYNDOLOD, and create 3 folders inside it:C:\_DYNDOLOD\DynDOLOD_OutputC:\_DYNDOLOD\SSELODGen_OutputC:\_DYNDOLOD\TexGen_Output
That's what you should get:
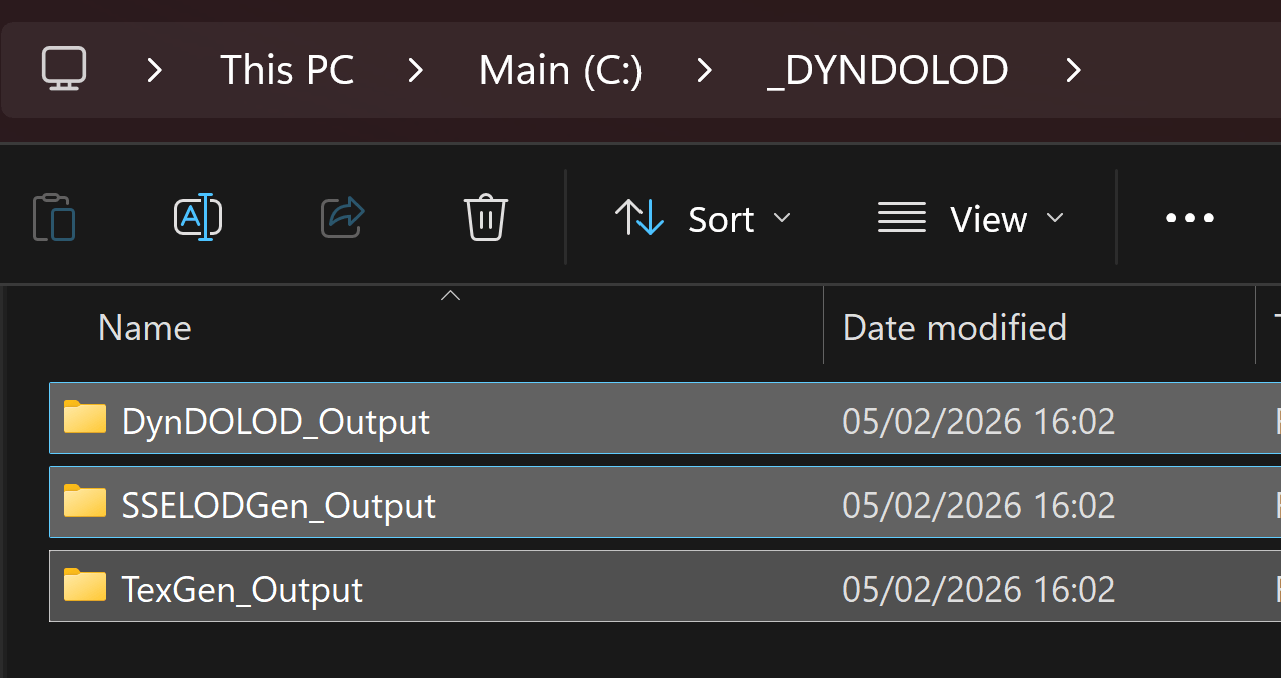 tip
tipMake sure they are empty! (in case it's not the first time you're doing this process)
-
On the top right of MO2 near the
Runbutton click on the list to open it (usually SKSE is pre-selected there) and selectEdit, like this: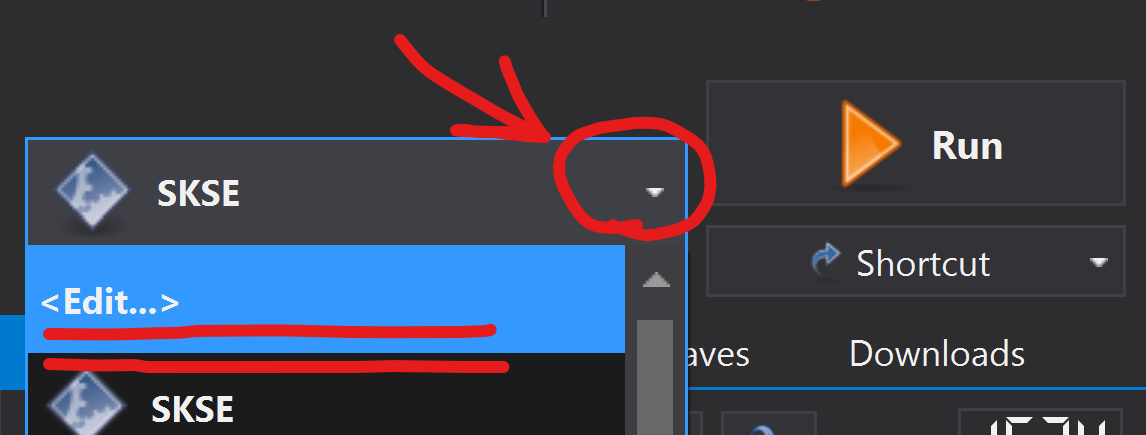
Here you would need to go through the list of tools we'd use in this guide, and make sure their outputs (which is the
-O:"some_path"parameter) are set to the folders you've created in the first step in theArgumentsfield, like this:-
For
xLODGenx64it should be-O:"C:\_DYNDOLOD\SSELODGen_Output":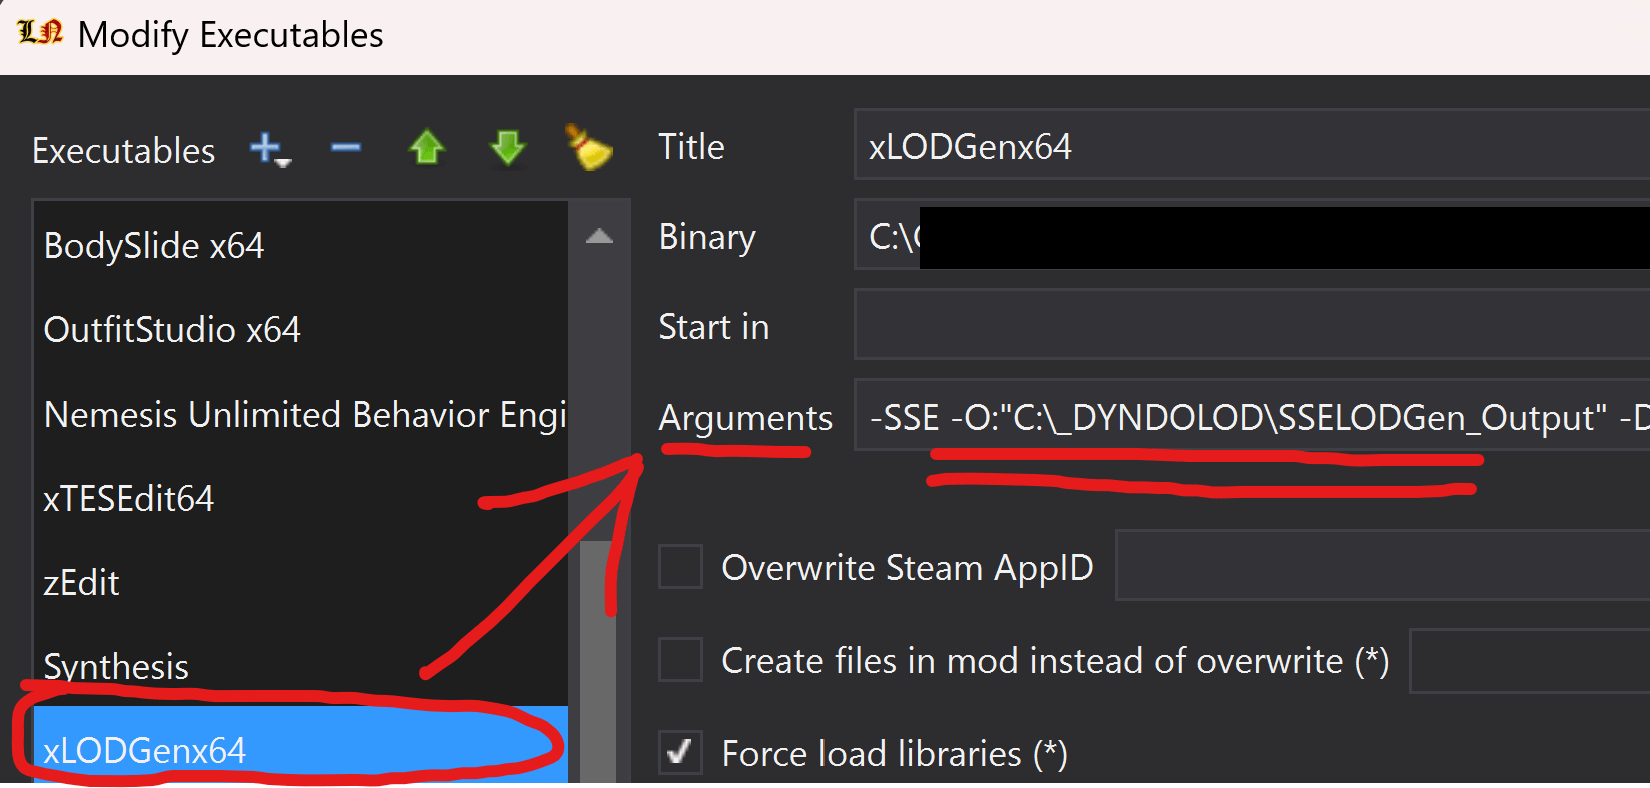
-
For
TexGenx64it should be-O:"C:\_DYNDOLOD\TexGen_Output":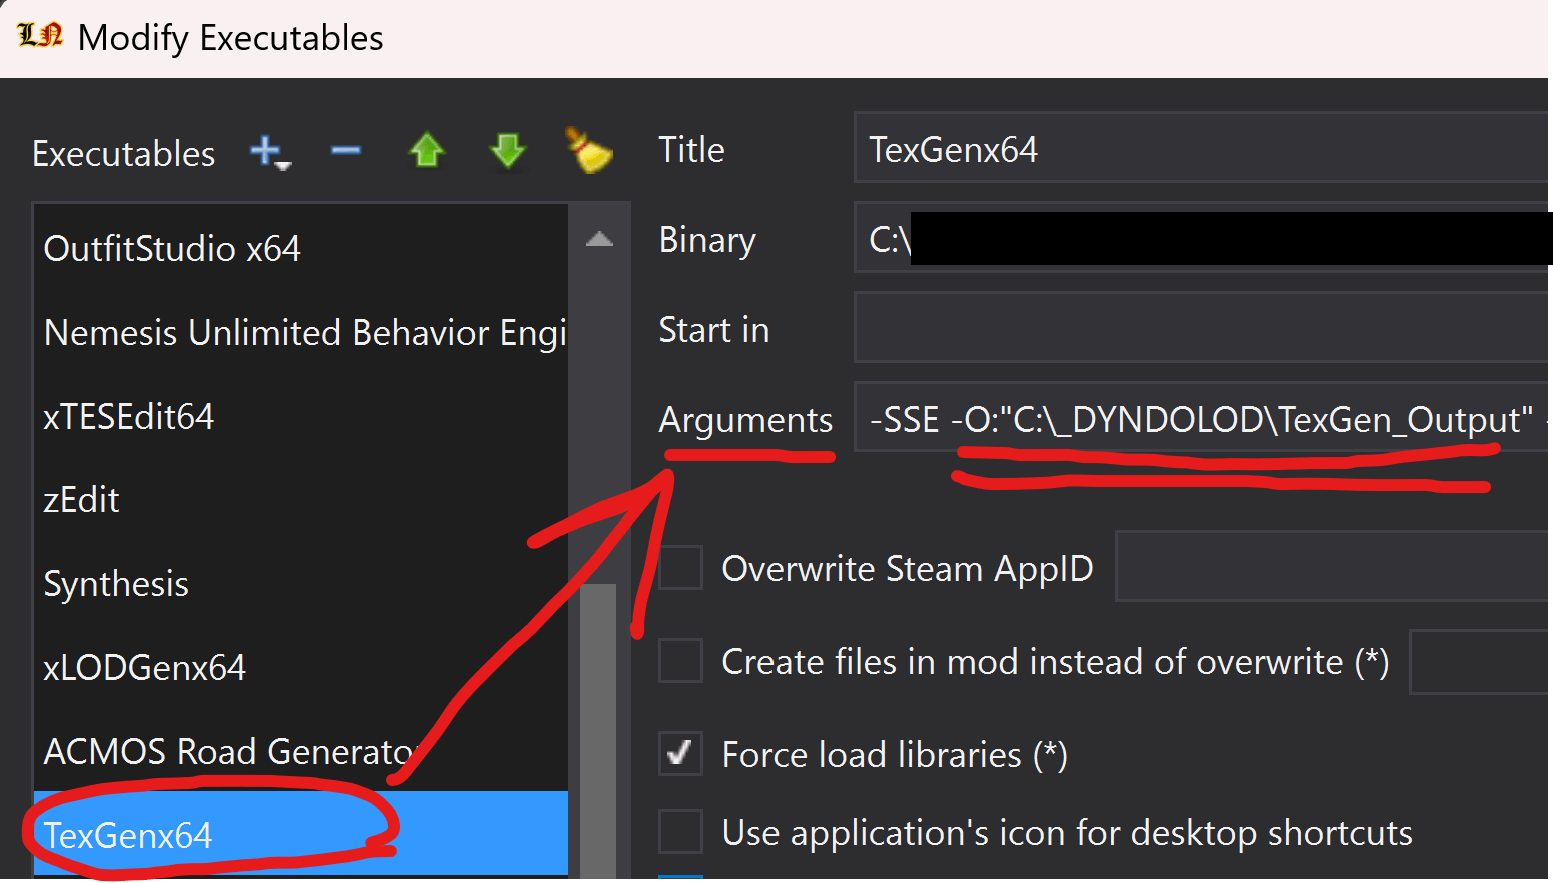
-
For
DynDOLODx64it should be-O:"C:\_DYNDOLOD\DynDOLOD_Output":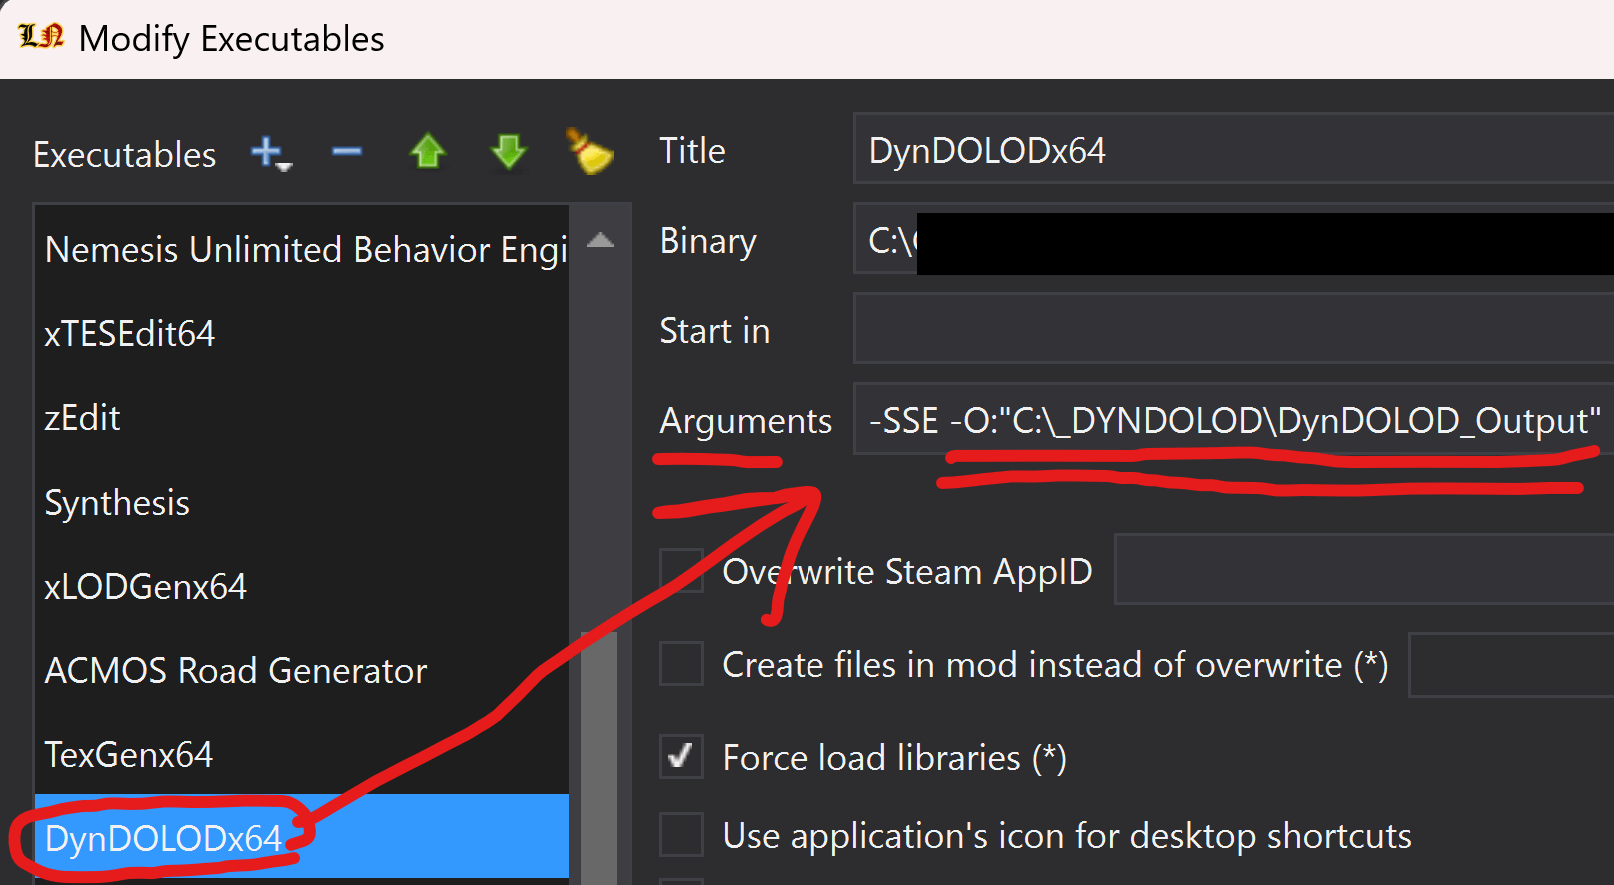
-
-
Make sure to exclude those
*.exefiles both as a "process" and as a "file" for your Anti Virus software:xLODGenx64.exe- located insideyour_LN_installation/tools/xLodGenTexGenx64.exe- located insideyour_LN_installation/tools/DynDOLODDynDOLODx64.exe- also located insideyour_LN_installation/tools/DynDOLODTexconvx64.exe- has many locations, either find all or exclude only as a process
warningFailing to exclude these files may lead to UNEXPECTED ERRORS, which you won't be able to get any help with.
-
Last thing to do is check and see if DynDOLOD has updated (the list always ships a version that's current at the time of its release):
-
Select
TexGenx64from the executable dropdown at the top-right of MO2 and hitRun: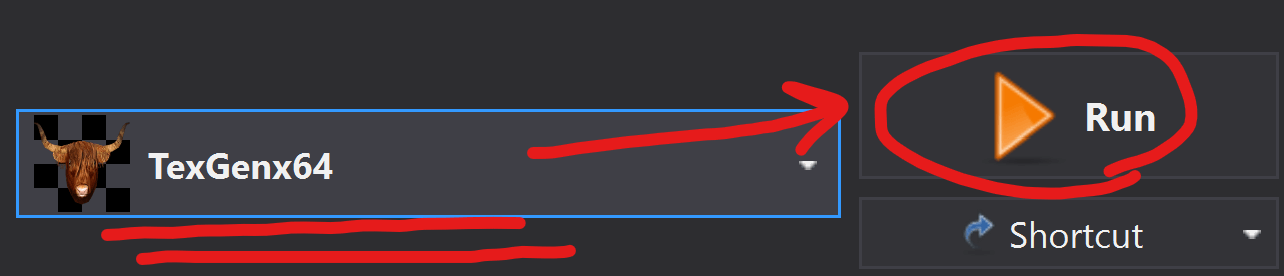
-
If TexGen opens normally without any additional warnings, DynDOLOD is up to date and you can go on to Step 2 xLODGen + ACMOS.
-
If you see this:
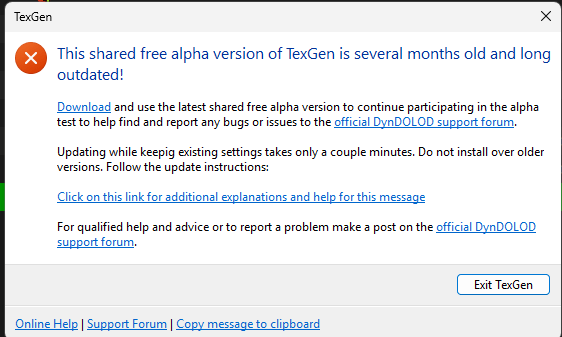
You will need to update. This is what you'd need to do:
How to Update TexGen and DynDOLOD
-
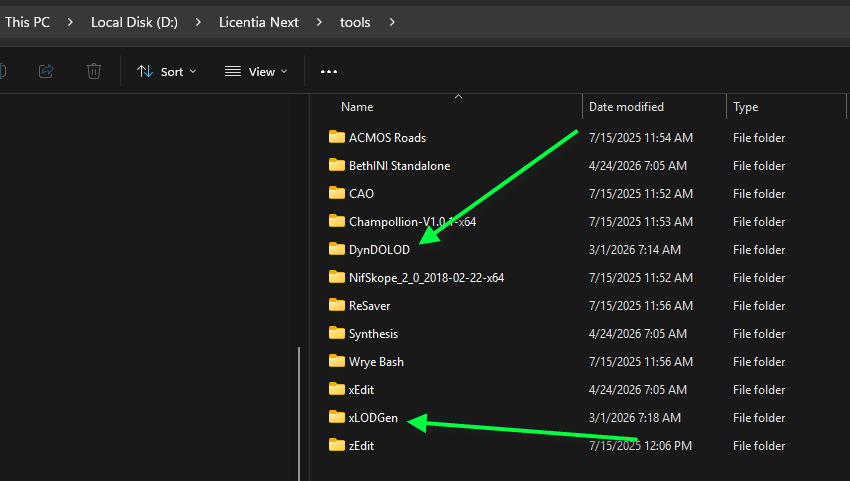
Locate the Licentia Next tools folders. Then delete the contents of the DynDOLOD and the xLODGEN folders. Do not delete the folders themselves:
-
Download the latest
DynDOLOD Alpha 3:- Go here and get the latest version
- Save the download anywhere
- Extract the contents of the download to the
Tools/DynDOLODfolder.
-
Download the latest
xLODGen:-
Go here and click this link to download the latest version (number may be different than shown in the image):
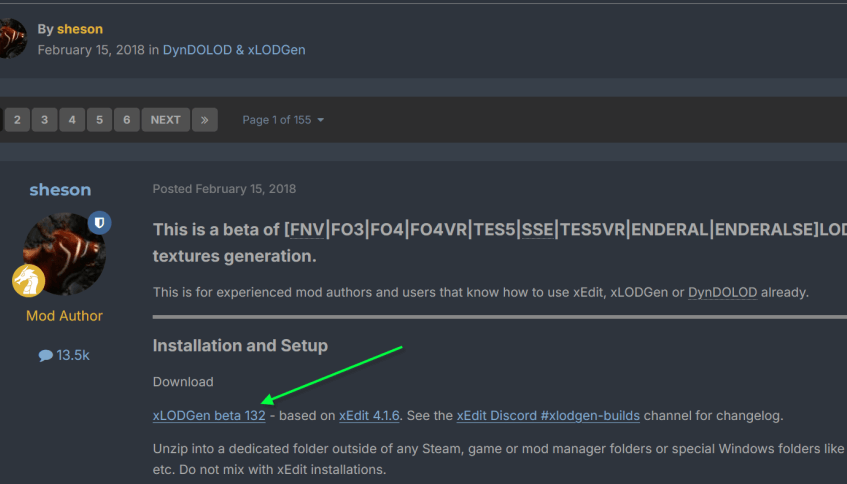
-
Save the download anywhere
-
Extract the contents of the download to the
Tools/xLODGENfolder.
-
-
Now you need to update these two mods. If MO2 already has one or both of these, it will tell you if you need to update.

-
Download DynDOLOD Resources SE here
-
Use
Ctrl + Min MO2 to open theInstall from Archivedialog and select the downloaded file -
Make these selections in the FOMOD:
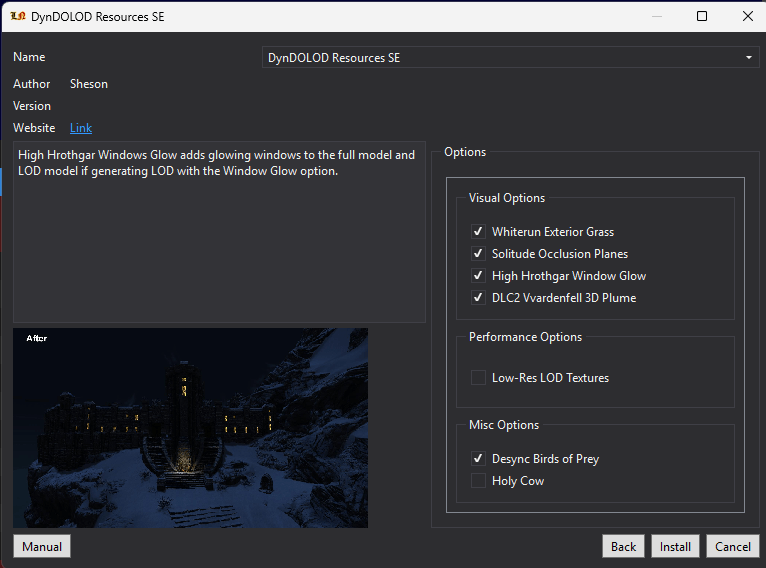
-
Install and choose
Replace -
Download DynDOLOD DLL NG from here
-
Use
Ctrl + Min MO2 to open theInstall from Archivedialog and select the downloaded file -
Choose
Replace
-
-
-
Step 2️⃣ — xLODGen + ACMOS
Before you begin - please understand that xLODGen and ACMOS should always be run one after another.
Don't just run xLODGen and skip ACMOS!
Run xLODGen
🕐 Expected time: 25–30 minutes
-
Open your
Mod Organizer 2, and in the left pane find and disable the following mods:Licentia NEXT - xLODGen OutputLicentia NEXT - TexGen OutputLicentia NEXT - DynDOLOD OutputDynDOLOD FX Glow Accurate Disabler - Quality of LifeGrass Cache Helper NGNo Grass In Objects(should be already disabled)Config INI - GrassControl.iniLicentia NEXT - Grass Output
-
Then enable:
xLODGen Resource - SSE Terrain Tamriel
-
Select
xLODGenx64from the executable dropdown at the top-right of MO2 and hitRun: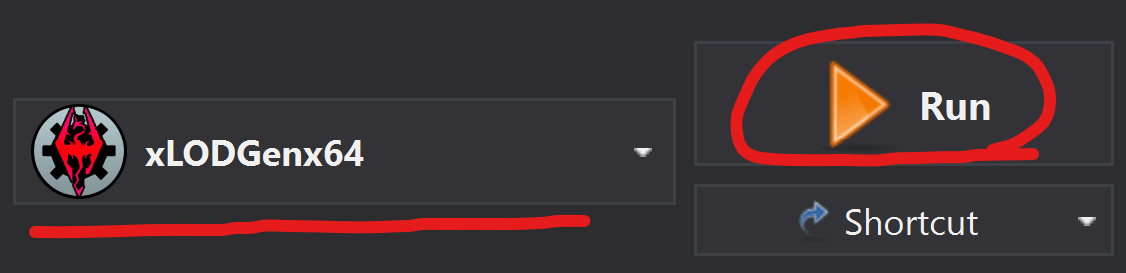
-
xLodGenwindow would open. It can take a while to load, don't worry!In the "Select Worldspace(s) to generate LOD for" section on the left check everything. This can be done by right-clicking anywhere in the worldspaces list and choosing
Select All: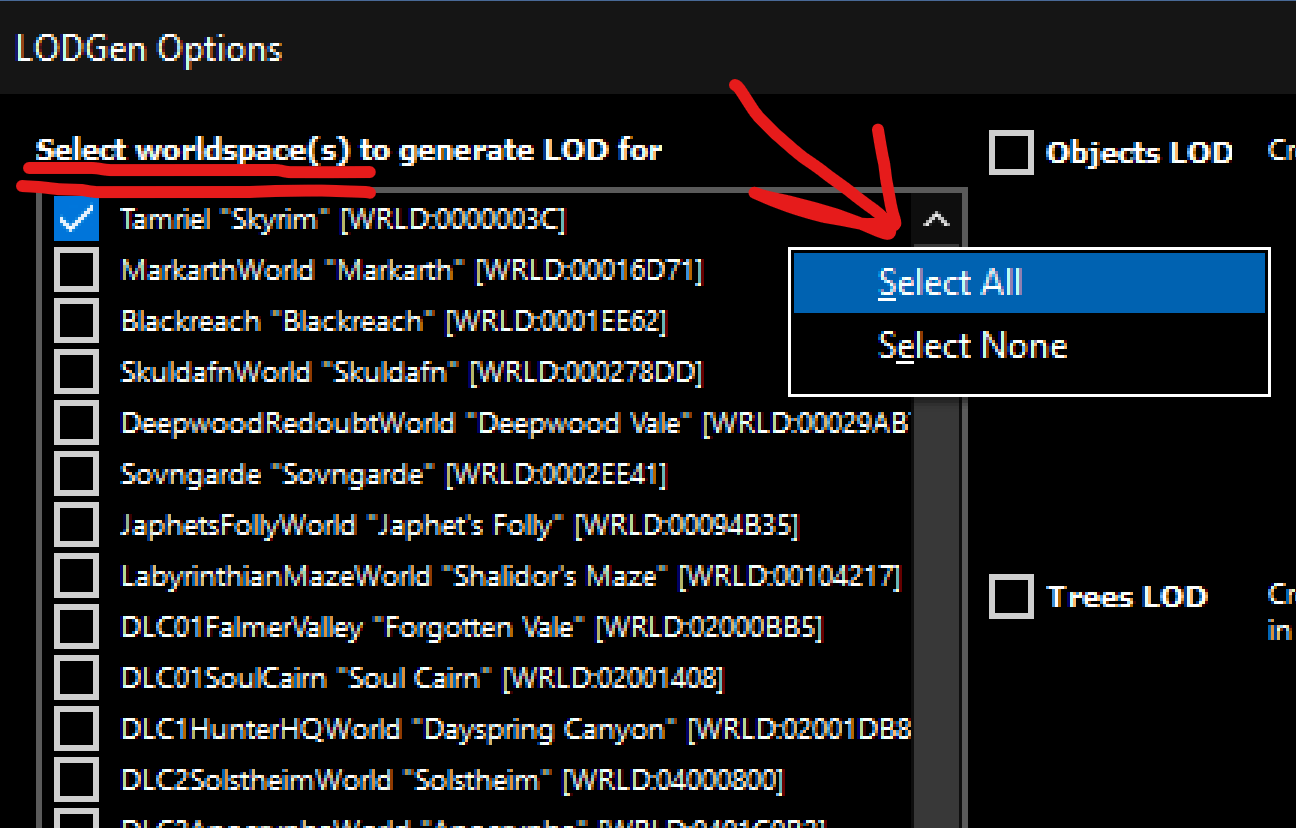
-
In the main window make sure only
Terrain LODis checked: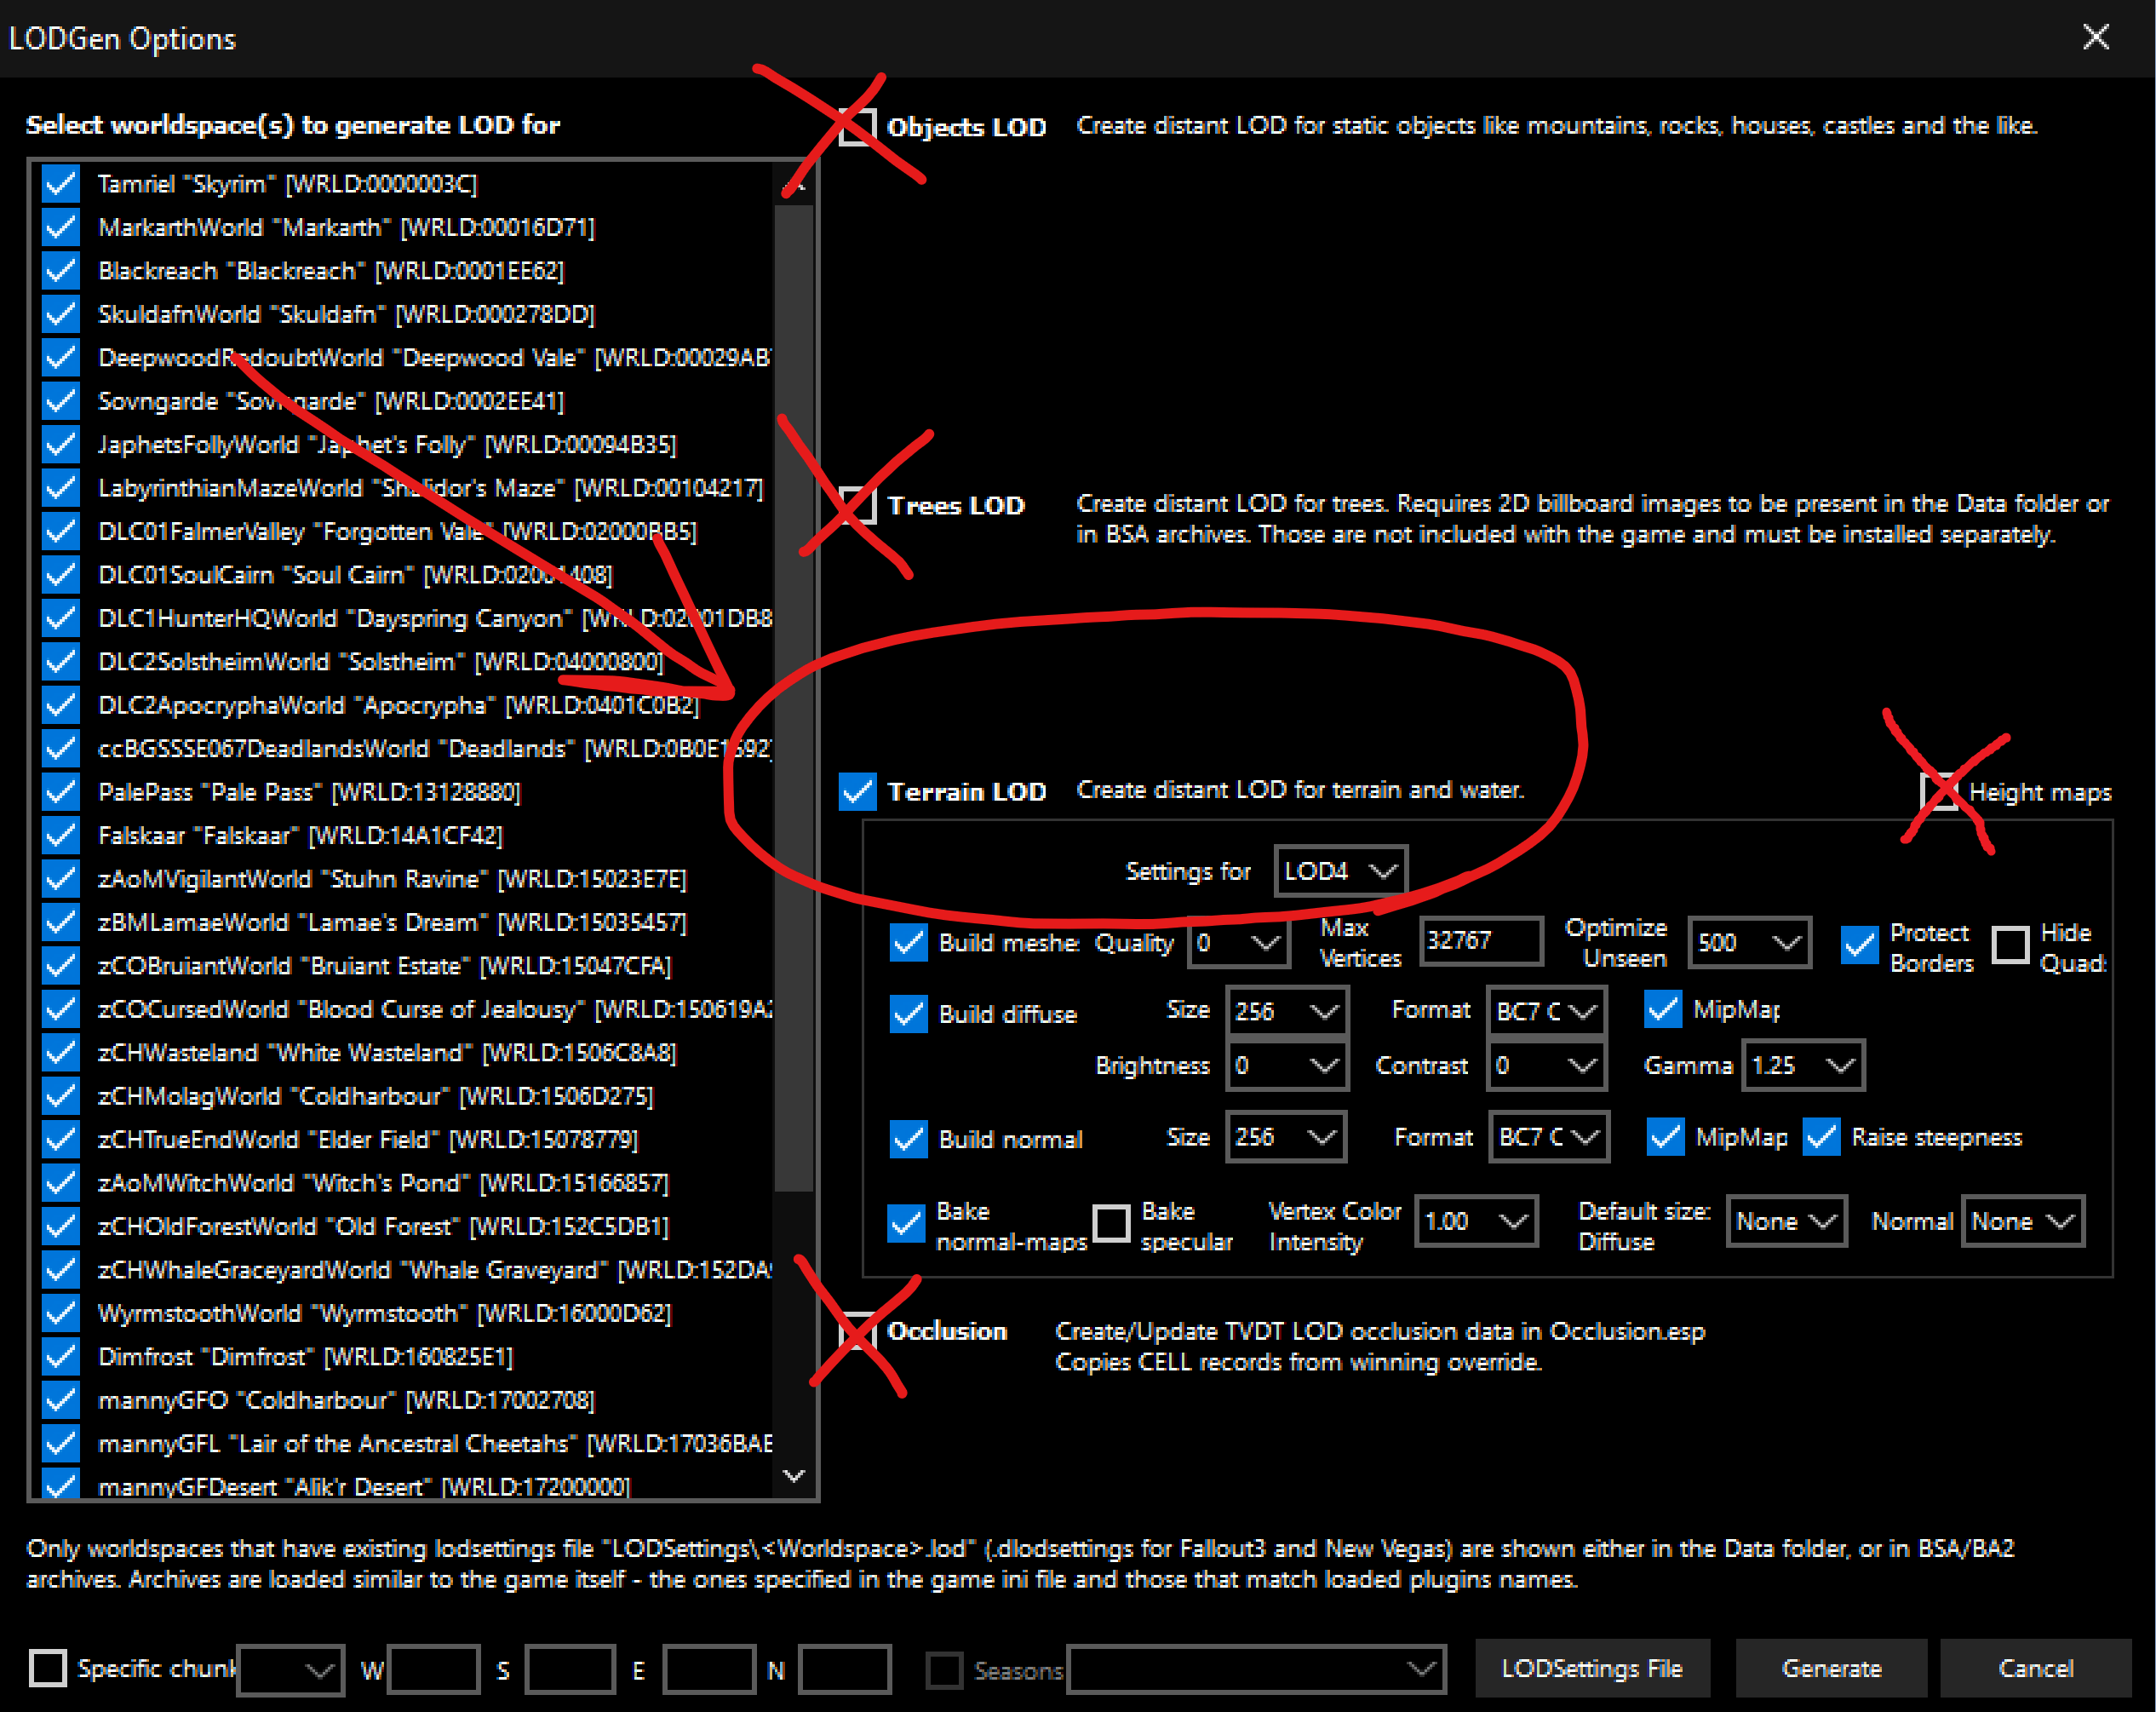
-
Select
LOD4underTerrain LODand set the following options: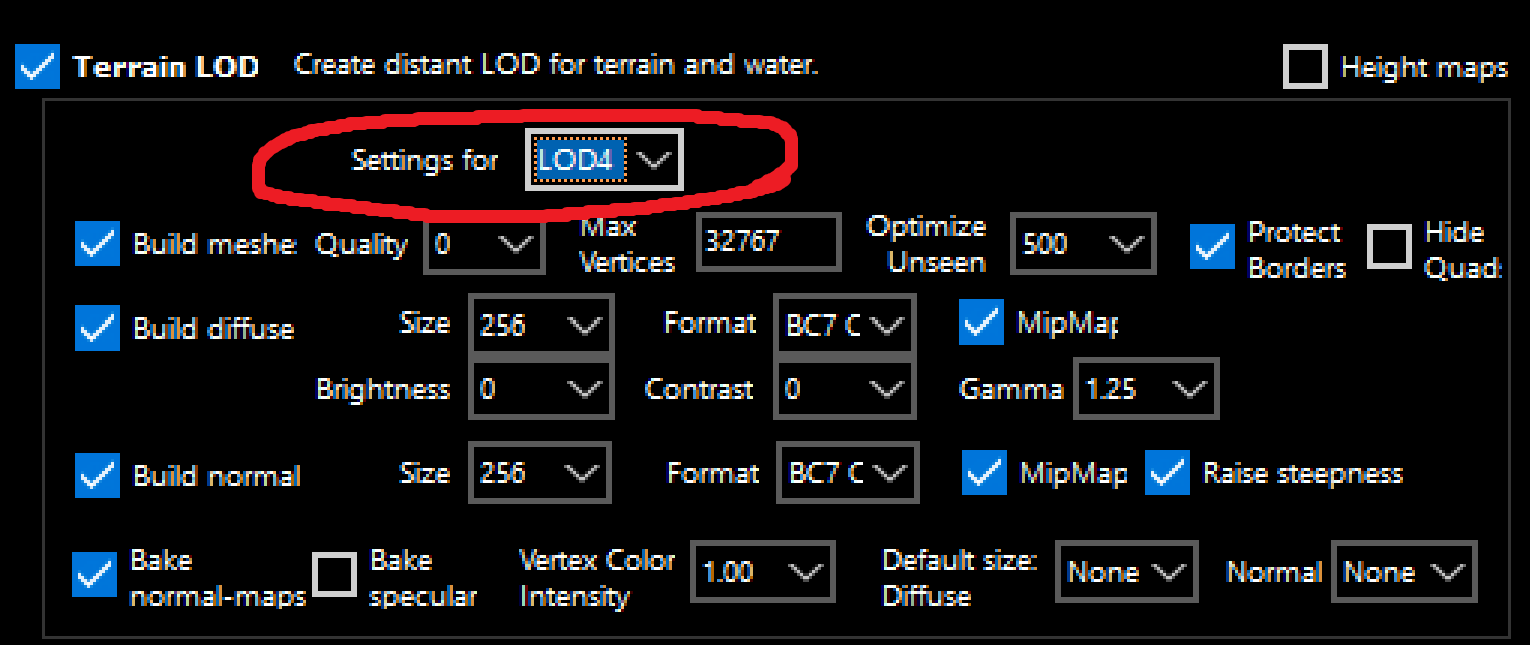
Text version of LOD4 settings
From left to right, top to bottom:
Build meshes- CheckedQuality- 0Max Vertices- 32767Optimize Unseen- 500Protect Borders- CheckedHide Quads- NOT checked
Build diffuse- CheckedSize- 256Format- BC7 QuickMipMaps- CheckedBrightness- 0Contrast- 0Gamma- 1.25
Build normal- CheckedSize- 256Format- BC7 QuickMipMaps- CheckedRaise steepness- Checked
Bake normal maps- CheckedBake specular- NOT checkedVertex Color Intensity- 1.00Default size: Diffuse- NoneDefault size: Normal- None
-
Select
LOD8underTerrain LODand set the following options: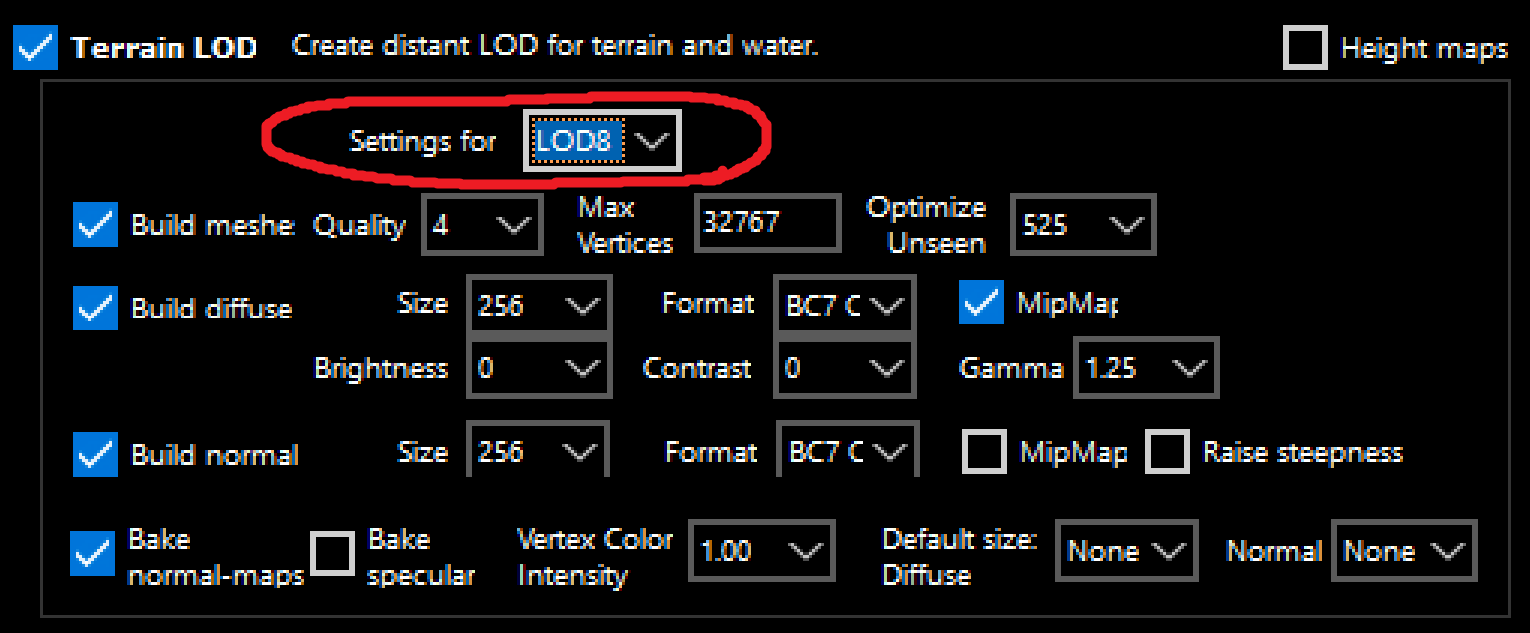
Text version of LOD8 settings
From left to right, top to bottom:
Build meshes- CheckedQuality- 4Max Vertices- 32767Optimize Unseen- 525
Build diffuse- CheckedSize- 256Format- BC7 QuickMipMaps- CheckedBrightness- 0Contrast- 0Gamma- 1.25
Build normal- CheckedSize- 256Format- BC7 QuickMipMaps- NOT checkedRaise steepness- NOT checked
Bake normal maps- CheckedBake specular- NOT checkedVertex Color Intensity- 1.00Default size: Diffuse- NoneDefault size: Normal- None
-
Select
LOD16underTerrain LODand set the following options:
Text version of LOD16 settings
From left to right, top to bottom:
Build meshes- CheckedQuality- 6Max Vertices- 32767Optimize Unseen- 625
Build diffuse- CheckedSize- 256Format- BC7 QuickMipMaps- CheckedBrightness- 0Contrast- 0Gamma- 1.25
Build normal- CheckedSize- 256Format- BC7 QuickMipMaps- NOT checkedRaise steepness- NOT checked
Bake normal maps- CheckedBake specular- NOT checkedVertex Color Intensity- 1.00Default size: Diffuse- NoneDefault size: Normal- None
-
Select
LOD32underTerrain LODand set the following options: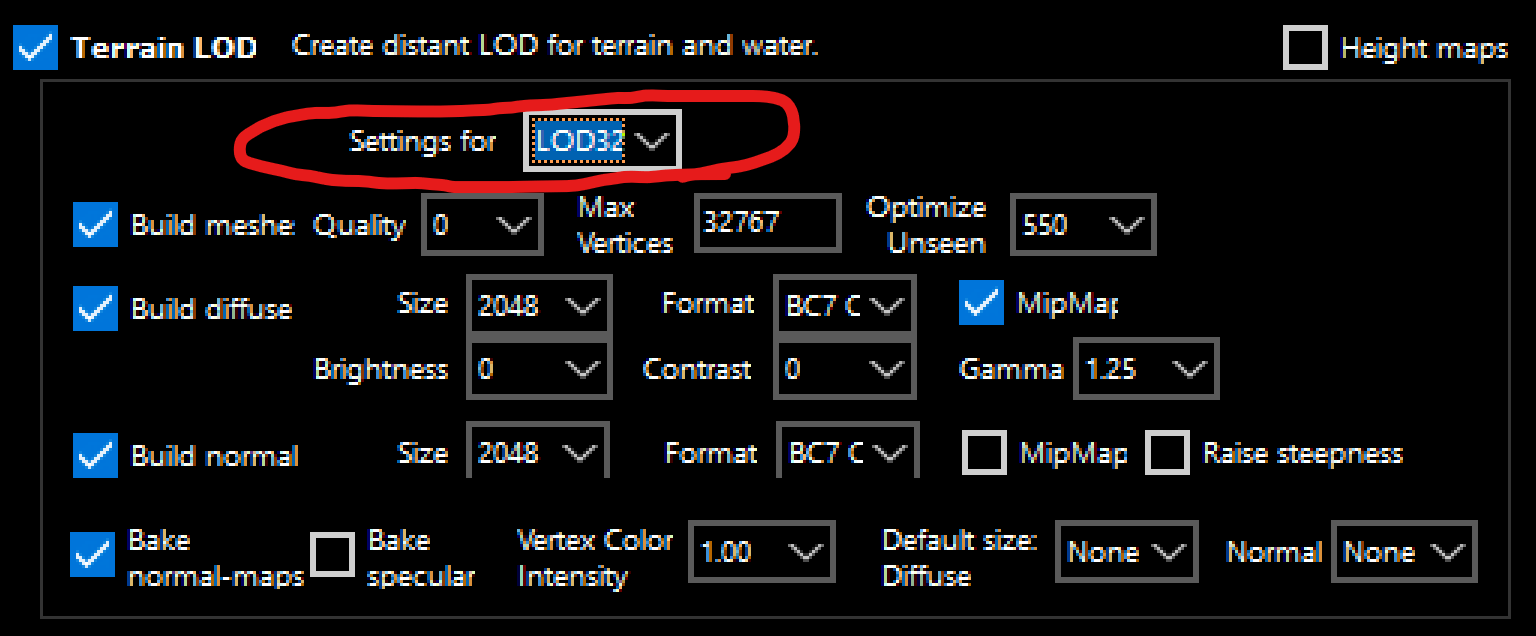
Text version of LOD32 settings
From left to right, top to bottom:
Build meshes- CheckedQuality- 0Max Vertices- 32767Optimize Unseen- 550
Build diffuse- CheckedSize- 2048Format- BC7 QuickMipMaps- CheckedBrightness- 0Contrast- 0Gamma- 1.25
Build normal- CheckedSize- 2048Format- BC7 QuickMipMaps- NOT checkedRaise steepness- NOT checked
Bake normal maps- CheckedBake specular- NOT checkedVertex Color Intensity- 1.00Default size: Diffuse- NoneDefault size: Normal- None
-
After you've set all LOD levels' settings - make sure
Seasonsare NOT checked (1), and clickGenerate(2) at the bottom-right of the window: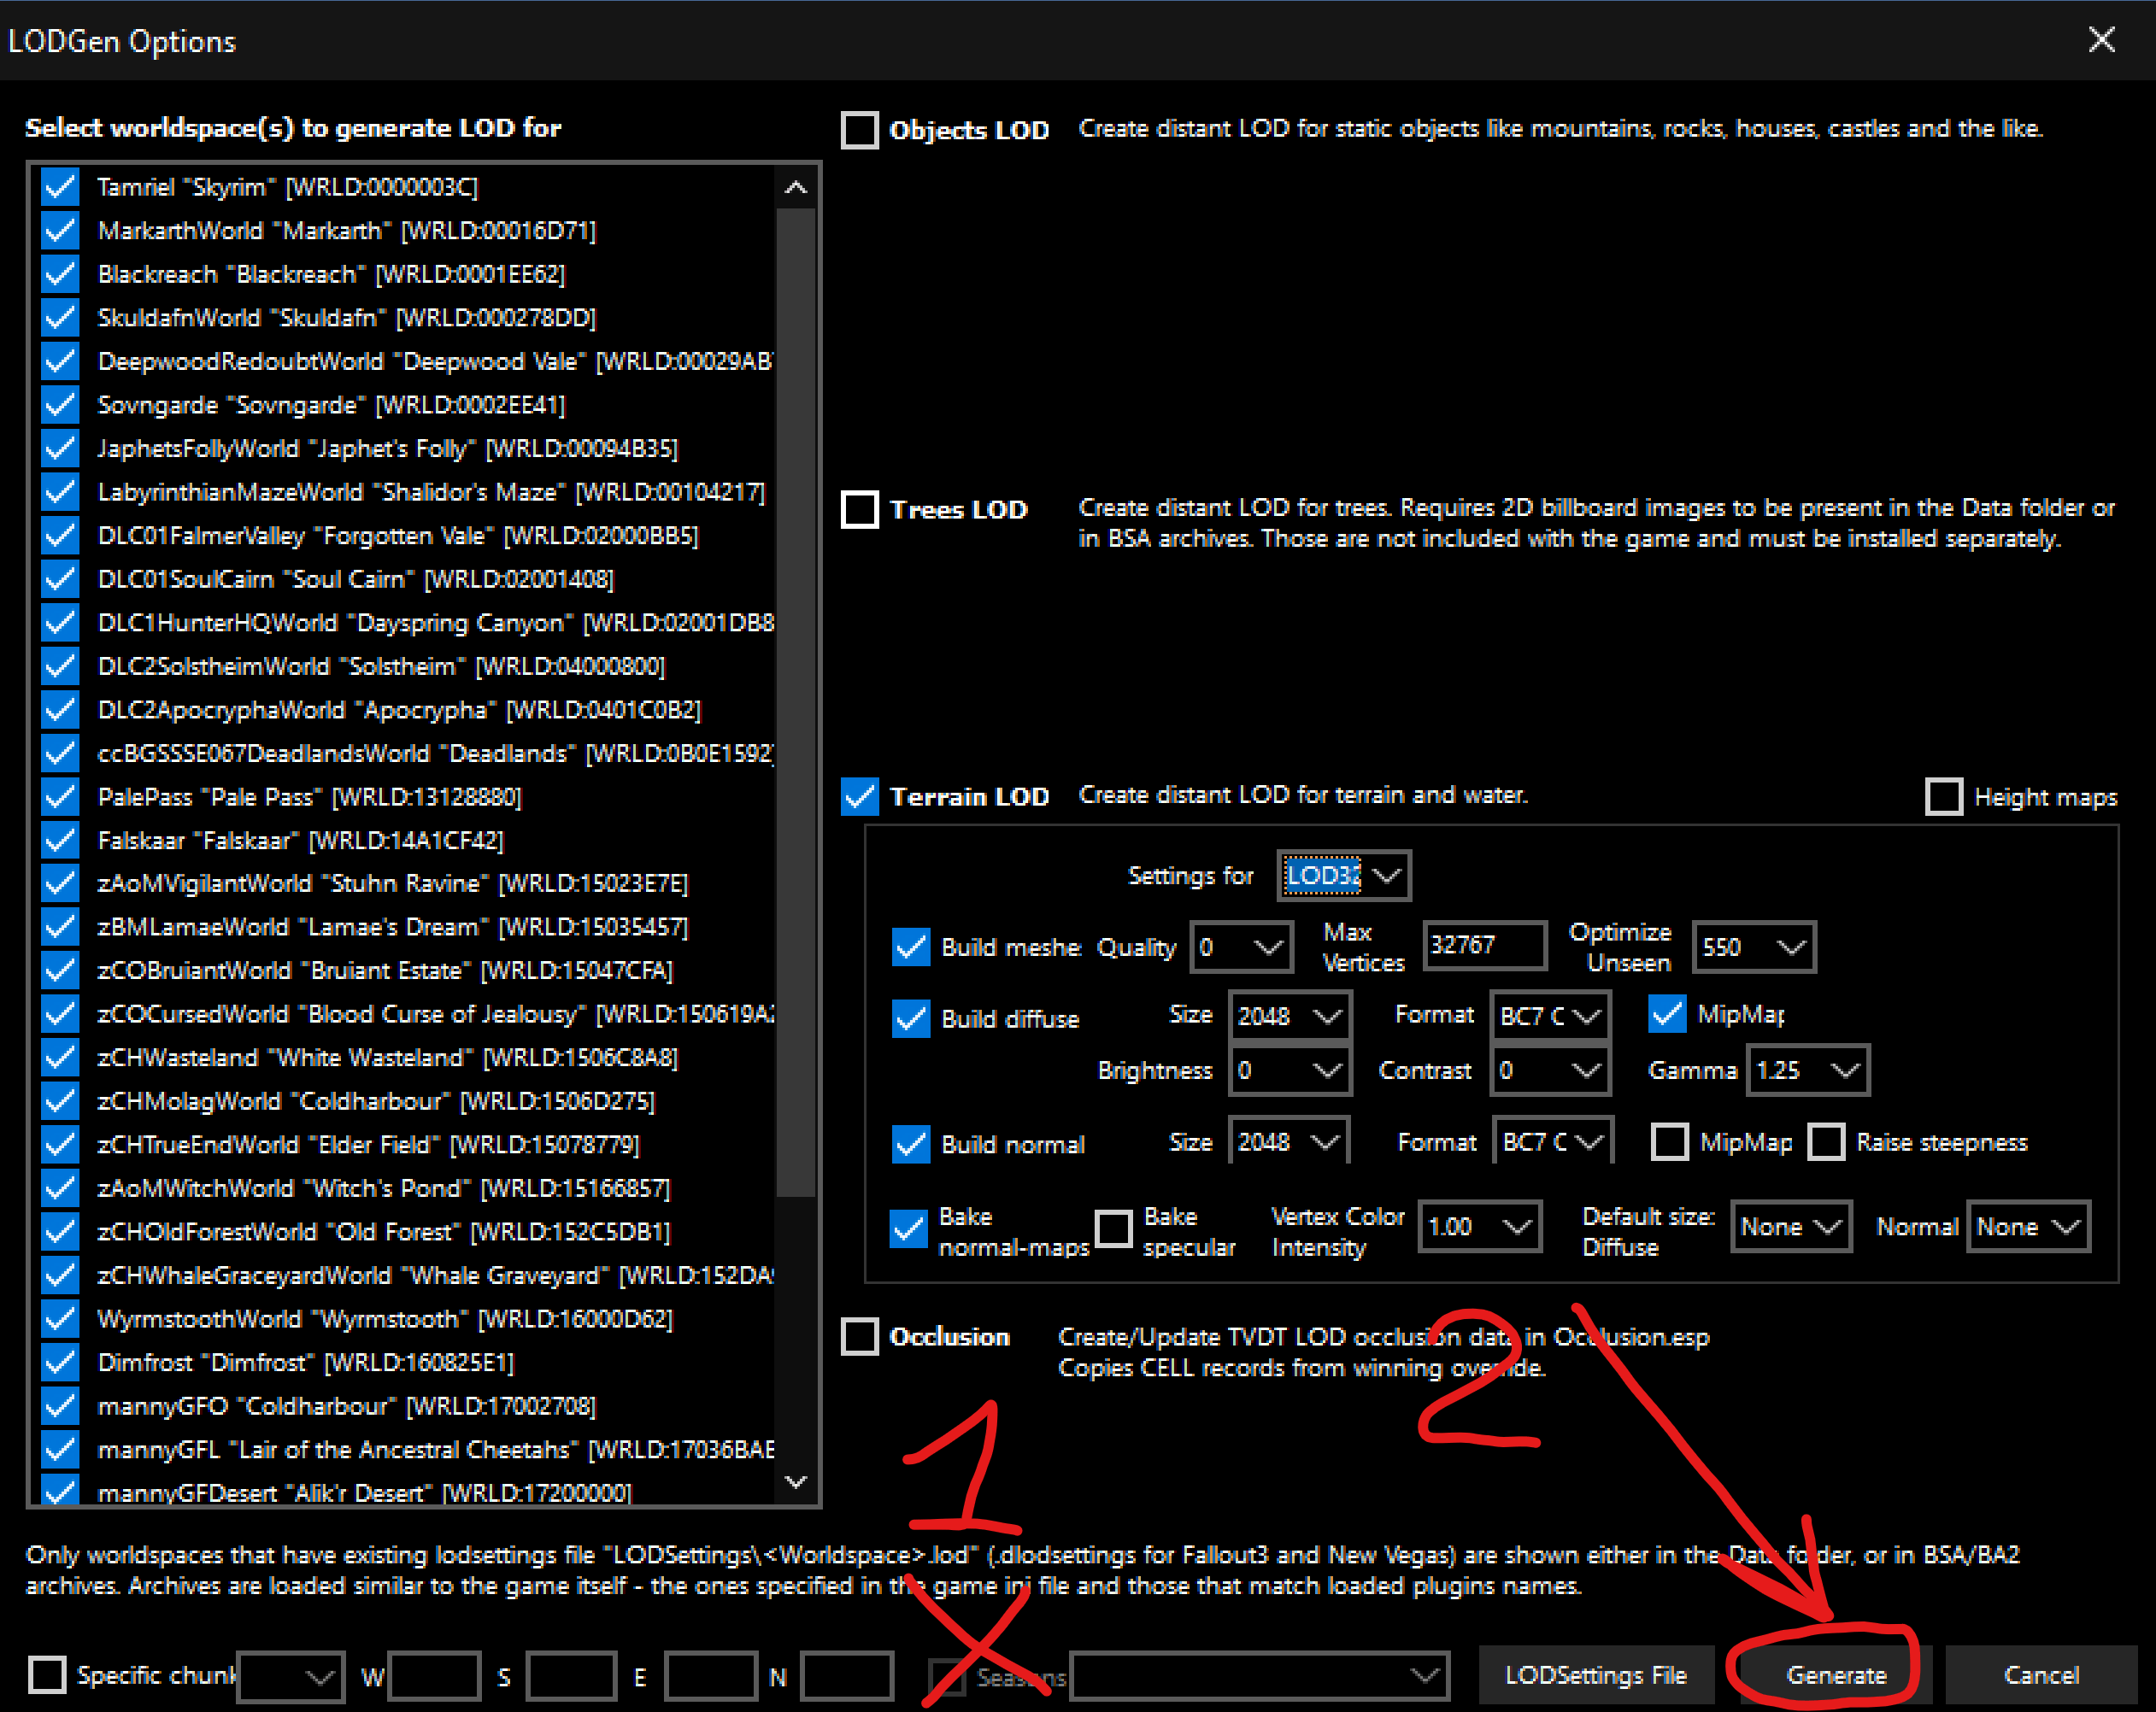
-
Now you just have to wait for approximately 25-30 minutes (depending on your PC, this may take up to an hour, depends on the CPU). You can track the time passed on the top bar of the
xLODGenwindow!When the process is finished, you would see the
LOD generation donemessage at the bottom of the main window:
Close the
xLODGenwindow and proceed to the next step (ACMOS).
Run ACMOS Road generator
🕐 Expected time: 2–3 minutes
-
Select
ACMOS Road generatorfrom the executable dropdown at the top-right of MO2 and hitRun: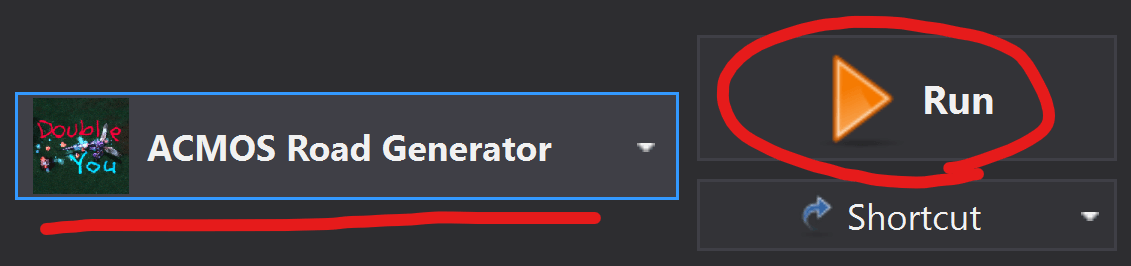
-
In the newly opened
ACMOSwindow selectPaths Onlyin theSelect Roadsdropdown menu: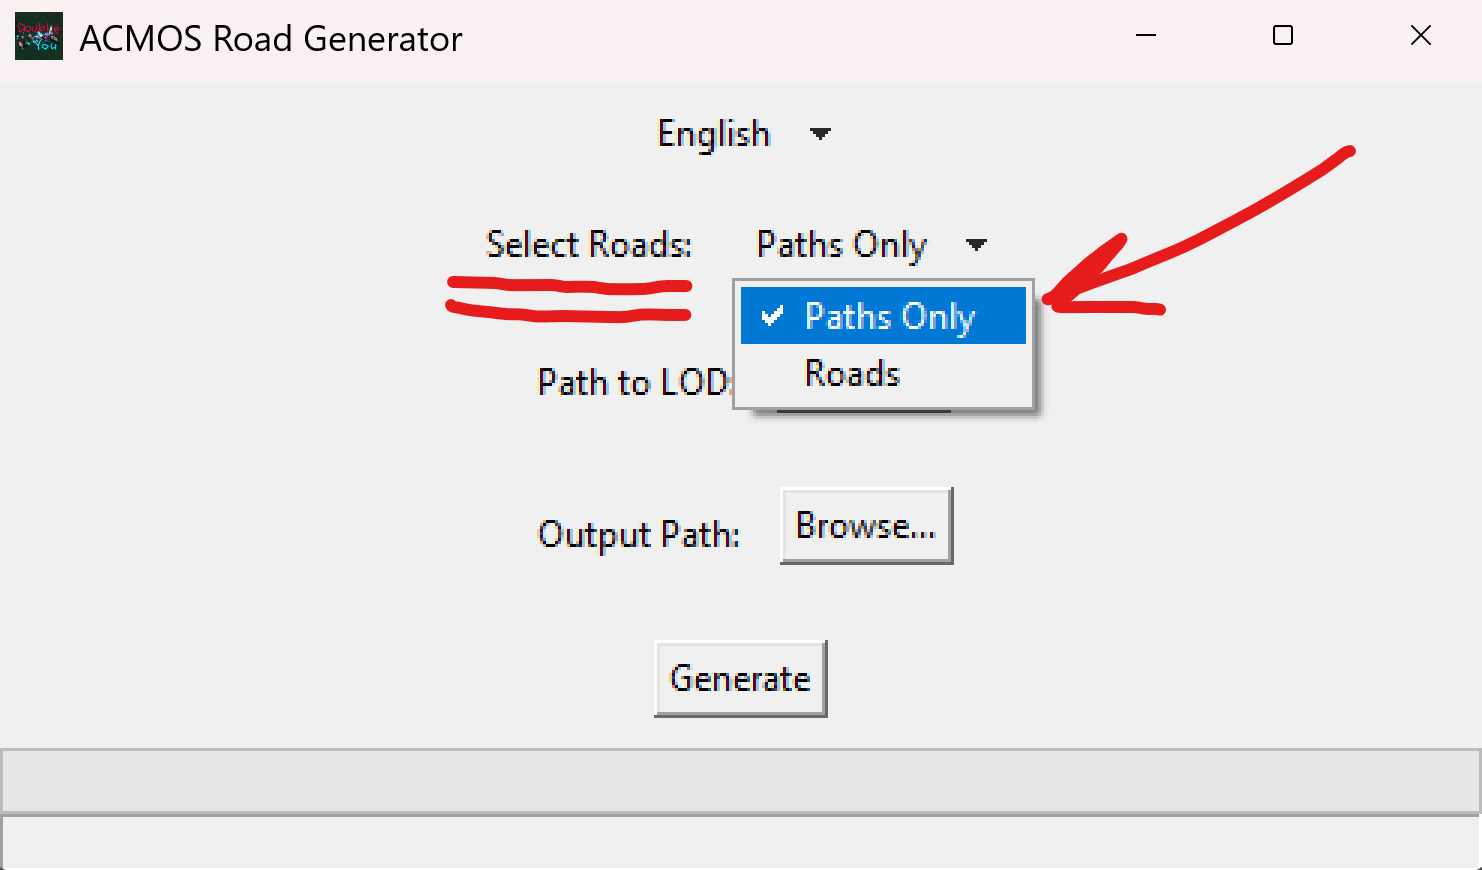
-
Now click
Browsenear thePath for LODstring: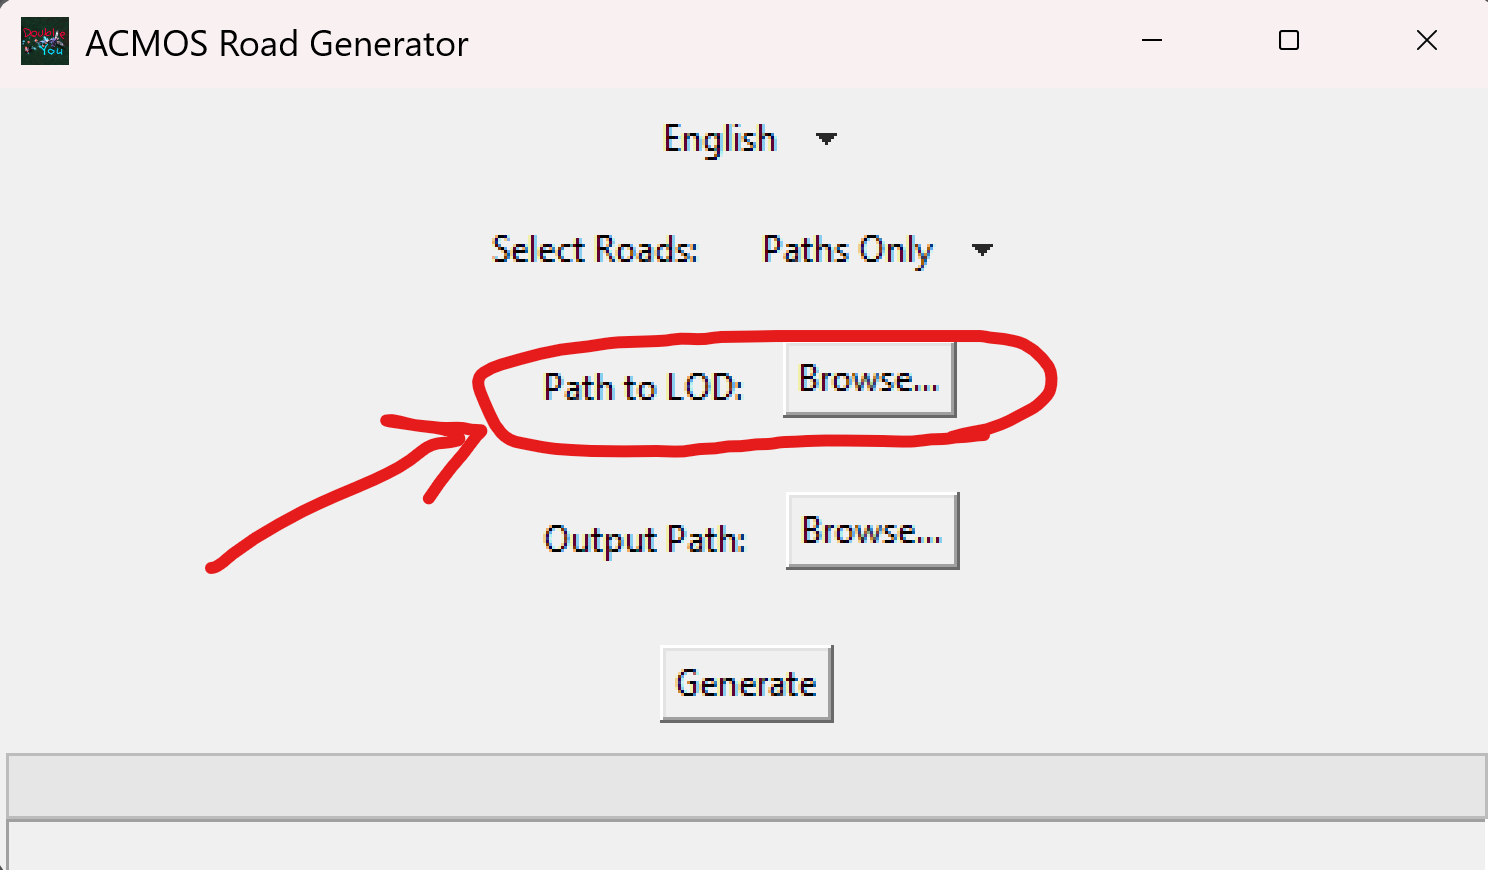
-
Navigate to the
C:\_DYNDOLODfolder we've created in the Preparation step (1), click ONCE on yourSSELODGen_Outputfolder (2), make sure its name appeared at the bottom and clickSelect Folder(3):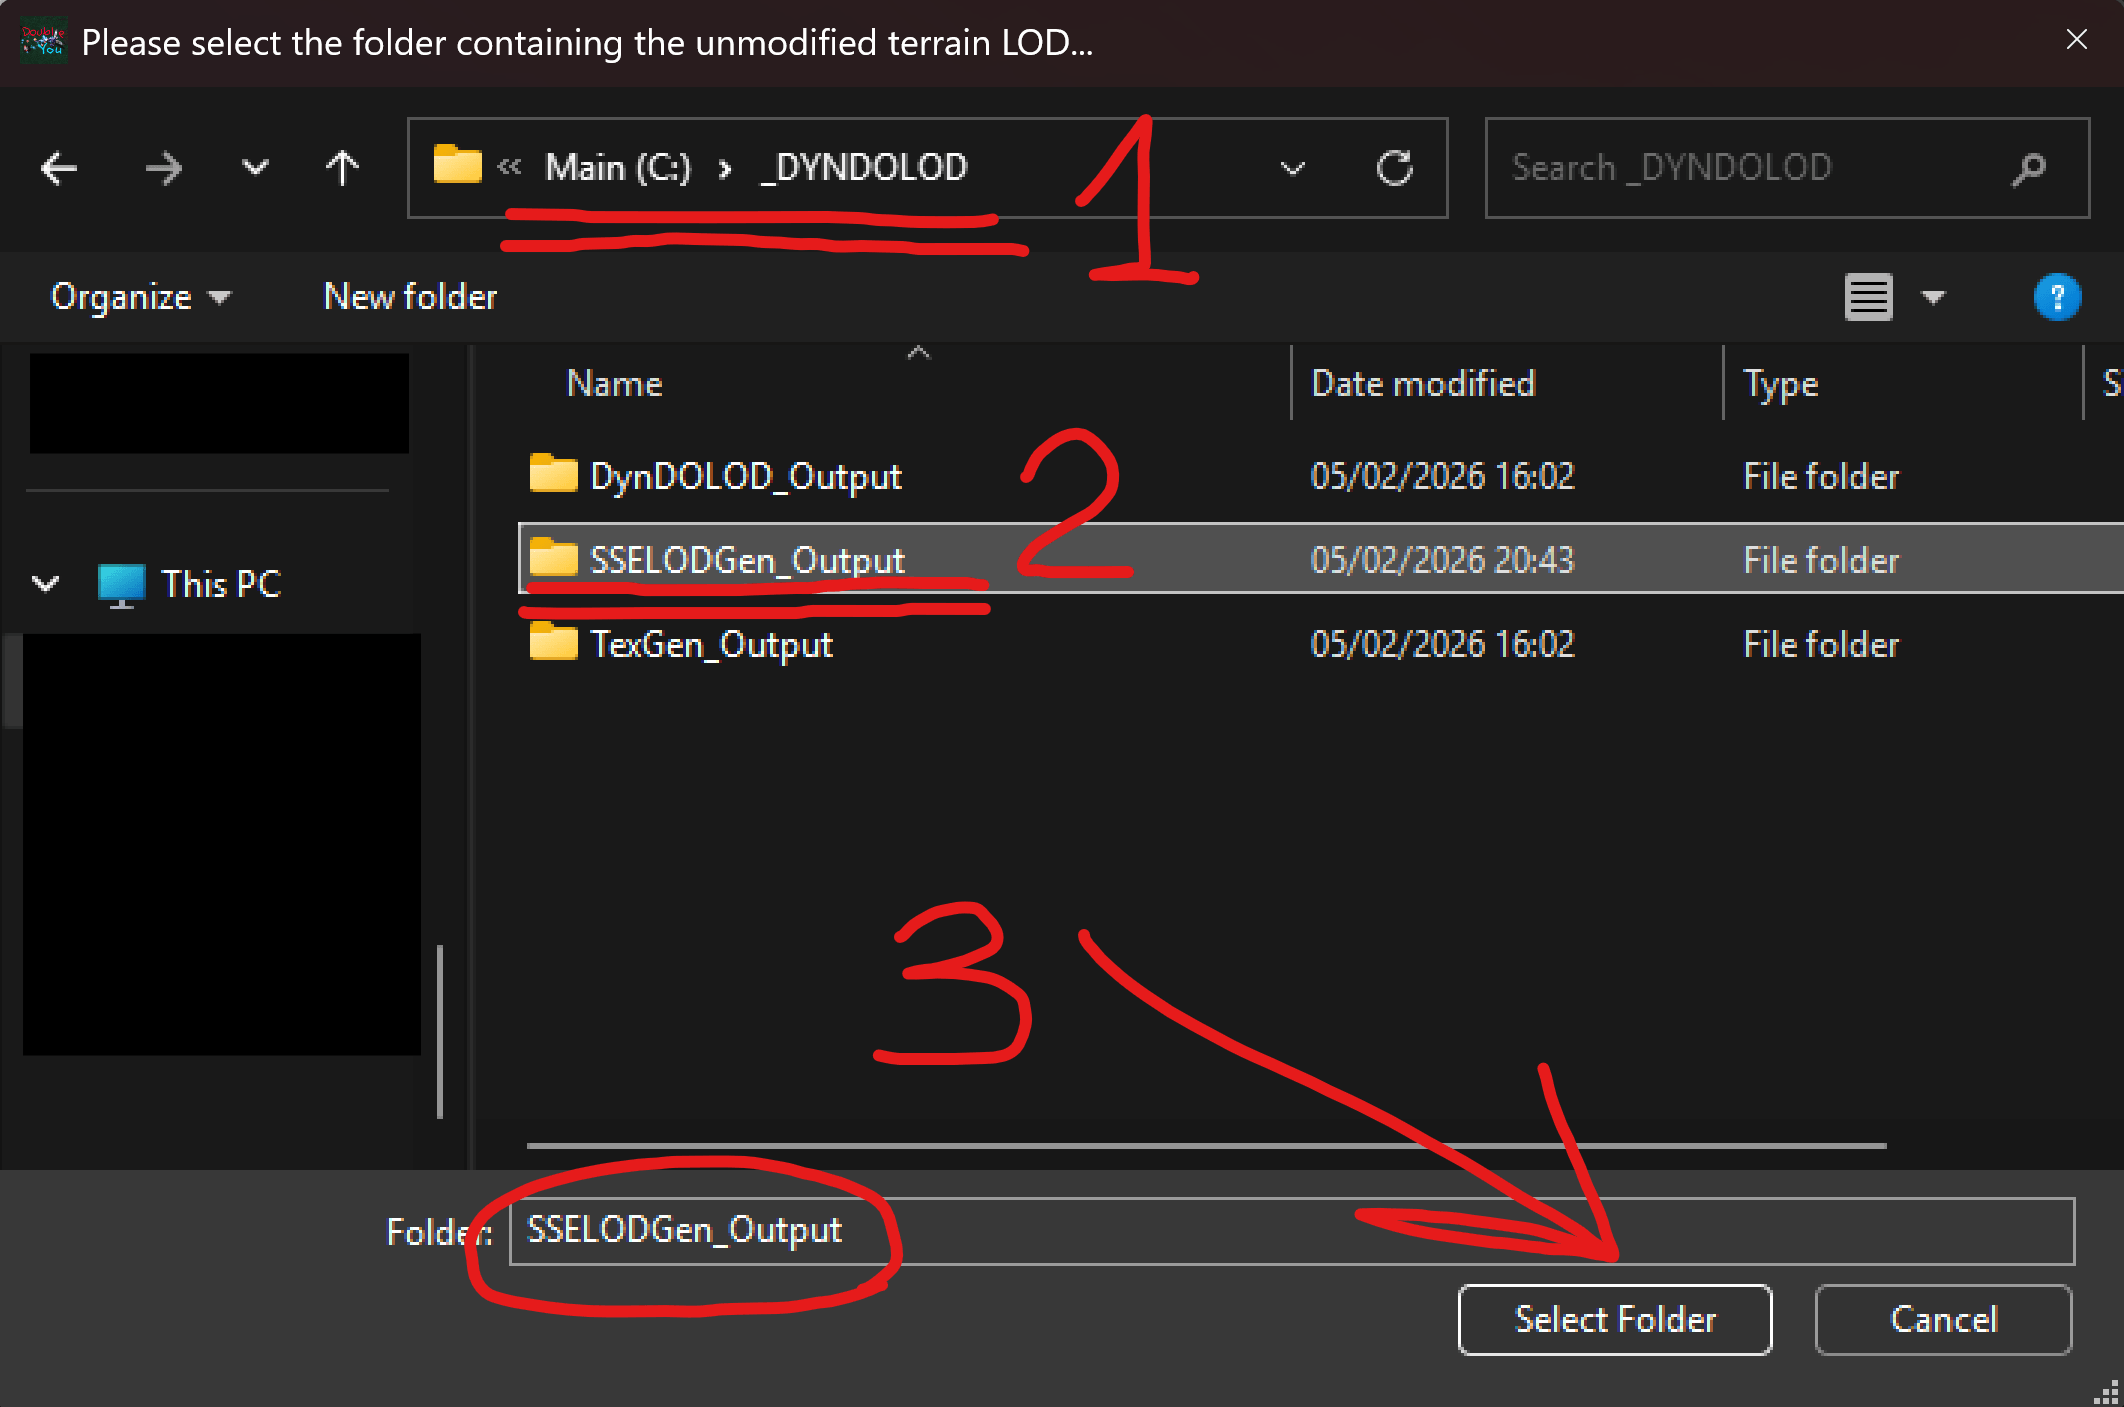
-
Note that the
C:\_DYNDOLOD\SSELODGen_Outputis visible in bothPath to LODandOutput Path(1), and clickGenerate(2)!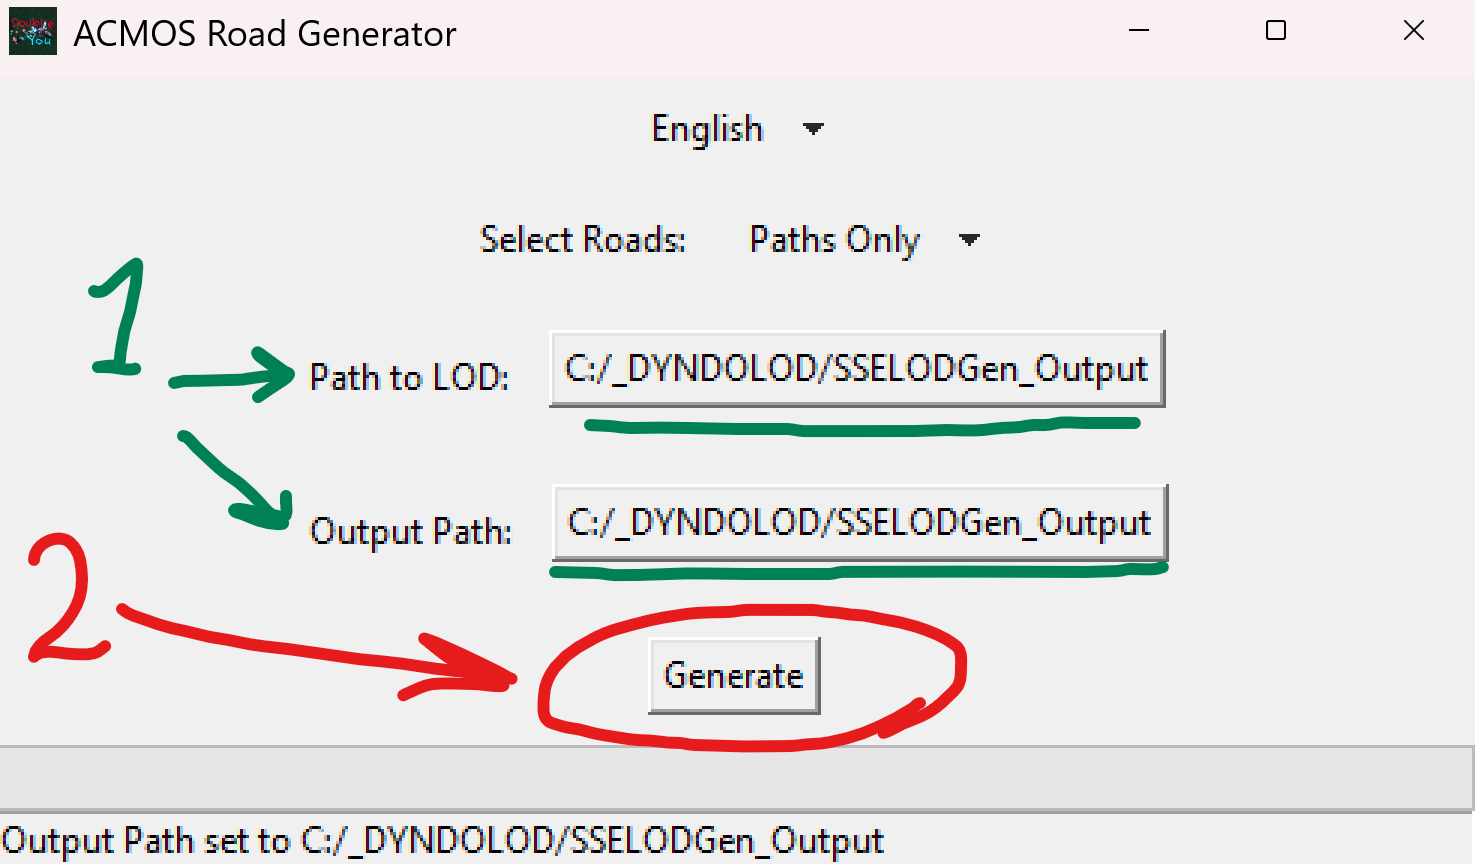
You would be greeted by an
Overwrite LOD Textures?Warning - clickYes.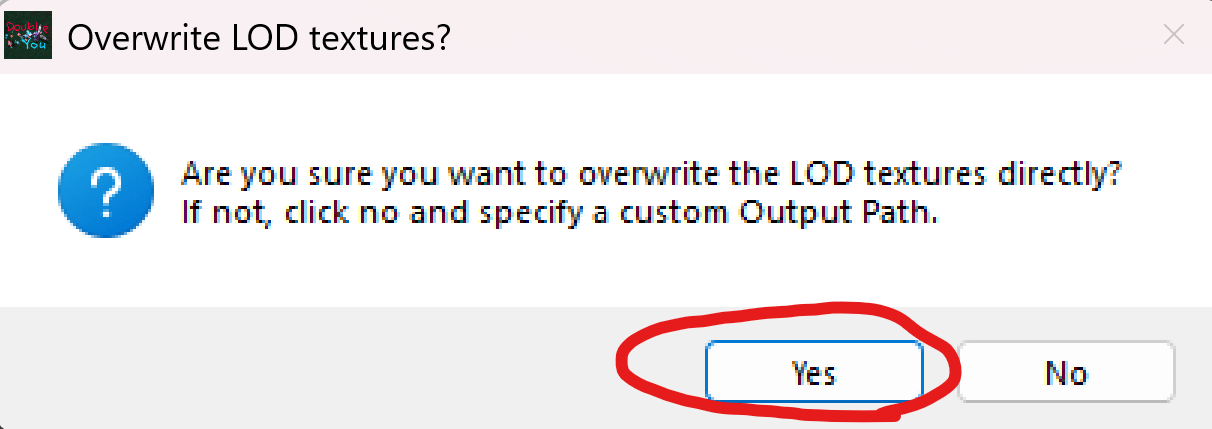
And wait till the generation completes (it would take just a few minutes).
-
When the generation is finished, you would see a
Zip?message - clickNo: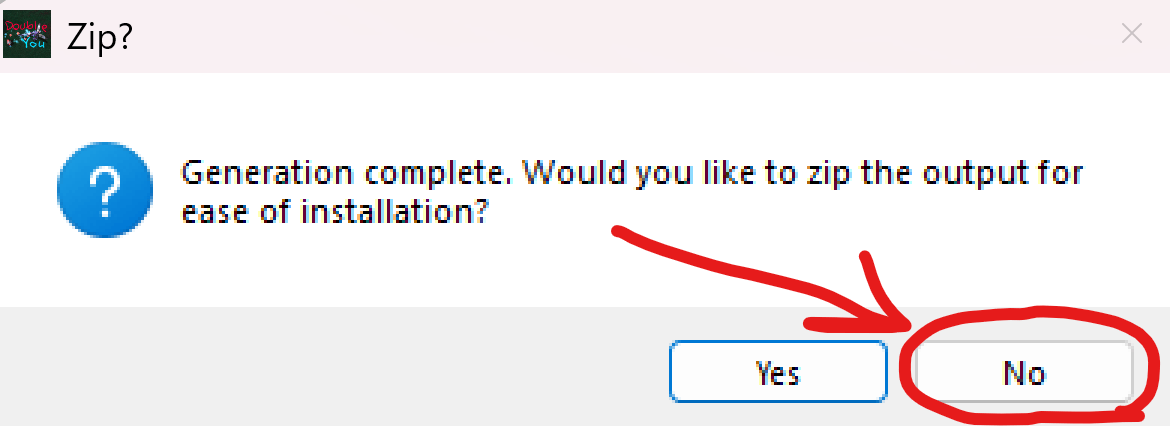
After that you'd see the
All Done!message - clickOk:
-
You can now close the
ACMOS Road Generatorand proceed to the next step.
Install xLODGen + ACMOS Output
-
Navigate to your
C:\_DYNDOLOD\SSELODGen_Outputfolder, you would see two folders there:meshestextures
-
Now:
- Add those 2 folders (not the
SSELODGen_Outputfolder itself) to archive (via 7zip or any other tool) in.zipformat - Copy the resulting archive to your Licentia downloads folder (for example
C:\Licentia NEXT\Downloads).
- Add those 2 folders (not the
-
In the
Mod Organizer 2, you would see theSSELODGen_Output.zipat theDownloadssection on the right. If you don't see it - clickRefreshon the left.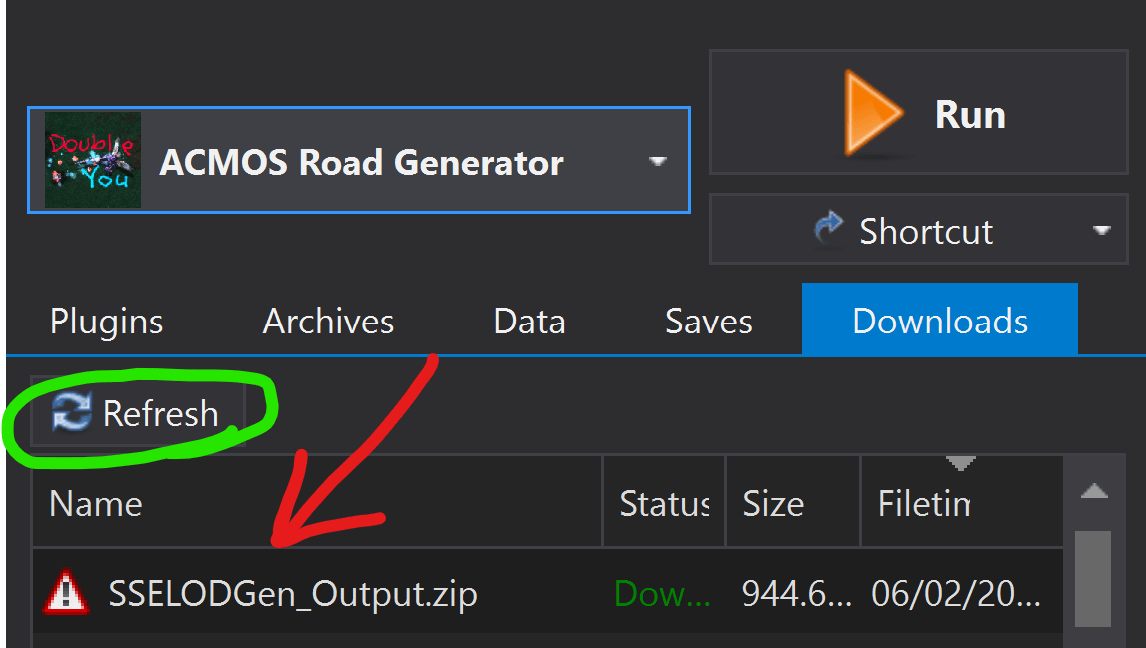
-
Double-click the
SSELODGen_Output.zip, and when prompted forQuick Install- just pressOk: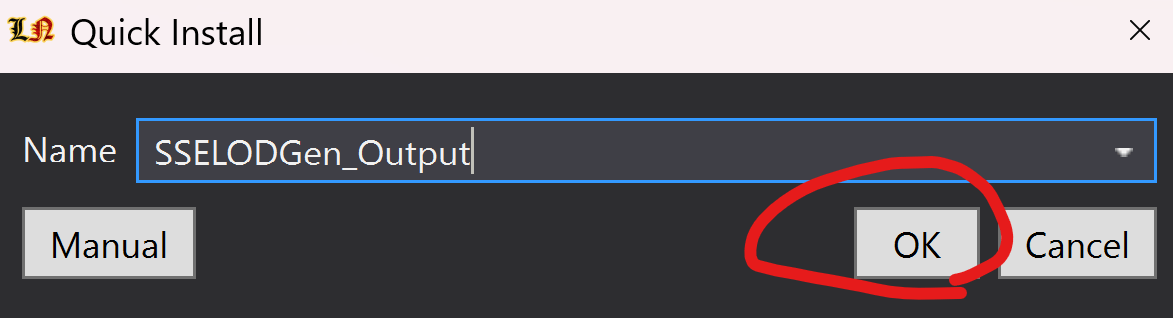
It would take a minute, so just wait.
-
The mod would appear at the bottom of the mods' list on the left:
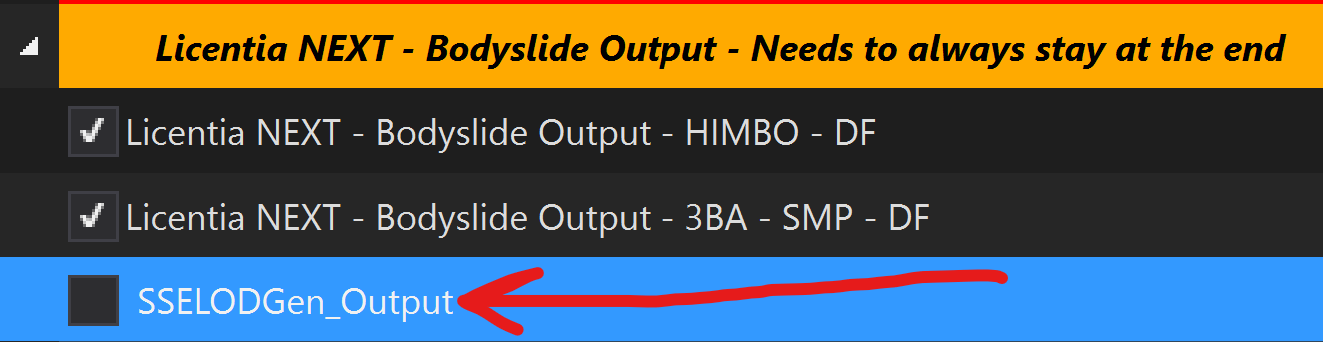
-
Drag it to the
Licentia NEXT - LOD Outputseparator, put it under the disabledLicentia NEXT - xLODGen Outputmod, and enable it. The result would look like this: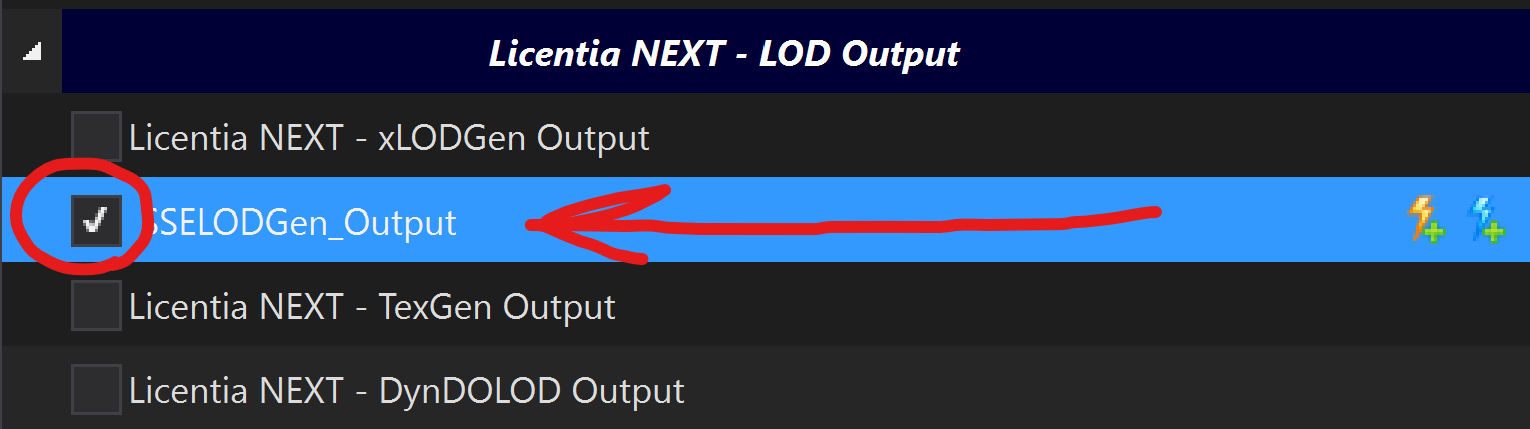
-
The last step - find and disable the mod -
xLODGen Resource - SSE Terrain Tamriel.
Step 3️⃣ — Grass Cache Generation
This step is mandatory if you changed:
- worldspaces
- grass mods
- landscape records
Original guide reference is available here.
(optional) List worldspaces with grass
You only need this when you've added and/or removed mods with new worldspaces!
🕐 Expected time: 10 minutes
General idea is this - before the grass cache generation, it's needed to determine which worldspaces require generation and which can be ignored.
-
In the
Mod Organizer 2, selectxTESEdit64in the dropdown on the top-right and clickRun: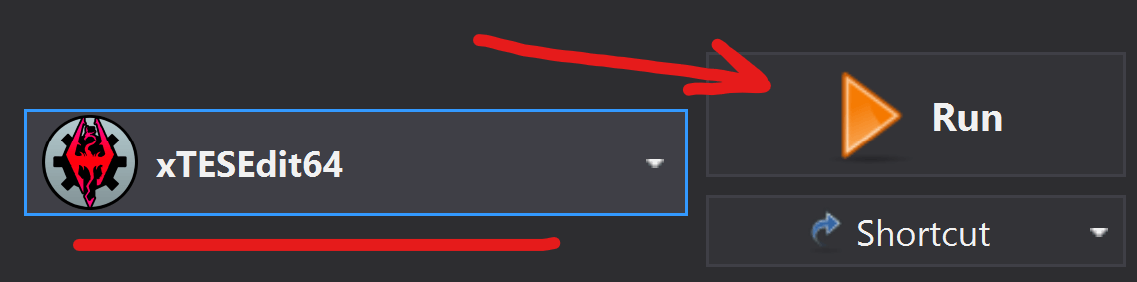
-
You would be greeted with the
Module Selectionwindow - make sure all the plugins are selected (they usually are), if not - right-click anywhere in the list and clickSelect All. Then clickOK: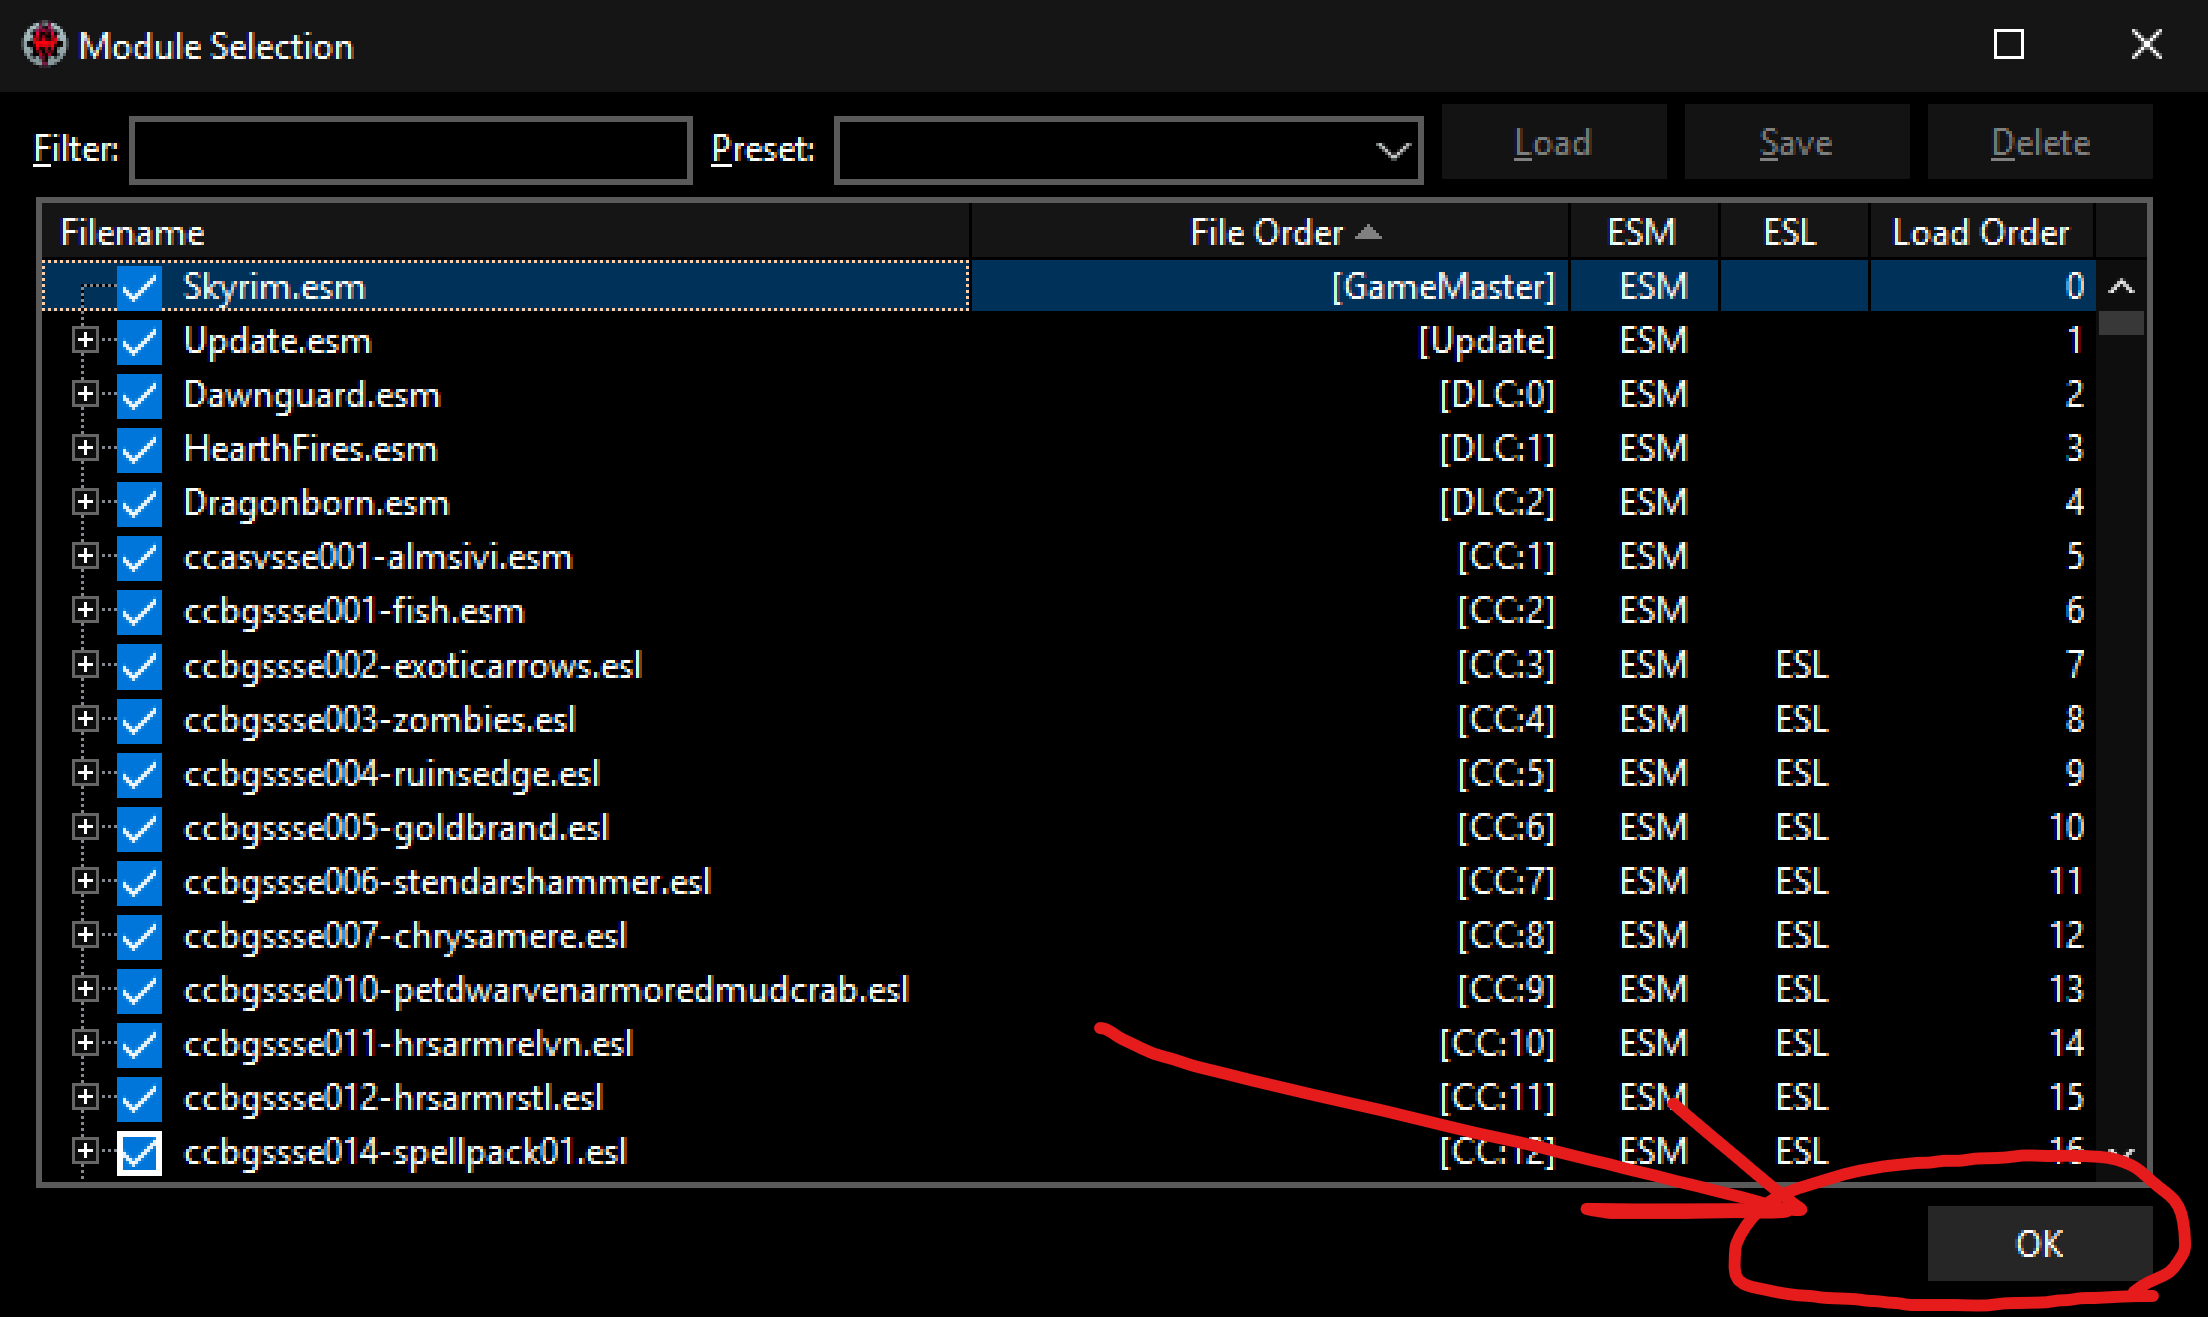
-
Next you'd be asked about
Mod Groups- just close that window, we won't need them. -
Now, right-click anywhere on the left part of
xEditand pressApply Script: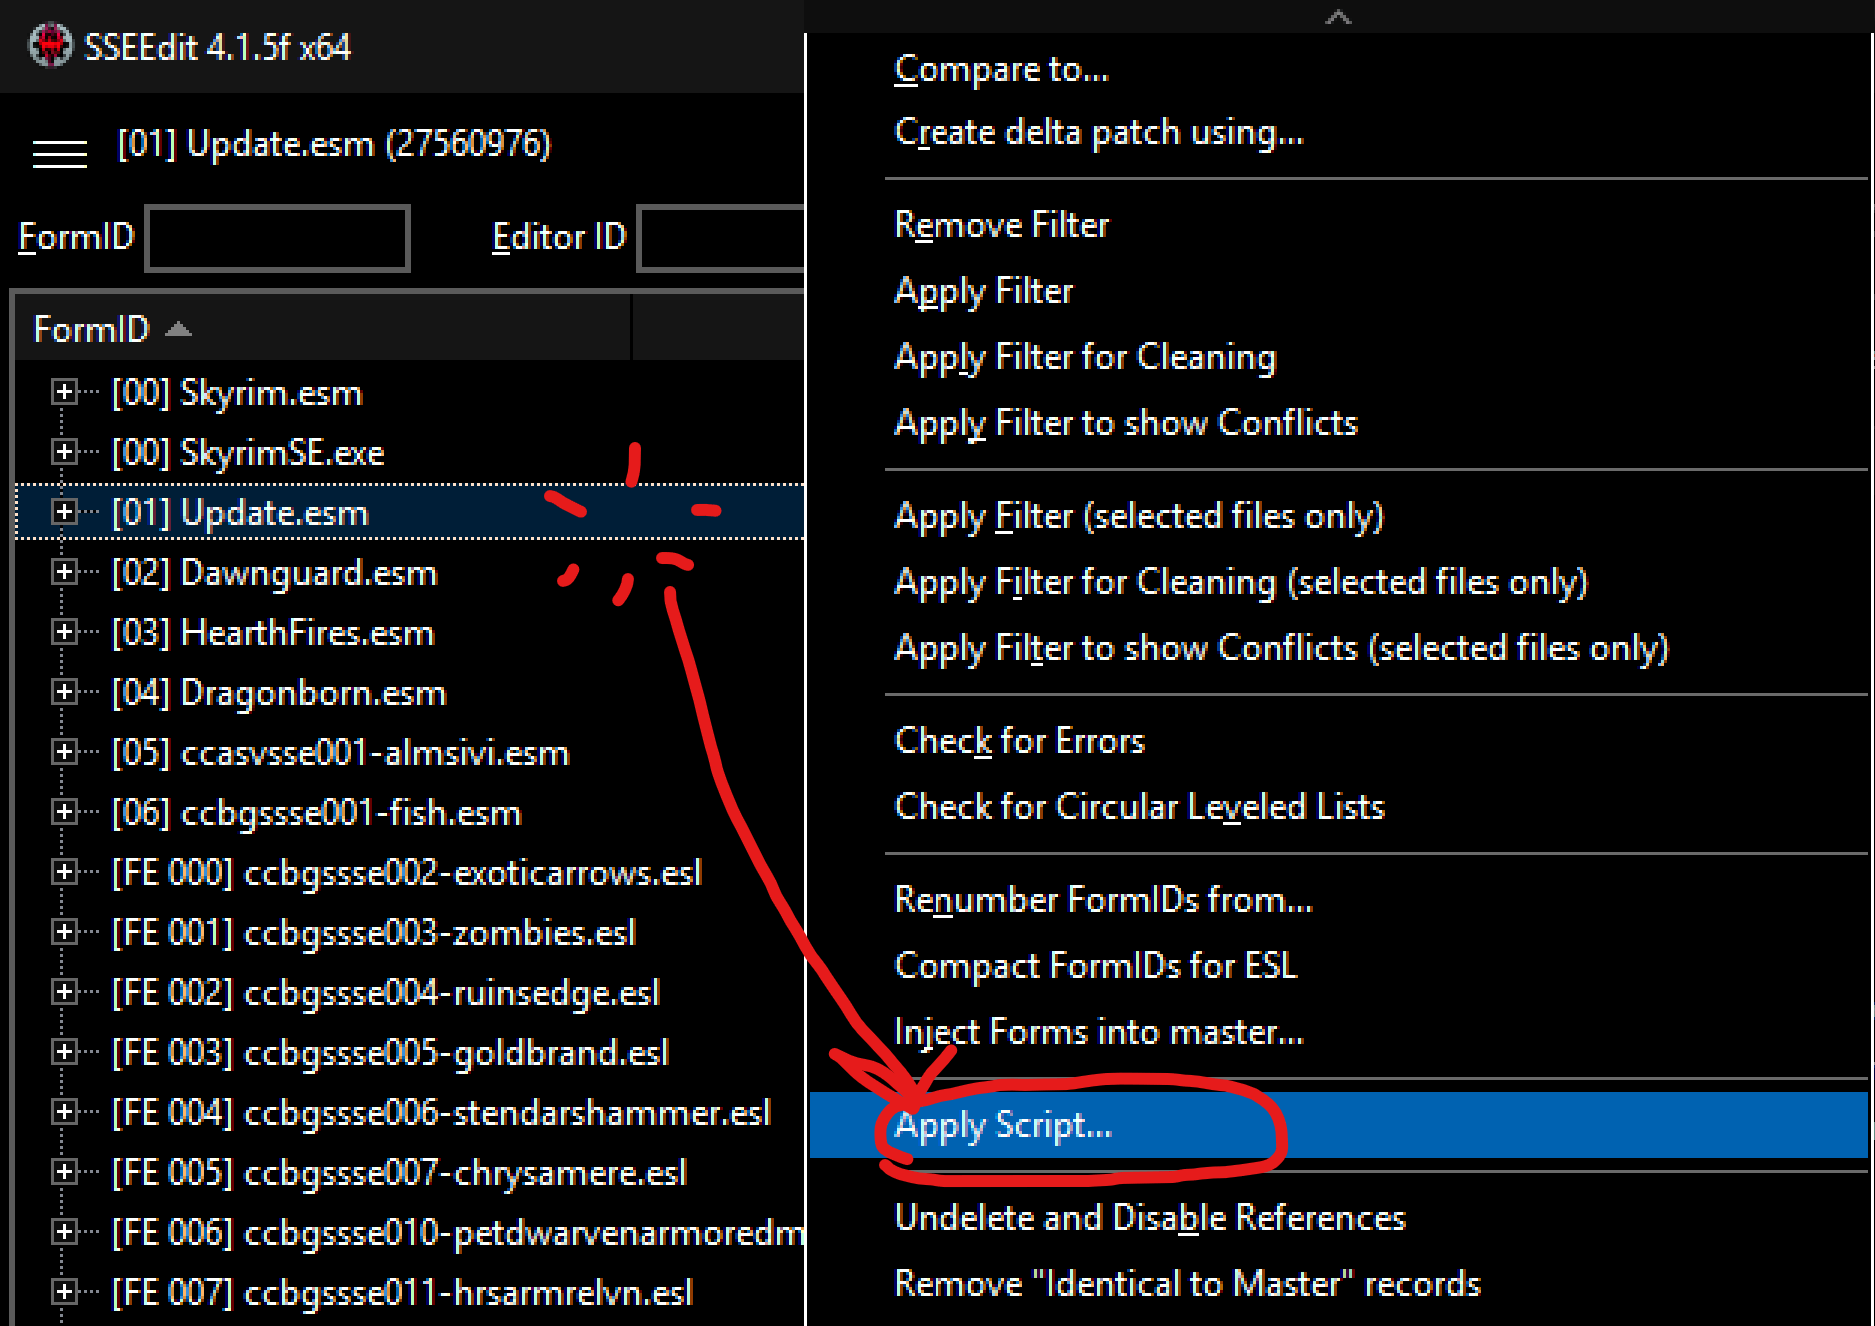
-
In the opened
Apply Scriptwindow select theList worldspaces with grassscript from the dropdown list (1), and clickOk(2):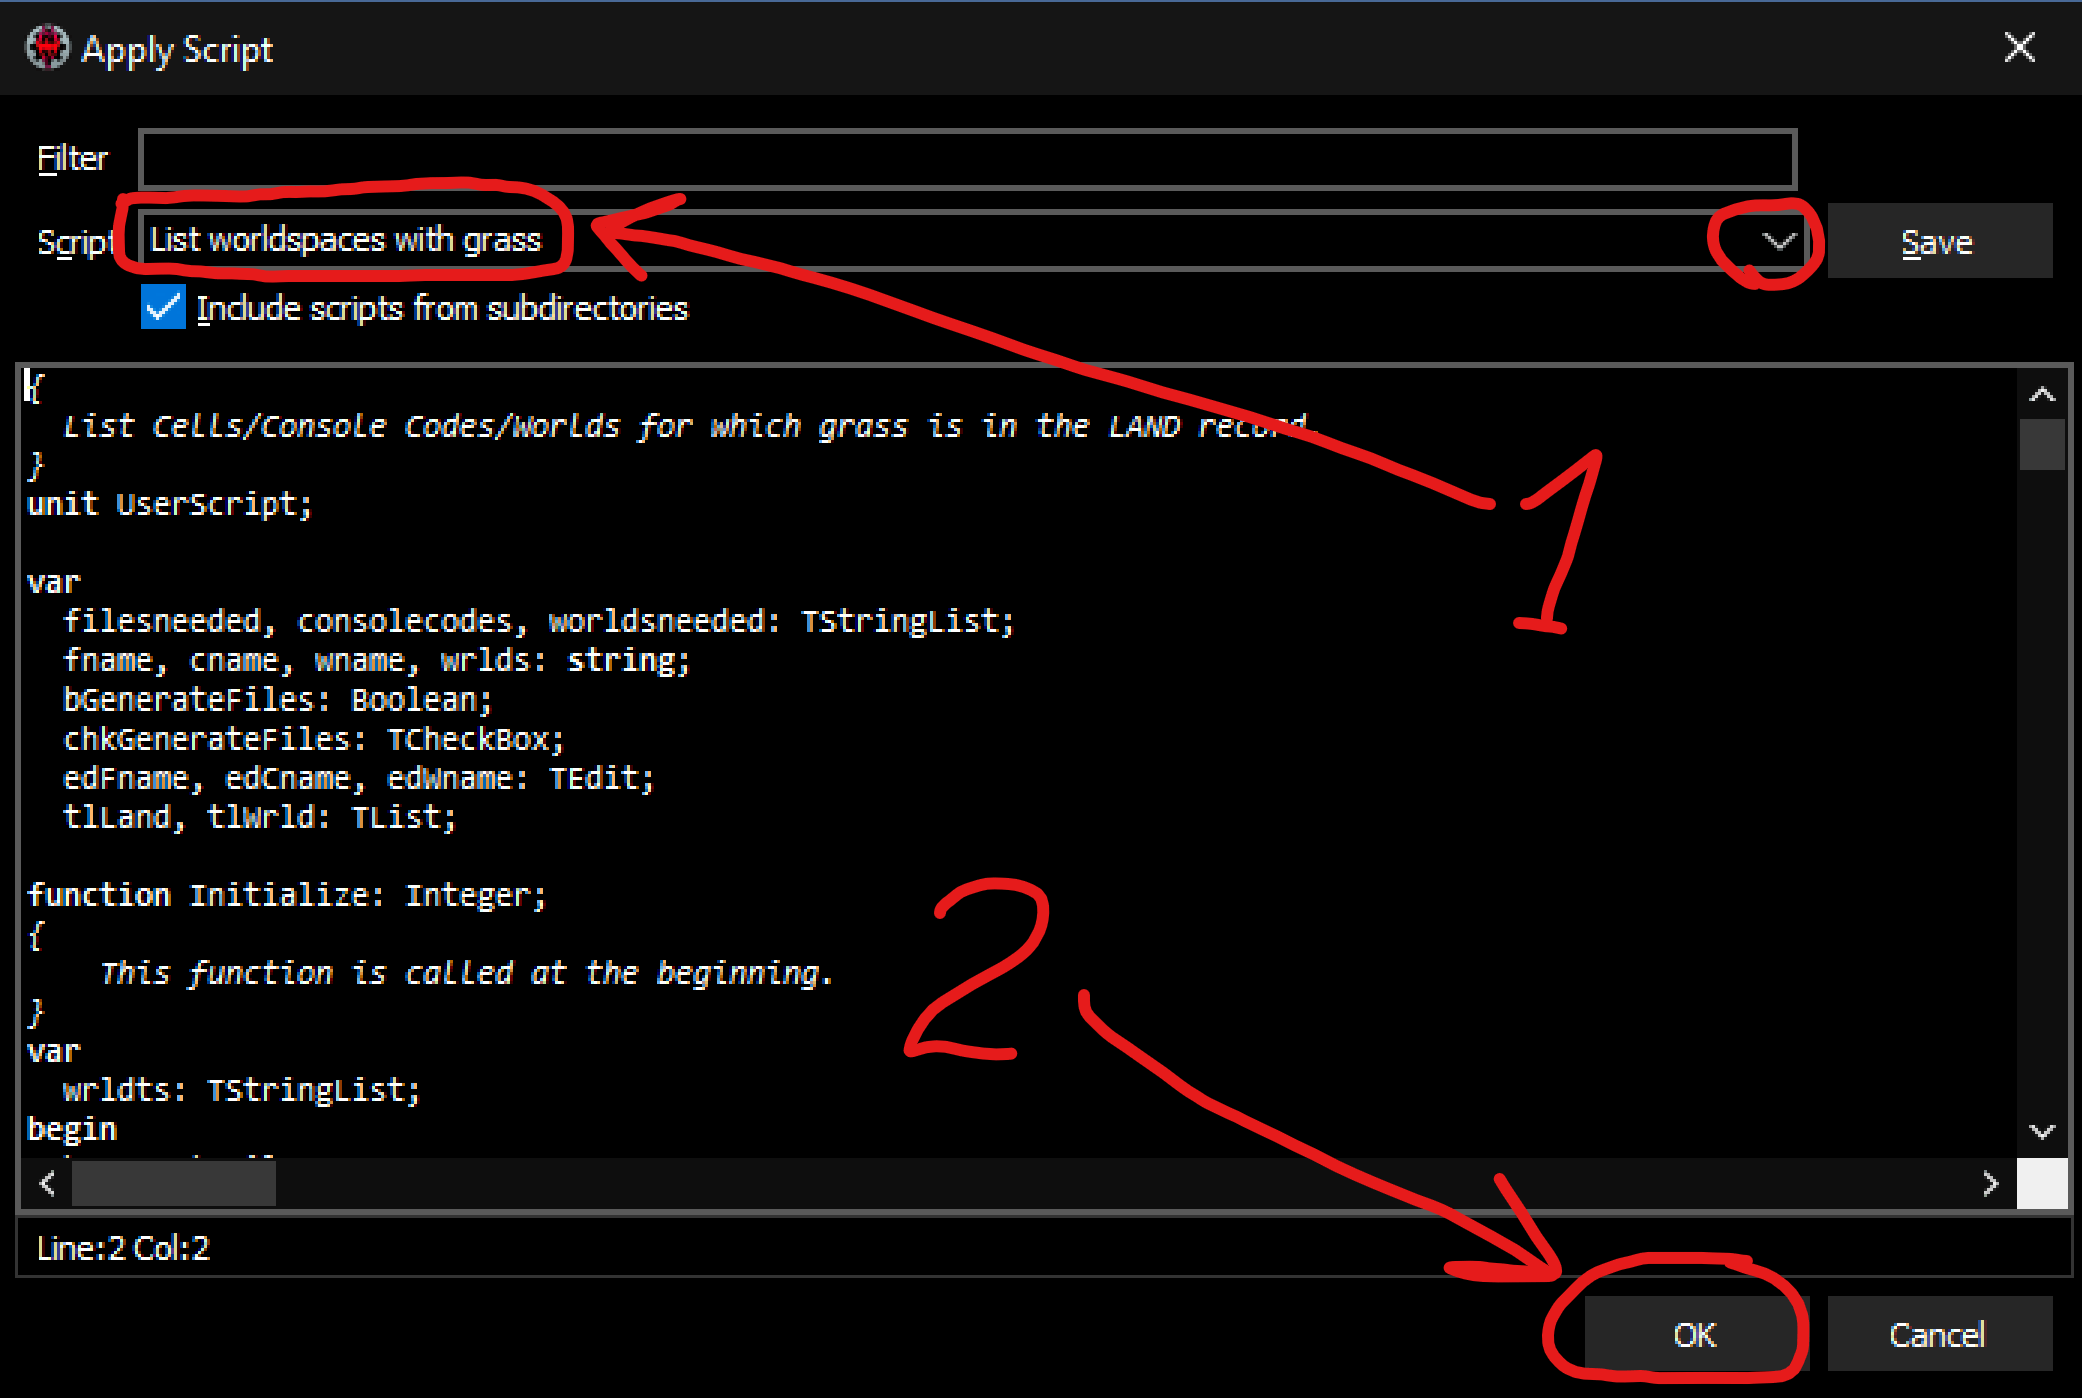
If you get the debug files window - just click
Ok.tipNow you just wait! The script may run for a while (15-20 minutes).
-
When the script finishes, you would be greeted with this new window:
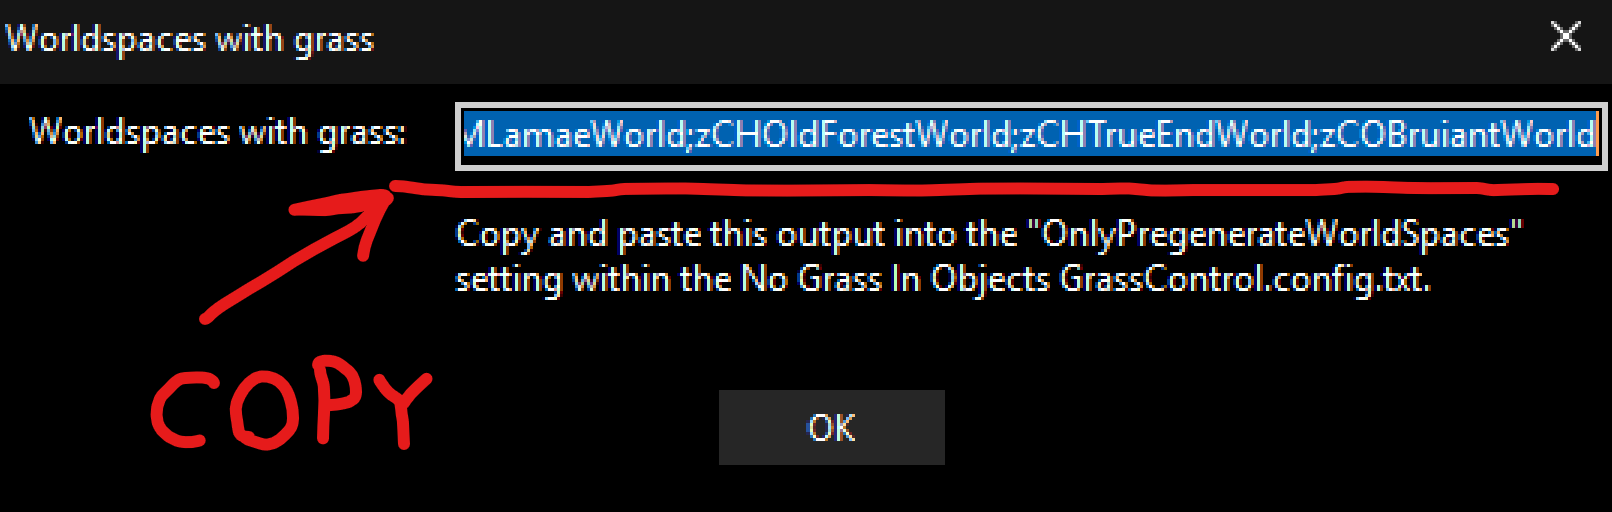
Copy the contents of this message box! Either just in your buffer or some note.
Then press
Ok. -
Close
xEdit, find theConfig INI - GrassControl.inimod inMod Organizer 2, right-click it and selectOpen in explorer:
-
In the opened Explorer window, go inside
SKSE/Pluginsfolder, find theGrassControl.inifile, and open it with any text editor:
-
In the opened document, find the
Only-pregenerate-world-spacesproperty, it would look something like this: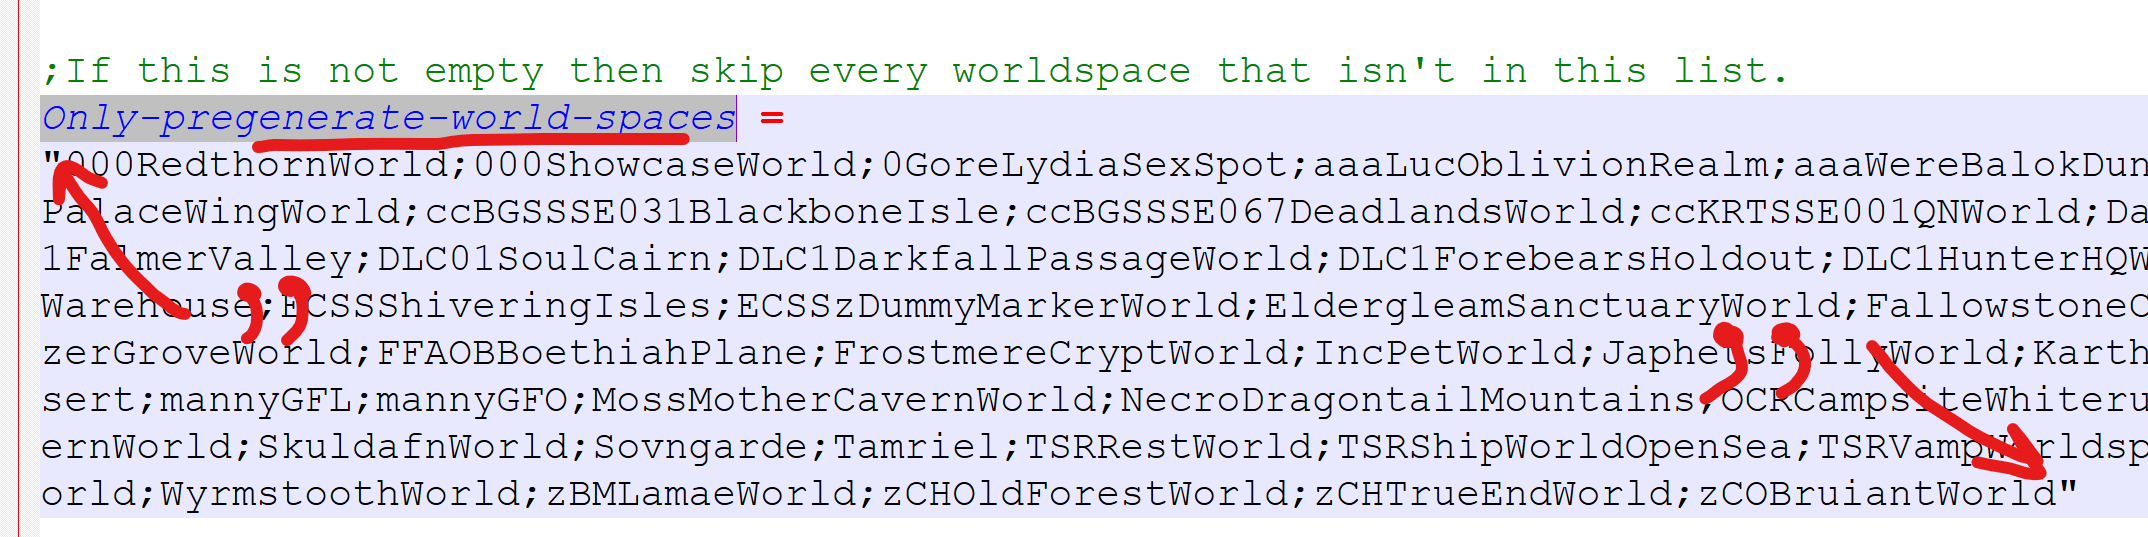
Note that there's a lot of text between the
" "! -
Replace everything between the
" "with the text you copied fromxEditearlier. Just make sure that after your changesOnly-pregenerate-world-spacesvalue is still surrounded by single double quotes (")! -
Save the document and proceed to the next step.
(optional) Recalculate grass bounds
You only need this if you've CHANGED THE GRASS MOD and ONLY IF this new grass mod doesn't come with grass bounds already calculated (check your mod's page for details).
Any grass records that has no object bounds set will not generate anything during grass pre-caching. This section helps ensure that ALL grass has object bounds data.
Note that this process would require installing Creation Kit!
Also this process presumes that you're using the Grass FPS Booster mod for your grass.
If you don't - just omit anything related to it.
🕐 Expected time: 25–30 minutes
-
Repeat steps 1-3 from the List worldspaces with grass section.
-
Right-click anywhere on the left pane and select
Apply Filter:
-
In the opened
Filter..window selectby Record Signature(1), find and selectGRAS - Grassin the list below (2), and clickFilteron the bottom-right (3):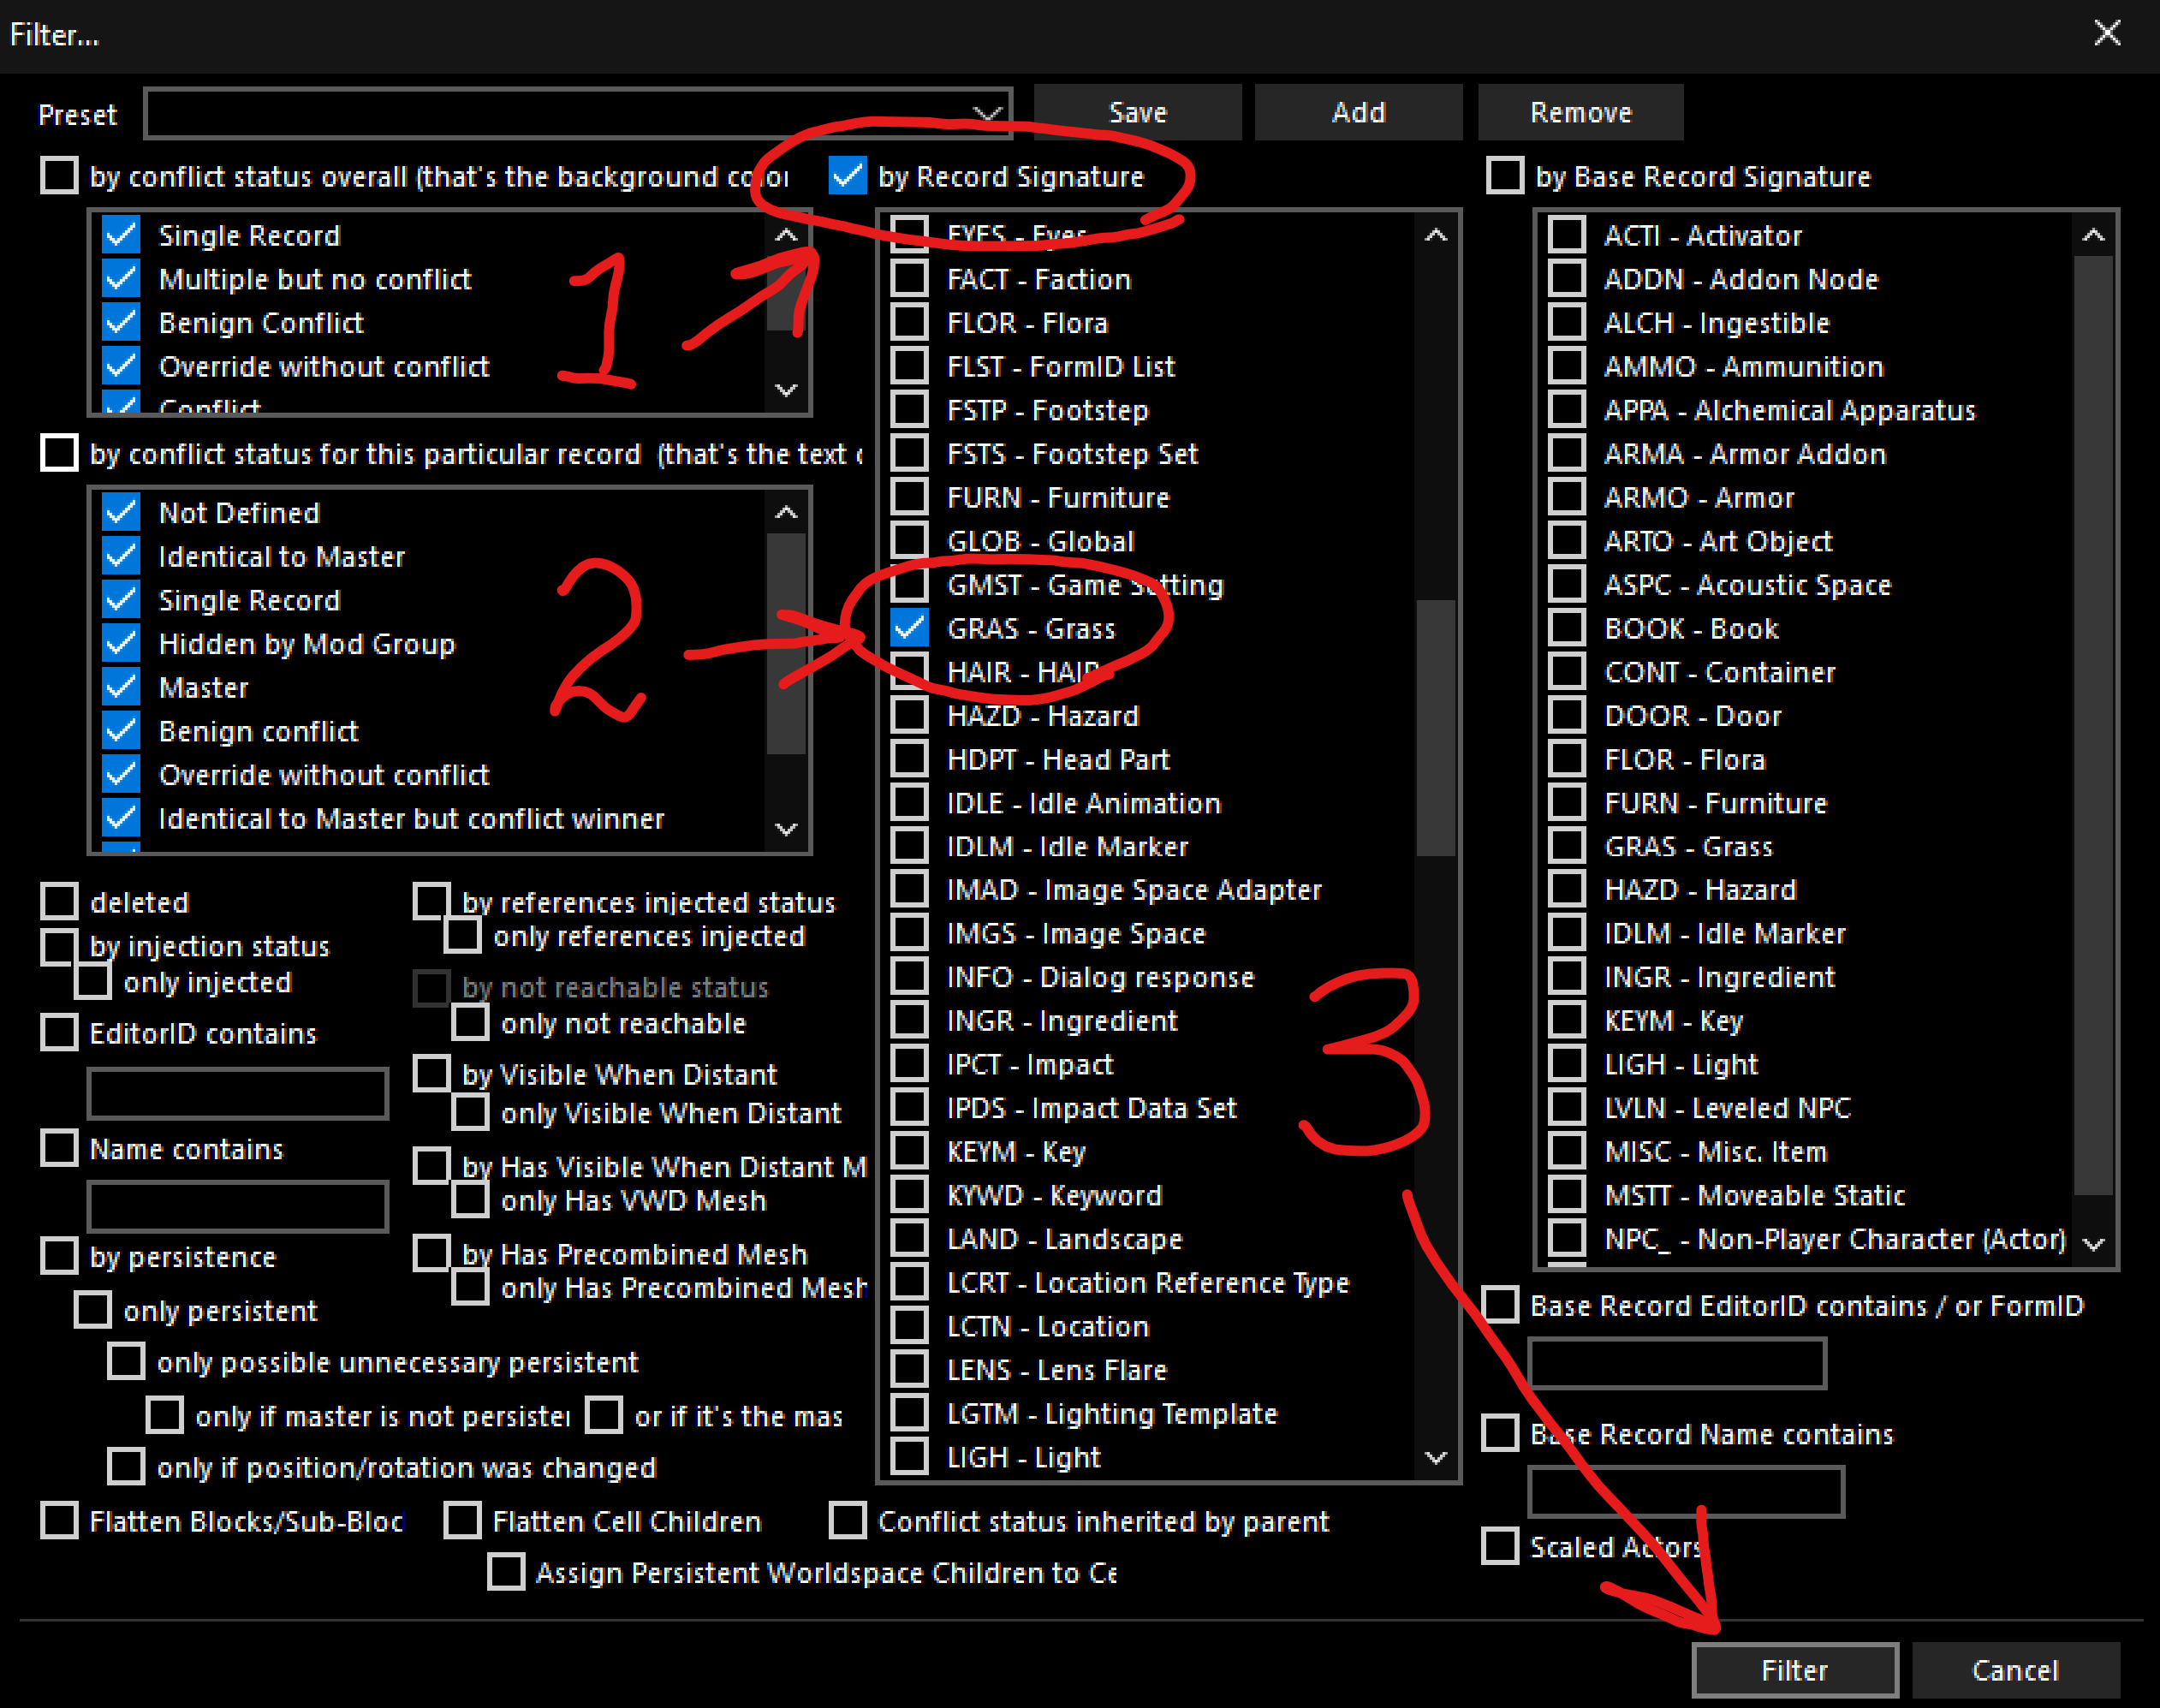
-
You would see all the plugins having any records of
GRASSin them. Now we have to create two NEW override plugins for grass.warningLicentia already ships with two grass plugins -
LN_M_Grass_MainandLN_M_Grass_Boost.You have to disable/remove/rename them before starting this step, or just name your NEW plugins differently. This guide is a bit more high level, so you'd figure it out.
Examples below would keep the original naming scheme.
- Main plugin (
LN_M_Grass_Main):-
For each plugin EXCEPT THE GRASS BOOST ONE you'd have to open up its grass records (1), right click them (2) - in case there are many records you can select them with
Shiftand then right-click - and chooseCopy as Override into...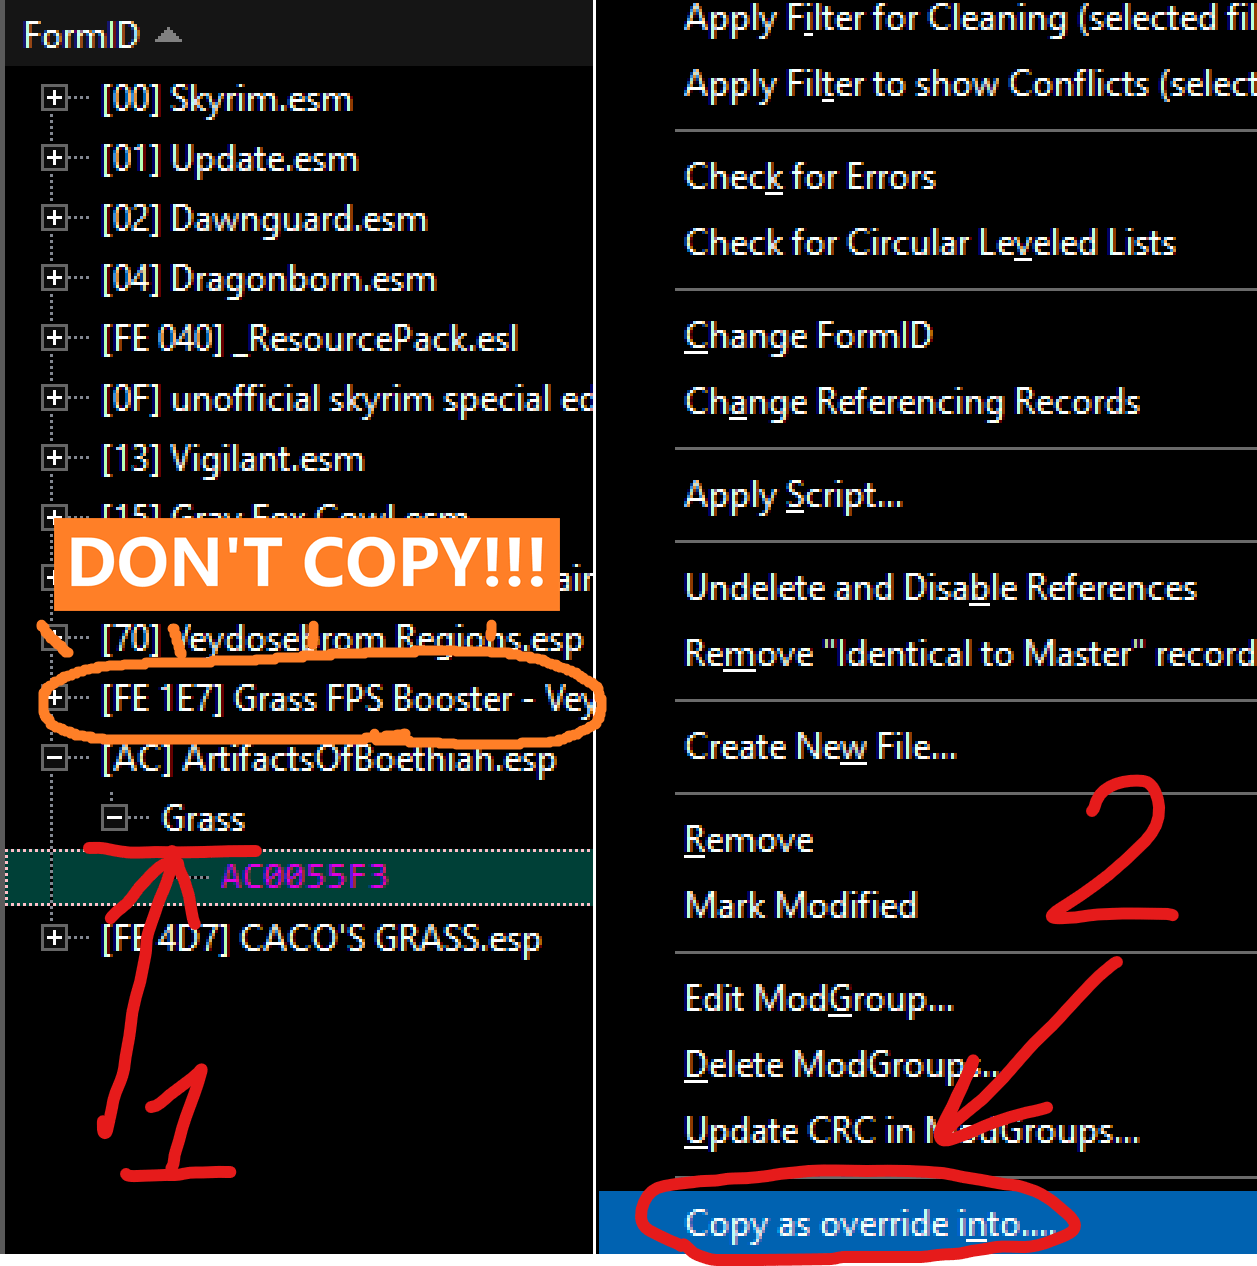
-
In the new window scroll to the bottom of the plugin list, select 5th from the bottom called
<new file.esp>with aESLflag on the right, and clickOk:
-
You'd be asked for a name, choose anything you want (we'd use
LN_M_Grass_Mainin this example), and clickOk. -
Repeat this for all the
GRASSrecords, going from bottom to the top! If you get any warnings sayingAdd as master?- sayYes.
-
- Boost plugin (
LN_M_Grass_Boost):-
Repeat the same exact steps as for the Main plugin above, BUT this time copy everything including the records from
Grass Boostplugin. -
Call your new plugin something like
LN_M_Grass_Boost
-
- Main plugin (
-
When you're done, hit
Ctrl + Sto save your plugins, and then closexEdit. -
Open your
Creation KitinMod Organiser 2:-
In top left click
FILE->Data... -
Select your
LN_M_Grass_Bounds_Mainplugin (1), clickSet as Active(2), hitOk(3) and wait forCreation Kitto finish loading: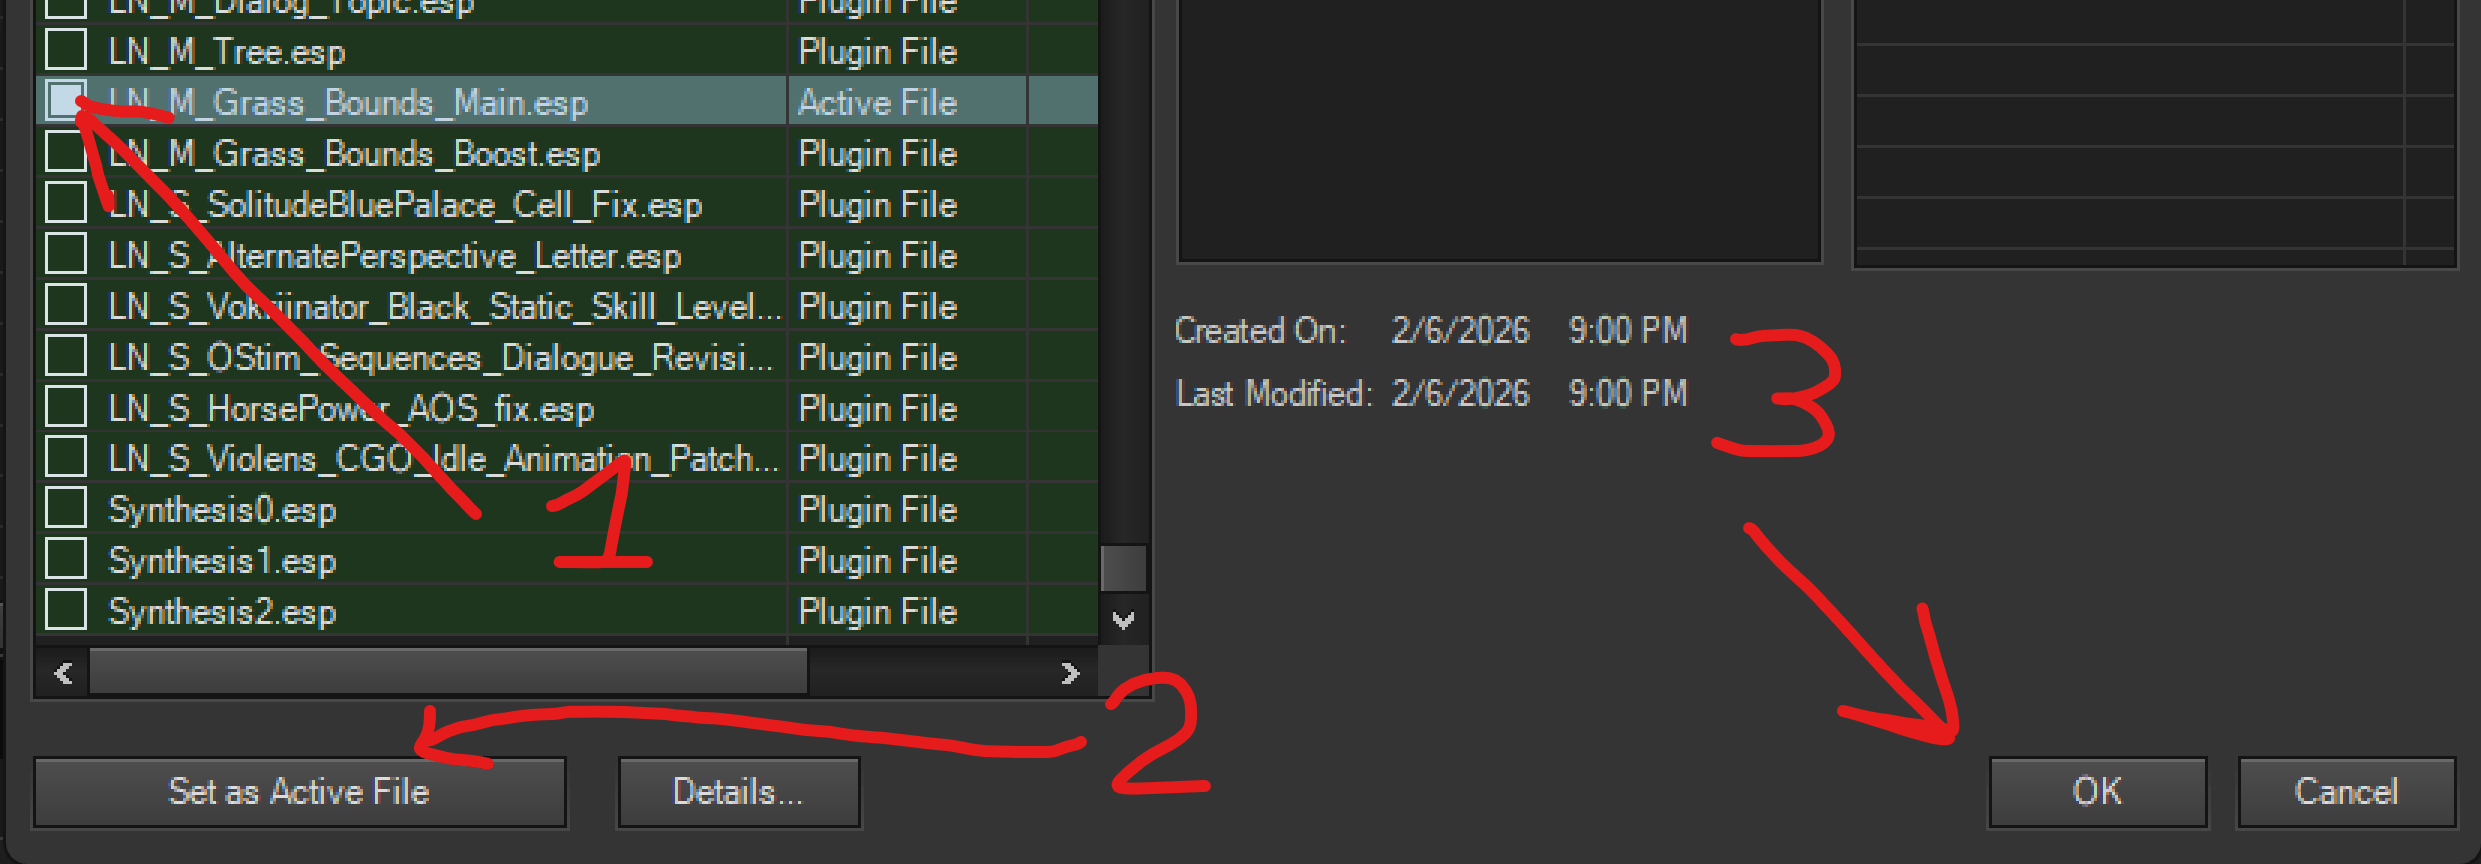
-
In the
Object WindowfindGrassand select it (1), then on the right select ALL grass records withShift + Left Clickon the first and last records (2), right click anywhere and clickRecalc Bounds: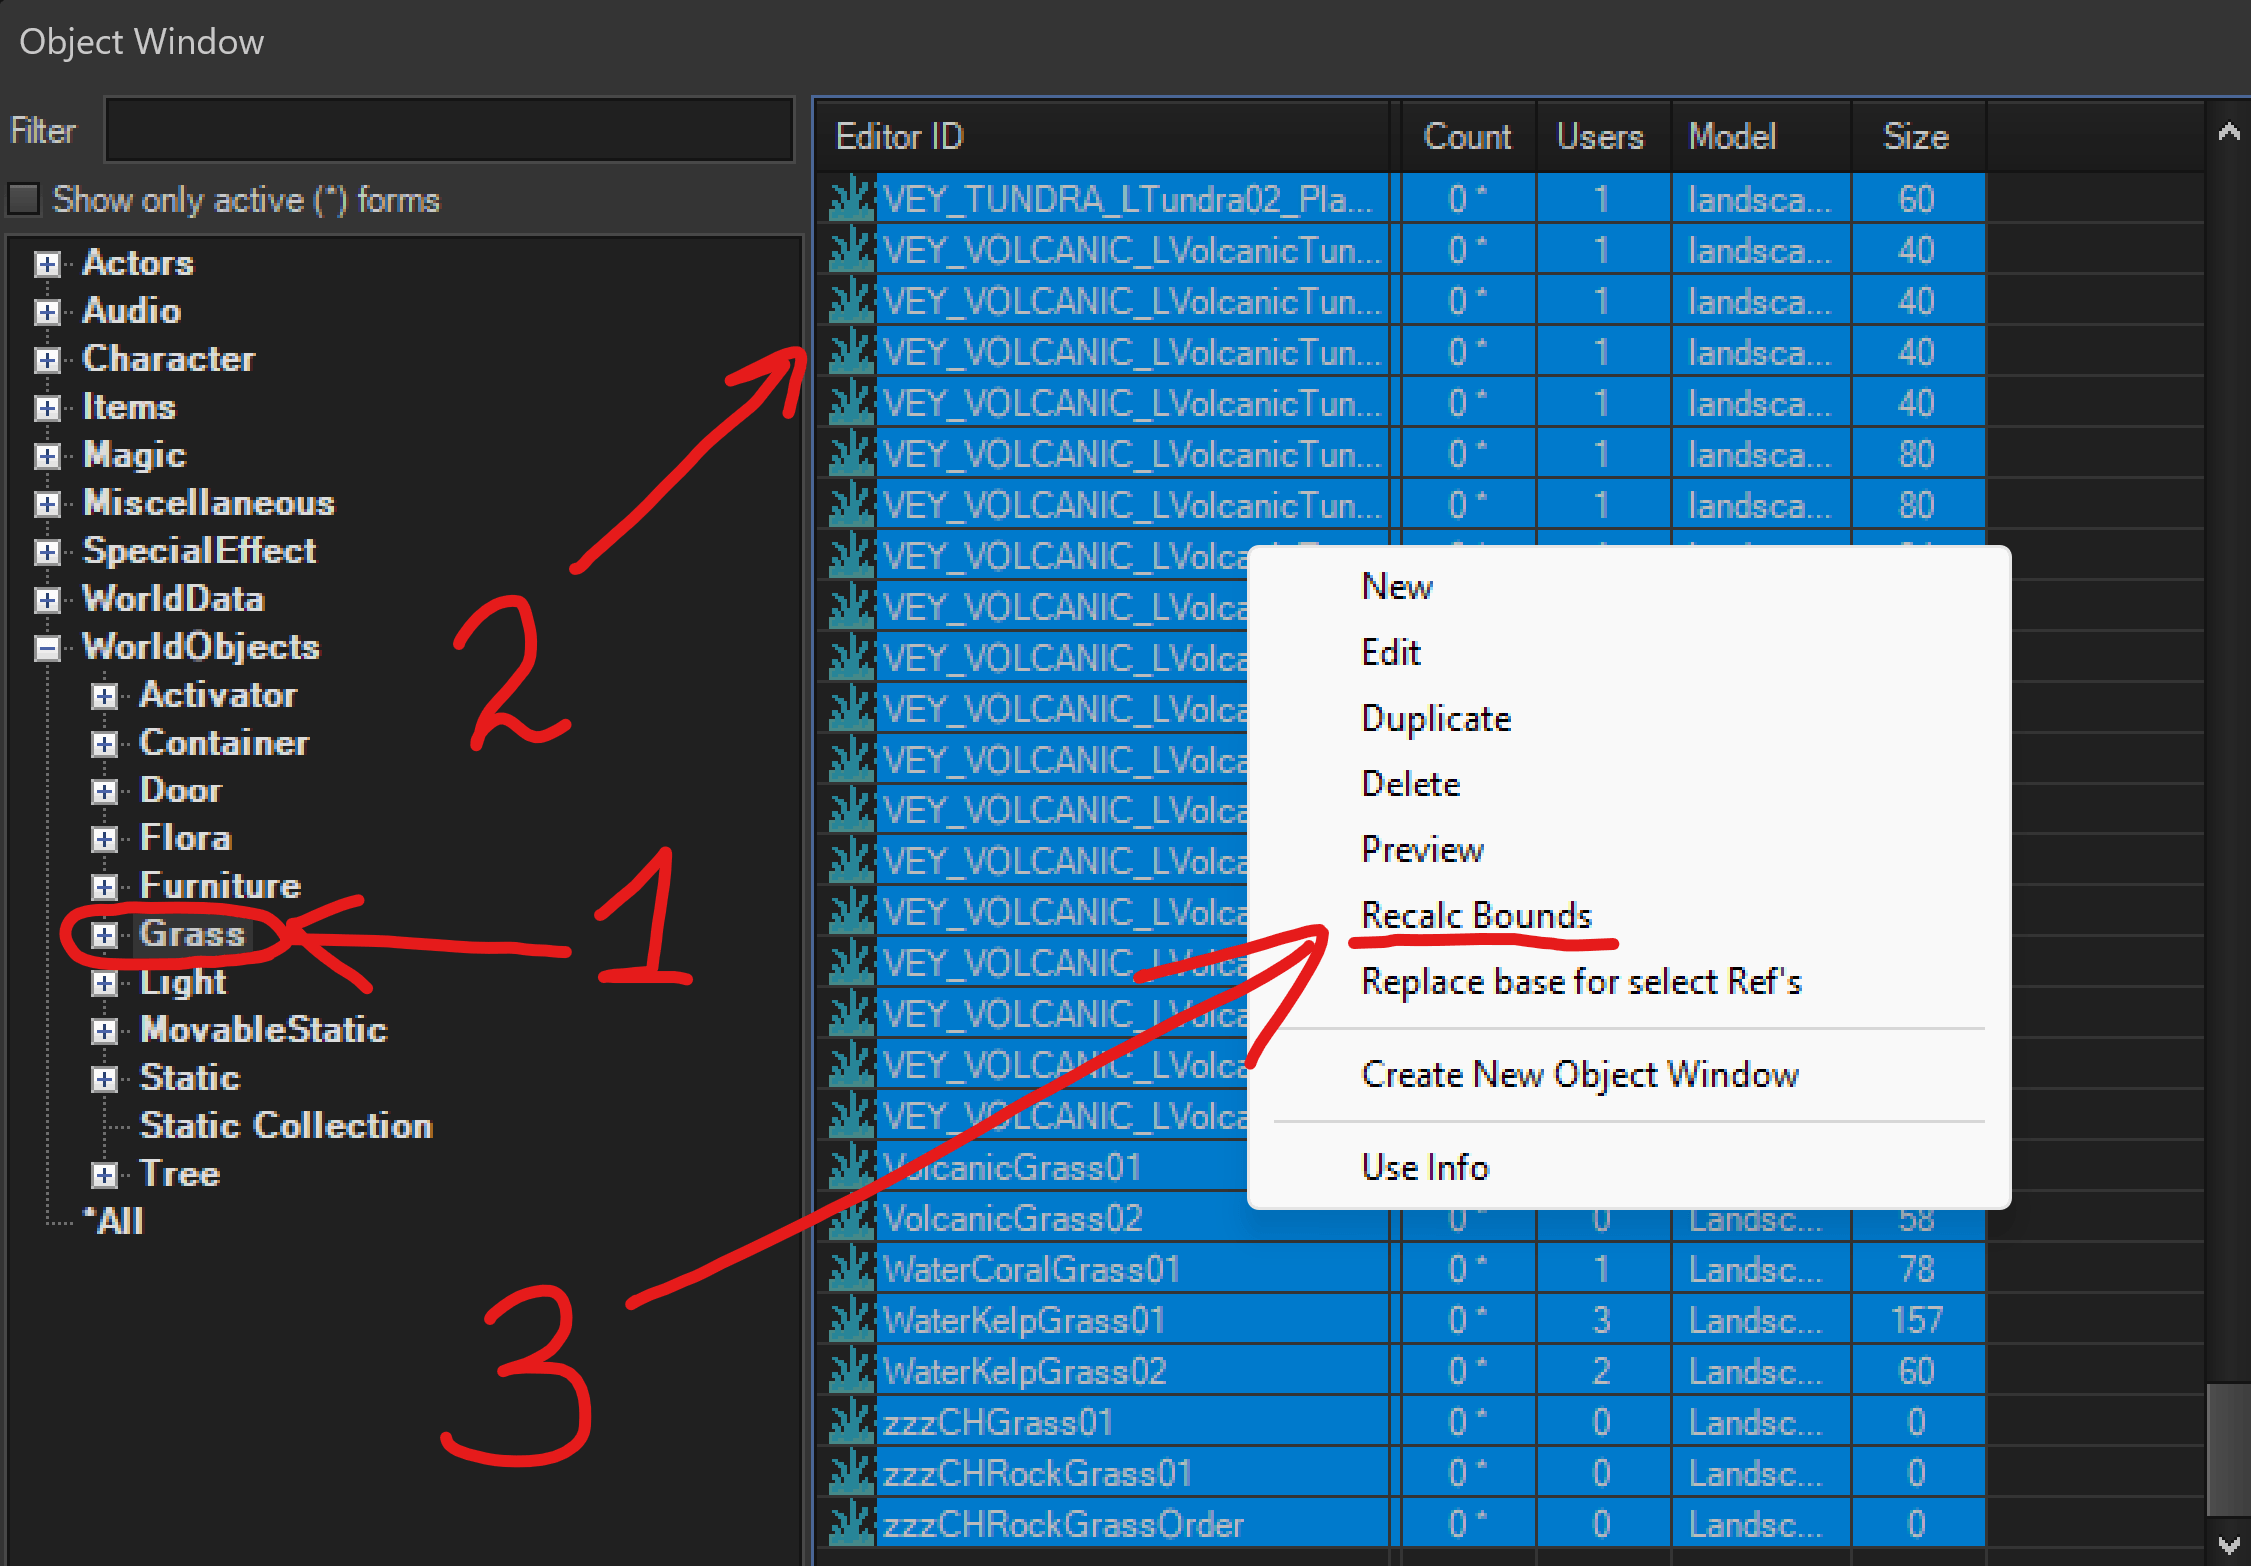
-
Click
FILE->Save, and then closeCreation Kit. -
Repeat the same process for the
LN_M_Grass_Bounds_Boostplugin.
-
-
Your newly created plugins would be saved in
Overwrite(or wherever you've set your Creation Kit output to).-
Move them to an empty mod/wherever you'd like and enable them
-
Make sure they're loaded after all
LN_M_****andLN_S_****plugins on the right inMod Organizer 2 -
Boostplugin should be loaded AFTER theMainplugin
Done! Now you're ready to proceed to the next step.
-
Preparation
🕐 Expected time: 5 minutes
-
In
Mod Organizer 2enable the following mods:No Grass In ObjectsConfig INI - GrassControl.ini
-
Then find the
Grass FPS Boostermod on the left:- Right-click on it and select
Information - In the newly opened window, select
Filetreetab (1), right click onGrass FPS Booster - ***your grass mod name***.ini(2), and clickHide(3):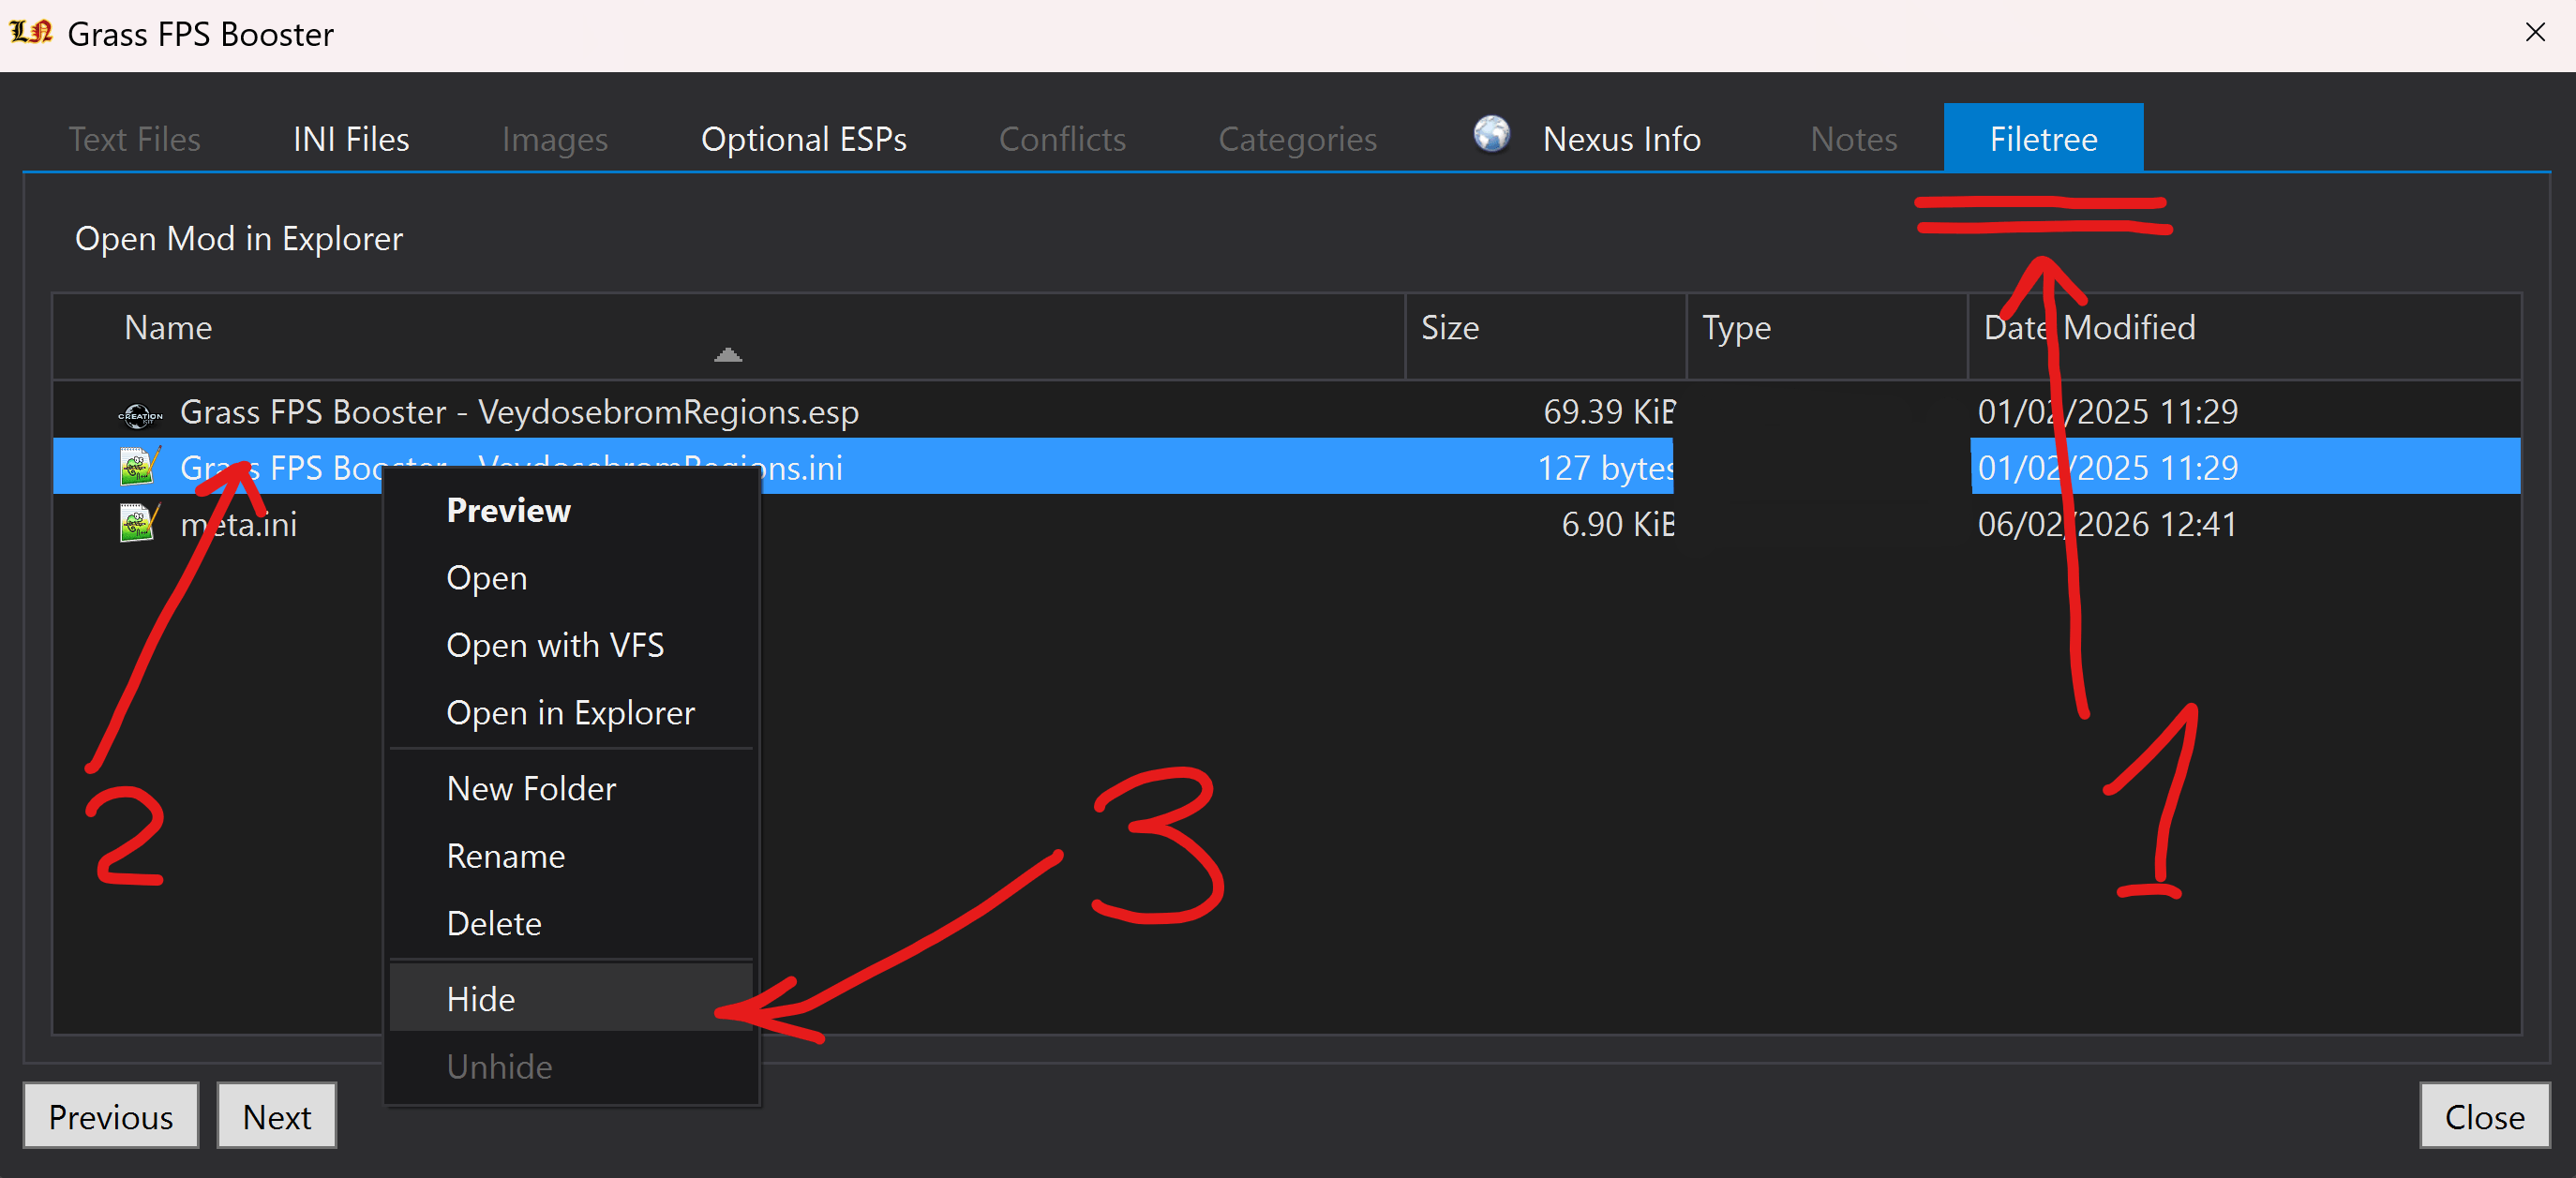
- Right-click on it and select
-
And on the right pane in
Pluginstab DiSABLE the following plugins:Grass FPS Booster - ***your grass mod name***.espLN_M_Grass_Bounds_Boost.esp(or whatever yourBoostplugin is called after Bounds Recalculation)
It should look like this:
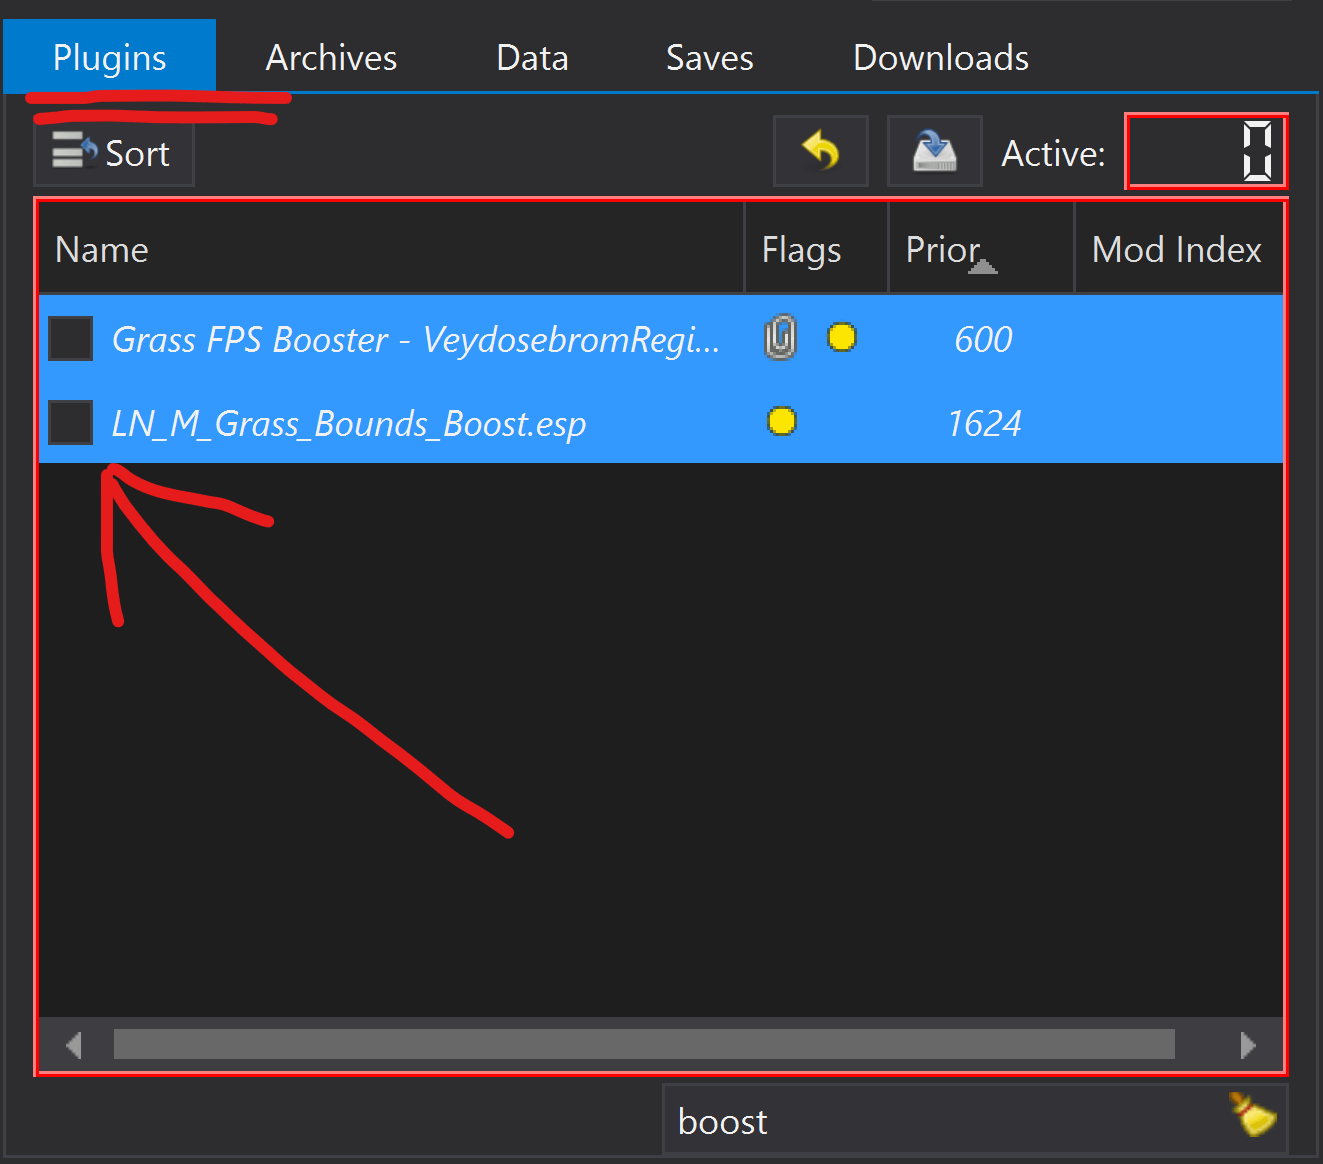
-
Verify
GrassControl.inisettings.They are already preconfigured in Licentia, but if you want to double-check - open the
GrassControl.inifile inside theConfig INI - GrassControl.inimod and make sure these values are set:Licentia NEXT settings that differ from the default GrassControl.ini
Use-grass-cache = trueExtend-grass-distance = trueExtend-grass-count = falseEnsure-max-grass-types-setting = 15Overwrite-min-grass-size = 60Global-grass-scale = 1.150000Only-load-from-cache = trueOnly-pregenerate-world-spaces = "values from the List Worldspaces with Grass step"DynDOLOD-Grass-Mode = 1
Generate Grass Cache
🕐 Grass cache generation will take a long time - 1-2 hours is completely normal (depends on your additions size and/or your PC performance).
The Guide recommends that you take a few minutes and read at least the stickied comments on the No Grass In Objects forum page found here.
It's your call what changes you choose to make and/or mods to disable, but in general it's good to go through and look.
If you decide to make changes, its best to do so by making a new profile and make them there. Call it Grass Profile or something, run the Grass Cache process on that profile. You can delete it after and your primary profile would remain untouched.
-
In
Mod Organizer 2at the top click thePuzzleicon (1) and hitPrecache Grass(2):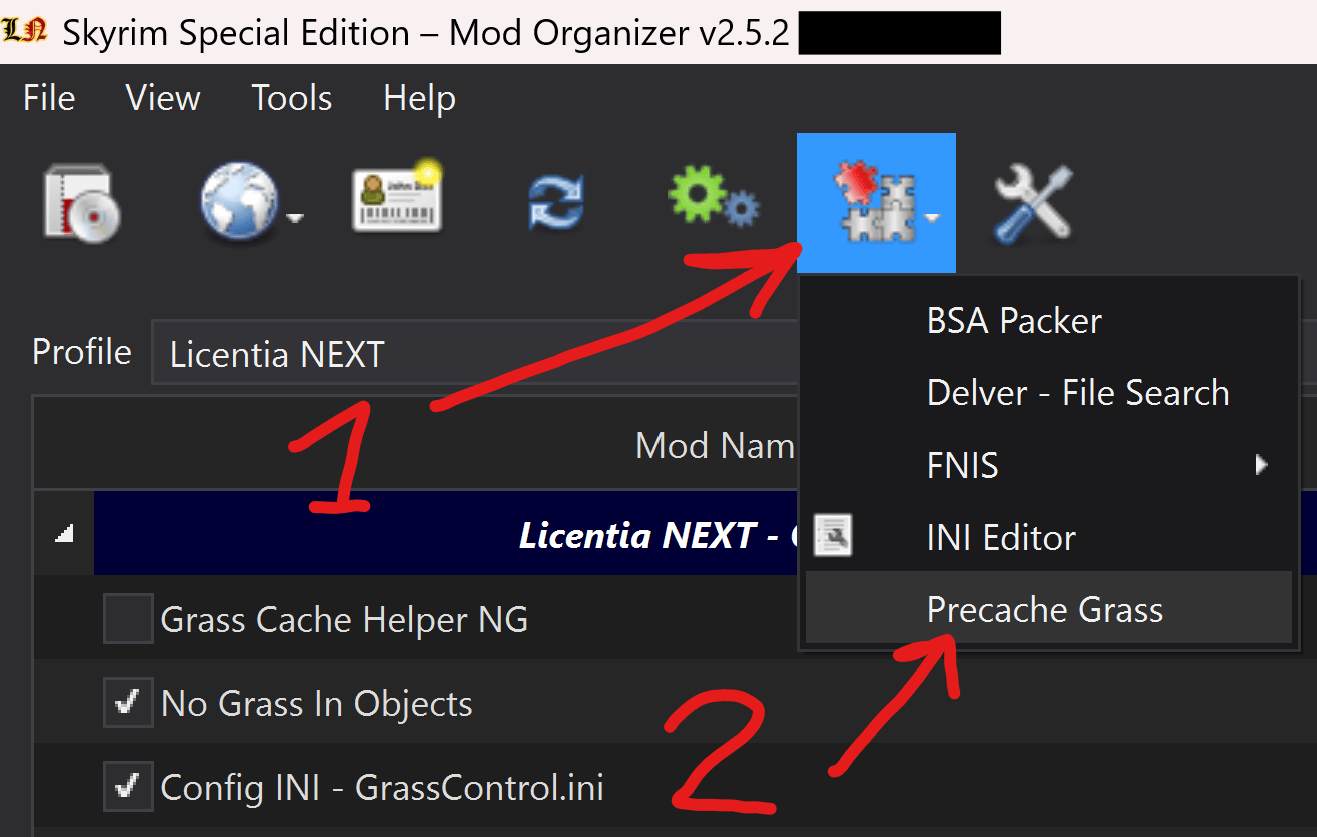
You would get a popup warning you about the process details - READ IT and click
Ok: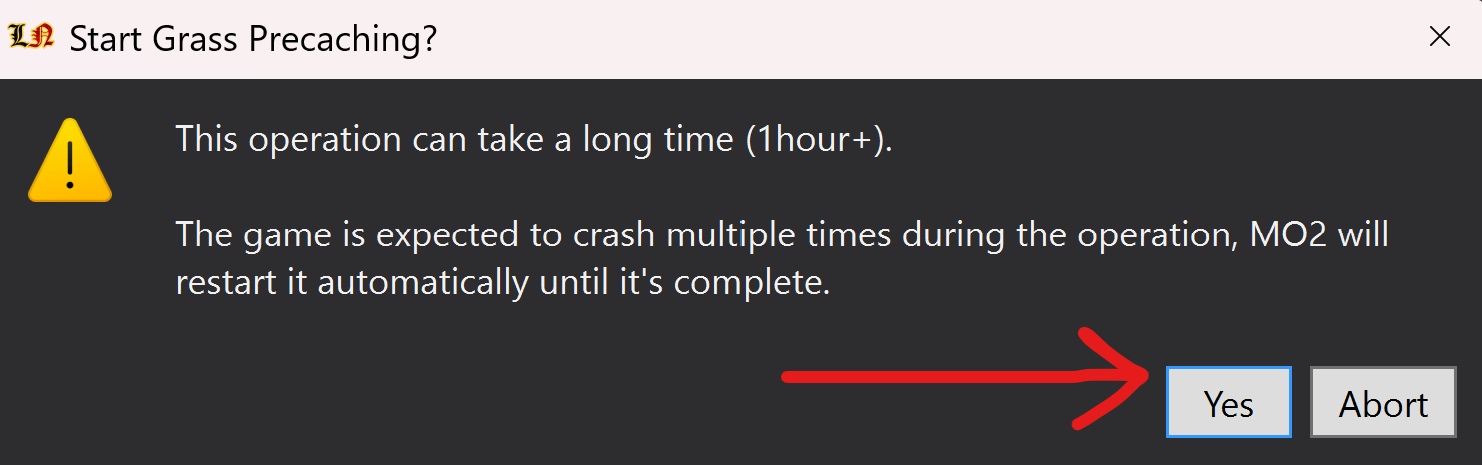
-
The game would start now!
-
The game may load 2-3 times longer than usual, that's normal
-
You'd see this popup when the grass precaching starts - DON'T CLICK
OKin this message, otherwise you won’t be able to monitor the progress:
-
Open up the console instead with
~. You'd be able to see the progress of cache generation there: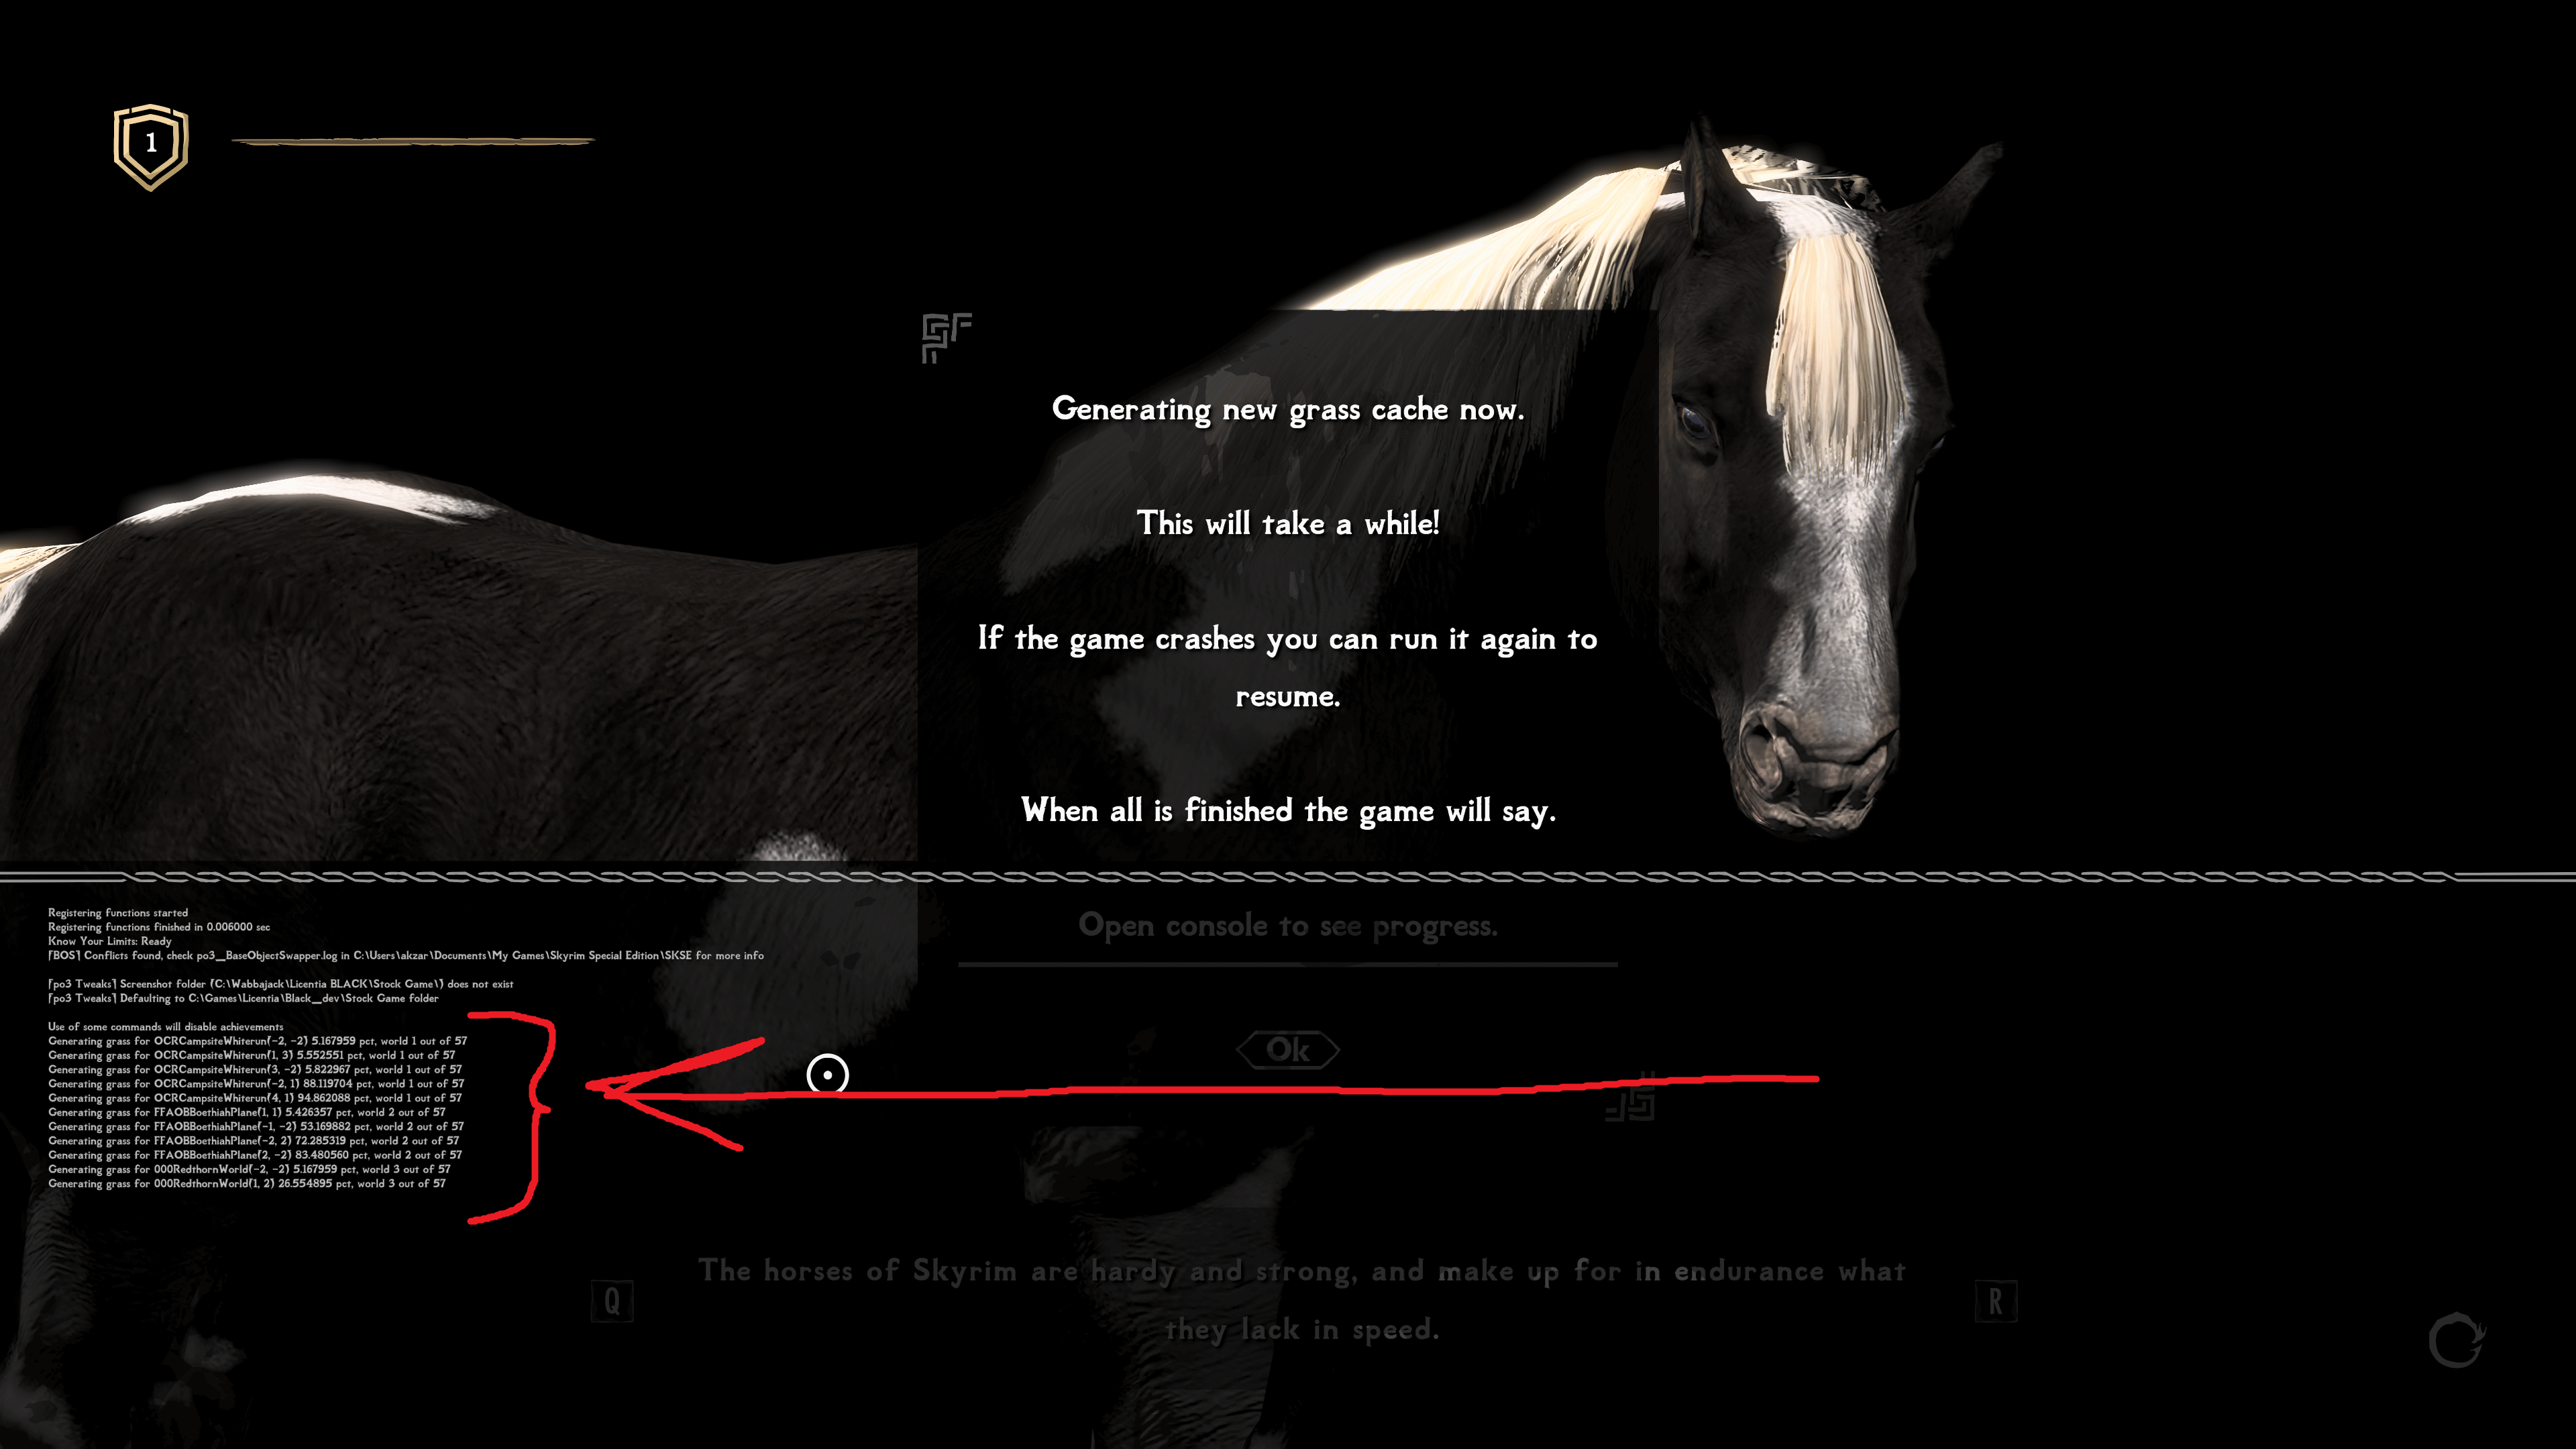
-
Now you just have to wait. The game would just stay at the loading screen and do the grass generation.
When the game crashes during generation - precache script would restart it automatically as many times as needed, you don’t have to do anything.
warning🕐 This process may take a long time (up to 2 hours), and a few restarts. Just wait!
In certain situations depending on any number of things, Windows may decide to intercept the crashlog and display it on your screen. If that happens, close it and the normal restart process should take over. You may have to unlock MO2 if it doesn't do it automatically.
-
-
When you see thiis Windows-style completion message - grass generation is completed! Just click
Ok: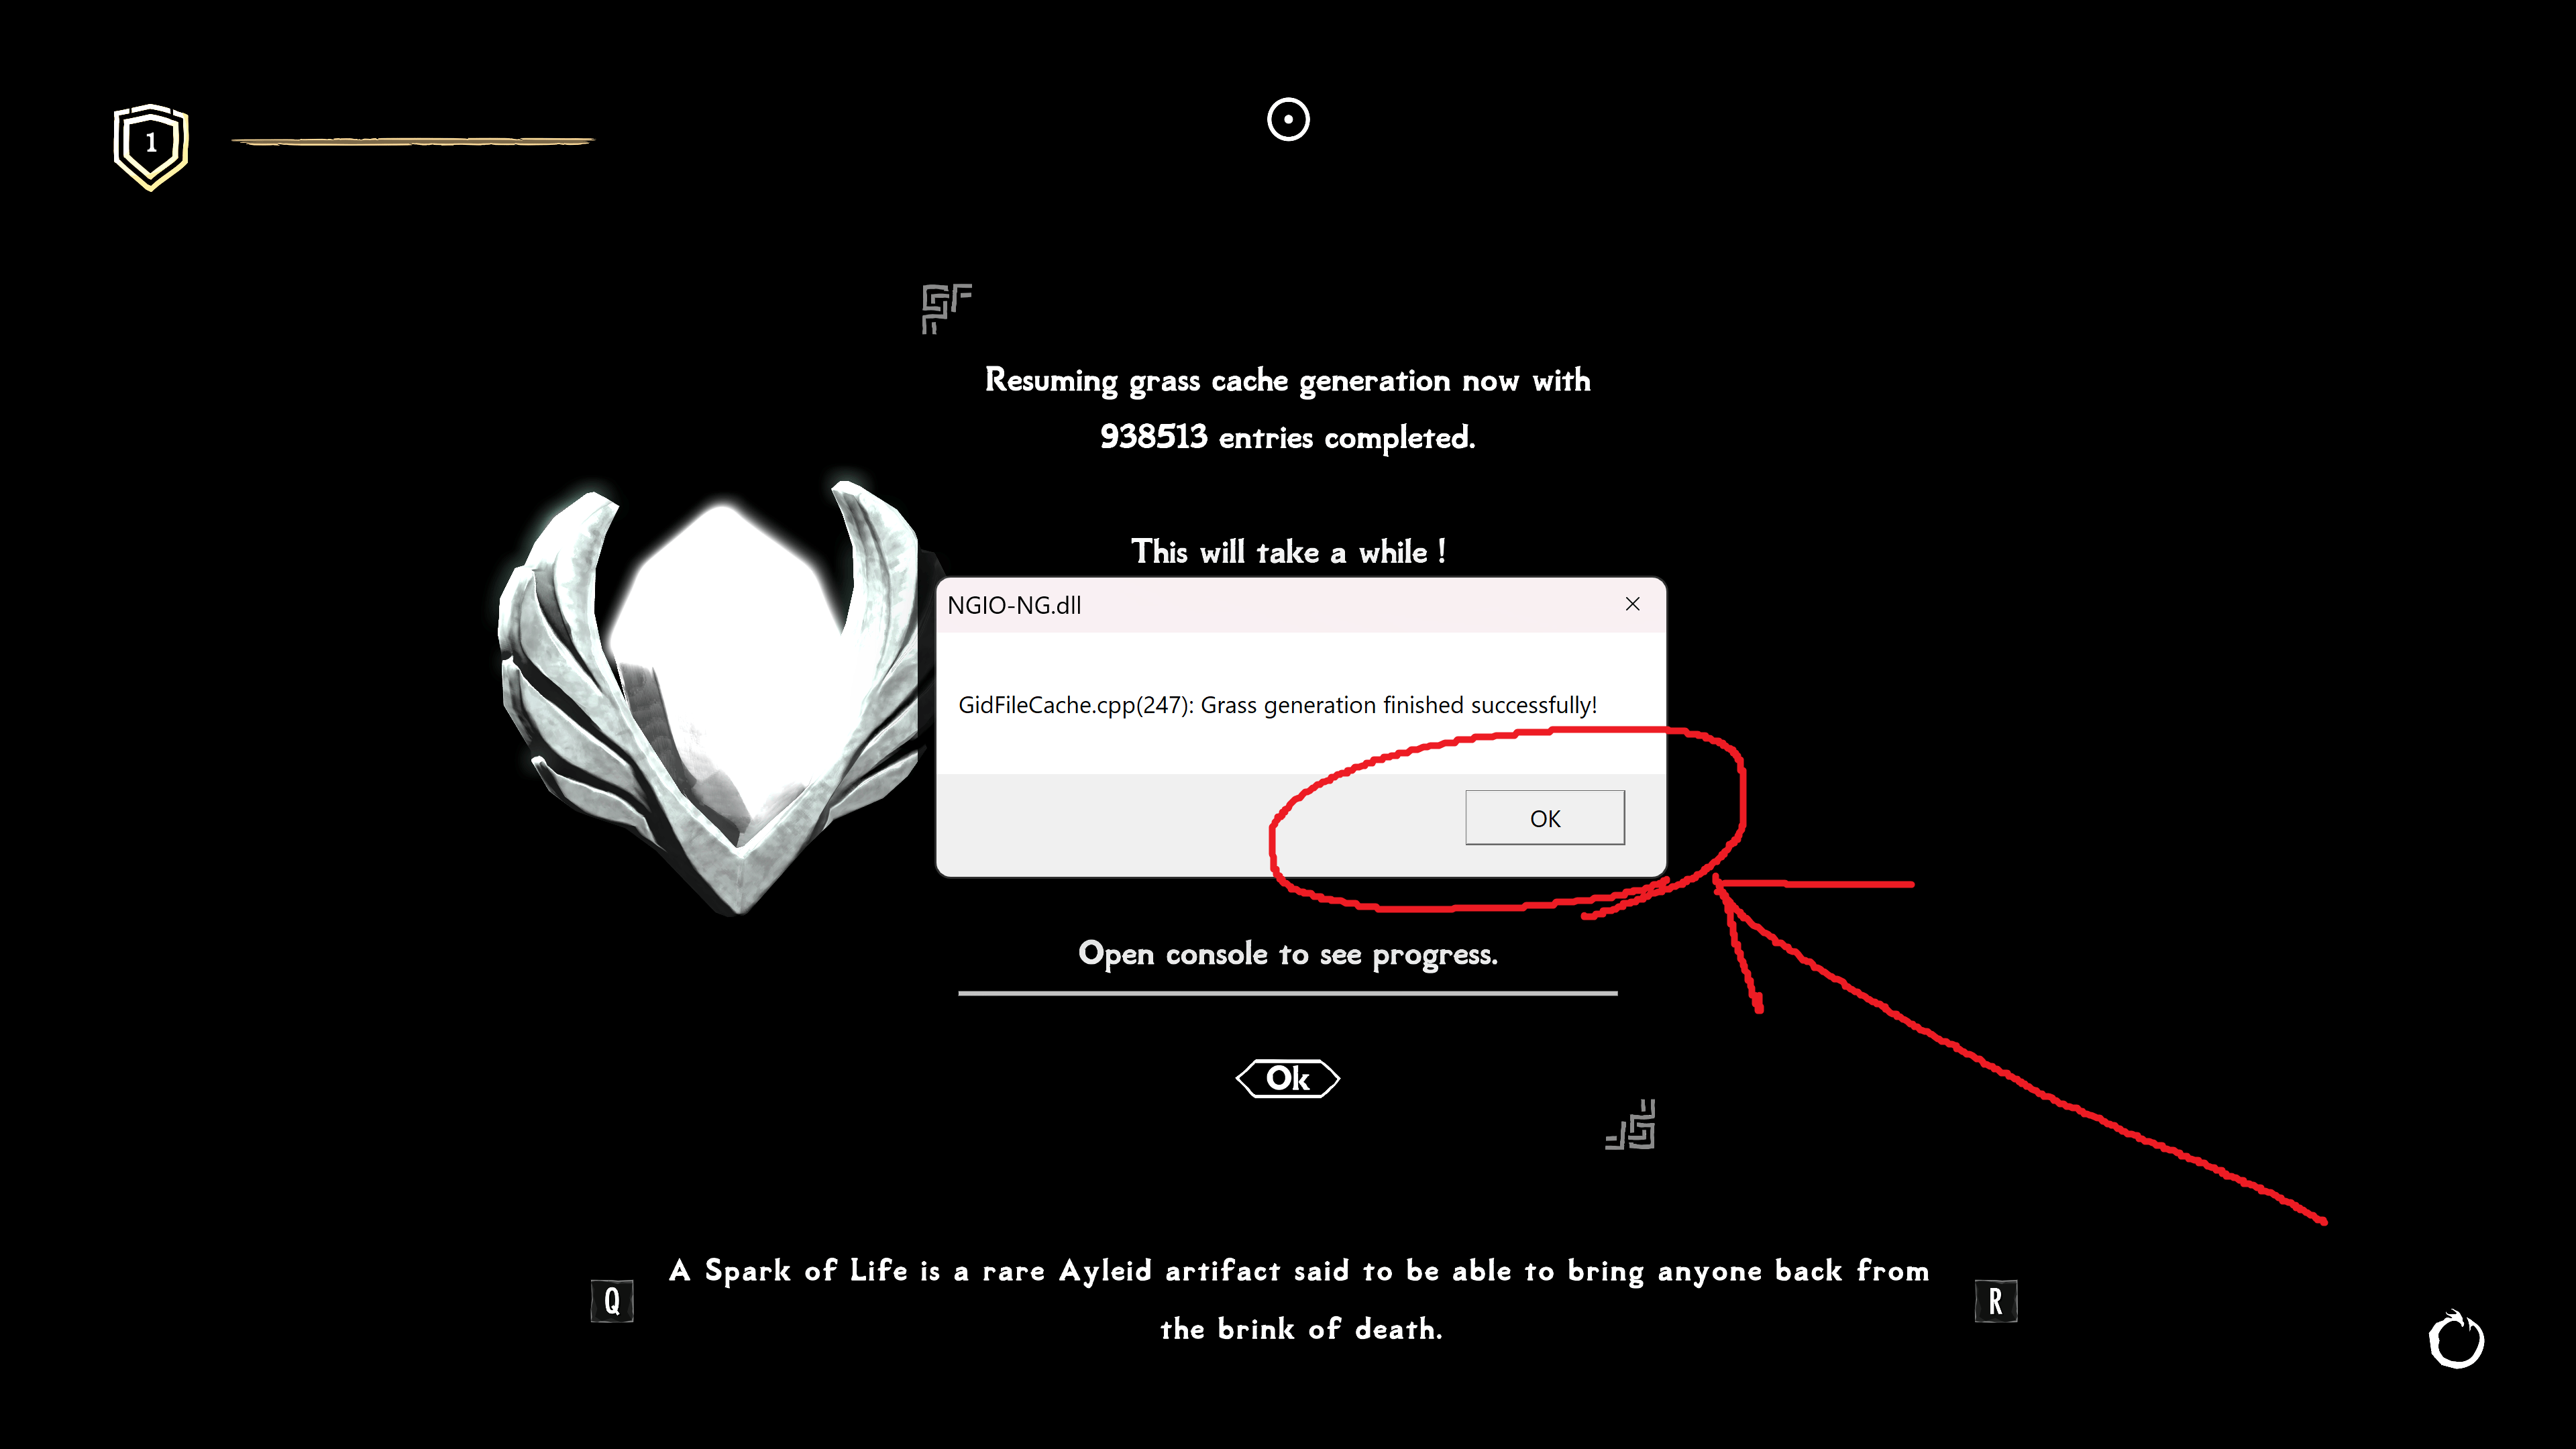
Game would close, and in
Mod Organizer 2you'd see this message - clickOkhere as well: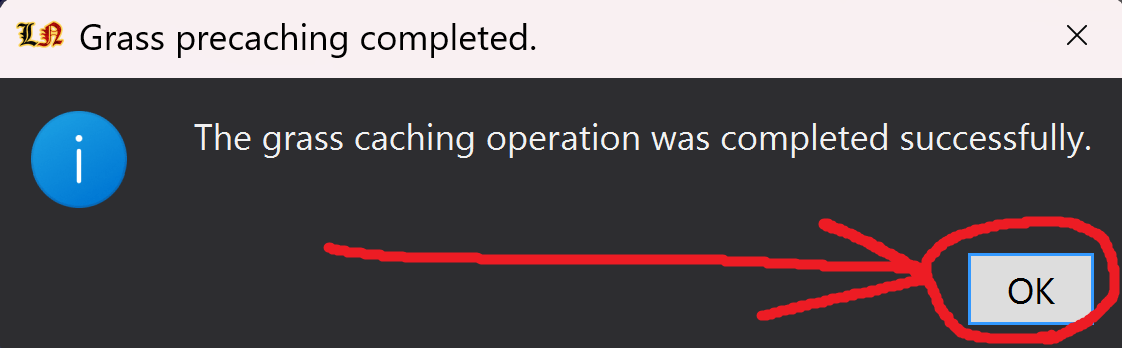
Grass cache generation is done! Proceed to the next step.
Install Grass Cache output
-
Find the
Overwritefolder on the bottom ofMod Organizer 2, right-click it and selectOpen in Explorer: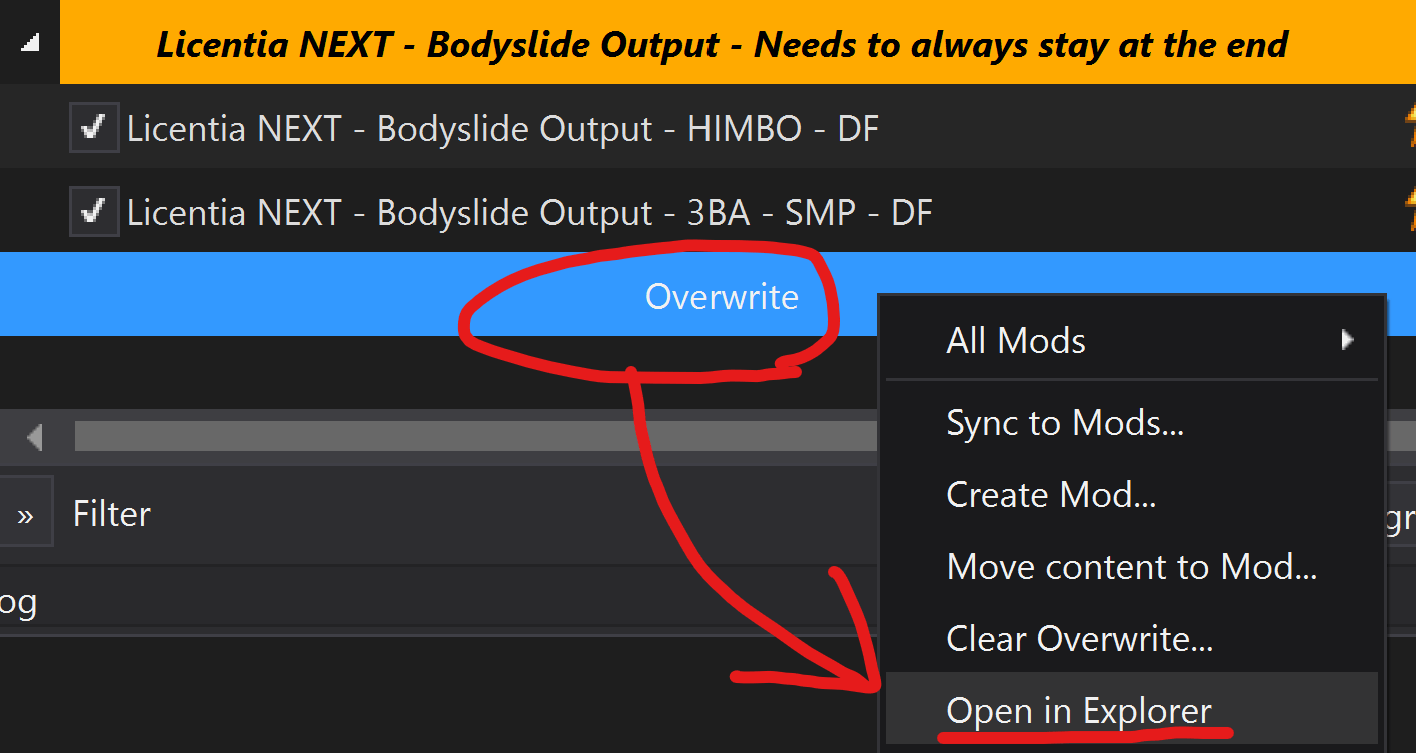
-
Find the
grassfolder and add it to achive. It has to be.zip!Then:
- delete the
grassfolder fromOverwritedirectory - move the archive to your Licentia downloads folder (for example
C:\Licentia NEXT\Downloads).
- delete the
-
In the
Mod Organizer 2, you would see thegrass.zipat theDownloadssection on the right. If you don't see it - clickRefreshon the left.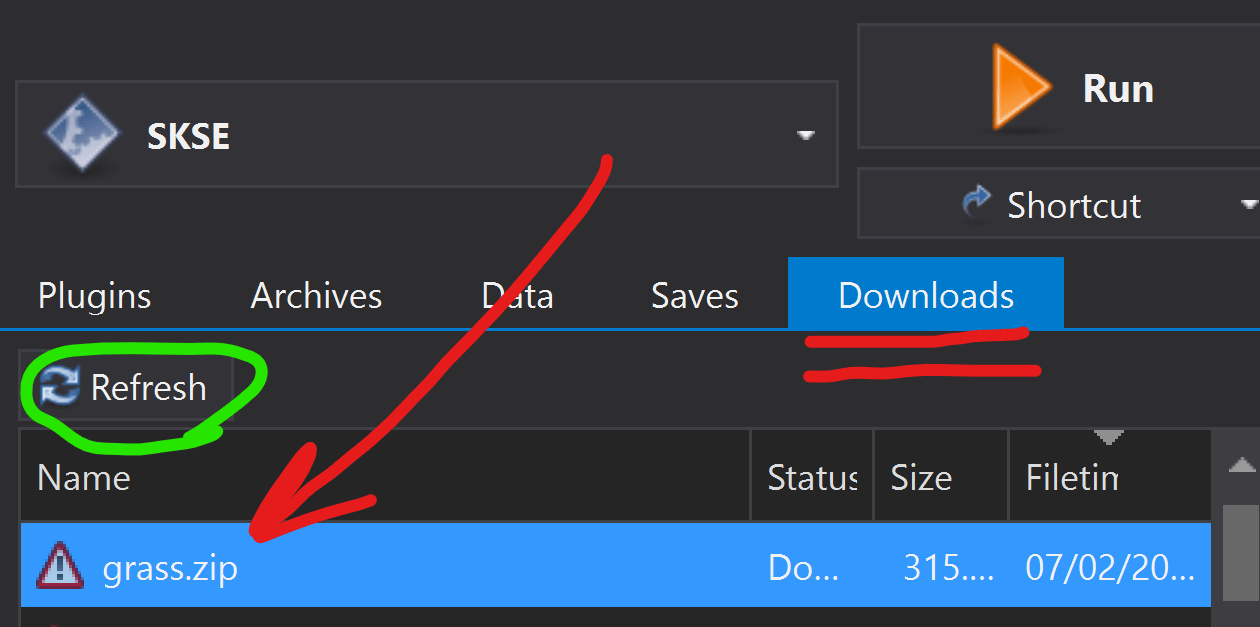
-
Double-click the
grass.zip, and when prompted forQuick Install- just pressOk:
It would take 10-20 seconds.
-
The mod would appear at the bottom of the mods' list on the left:

-
Drag it to the
Licentia NEXT - Grass Cacheseparator, put it under the disabledLicentia NEXT - Grass Cachemod, and enable it. The result would look like this: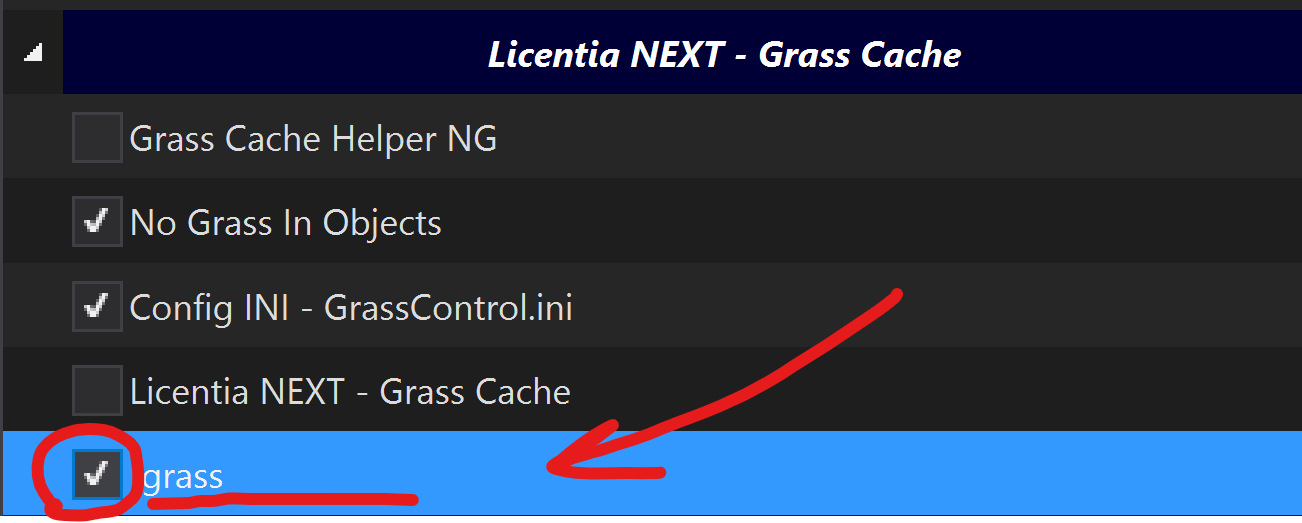
Done! Proceed to the next step.
Step 4️⃣ — TexGen + DynDOLOD
Both TexGen and DynDOLOD are always run together!
🕐 Expected time: 1 hour
Preparation
-
Enable the following mods in
Mod Organizer 2:DynDolod - Darken texture for generation - The good one last one
-
Setup
DynDOLODconfiguration:-
Navigate to
your_LN_installation/tools/DynDOLOD/Edit Scripts/DynDOLOD/folder, find theDynDOLOD_SSE.inifile and open it in any text editor -
Using
CTRL-F, search forExpert, and setExpert=1(default is0) -
Using
CTRL-F, seach forLevel32, and setLevel32=1(default is0) -
Using
CTRL-F, search forDoubleSidedTextureMask. Remove the semi-colon;in front of this line. It should now readDoubleSidedTextureMask=mountain,mtn. -
Save your changes and close the file.
-
Run TexGen
🕐 Expected time: 10 minutes
-
Select
TexGenx64from the executable dropdown at the top-right of MO2 and hitRun:
Give it a couple of minutes to load.
-
When
TexGenis open, set its settings like this, then clickStartin bottom right: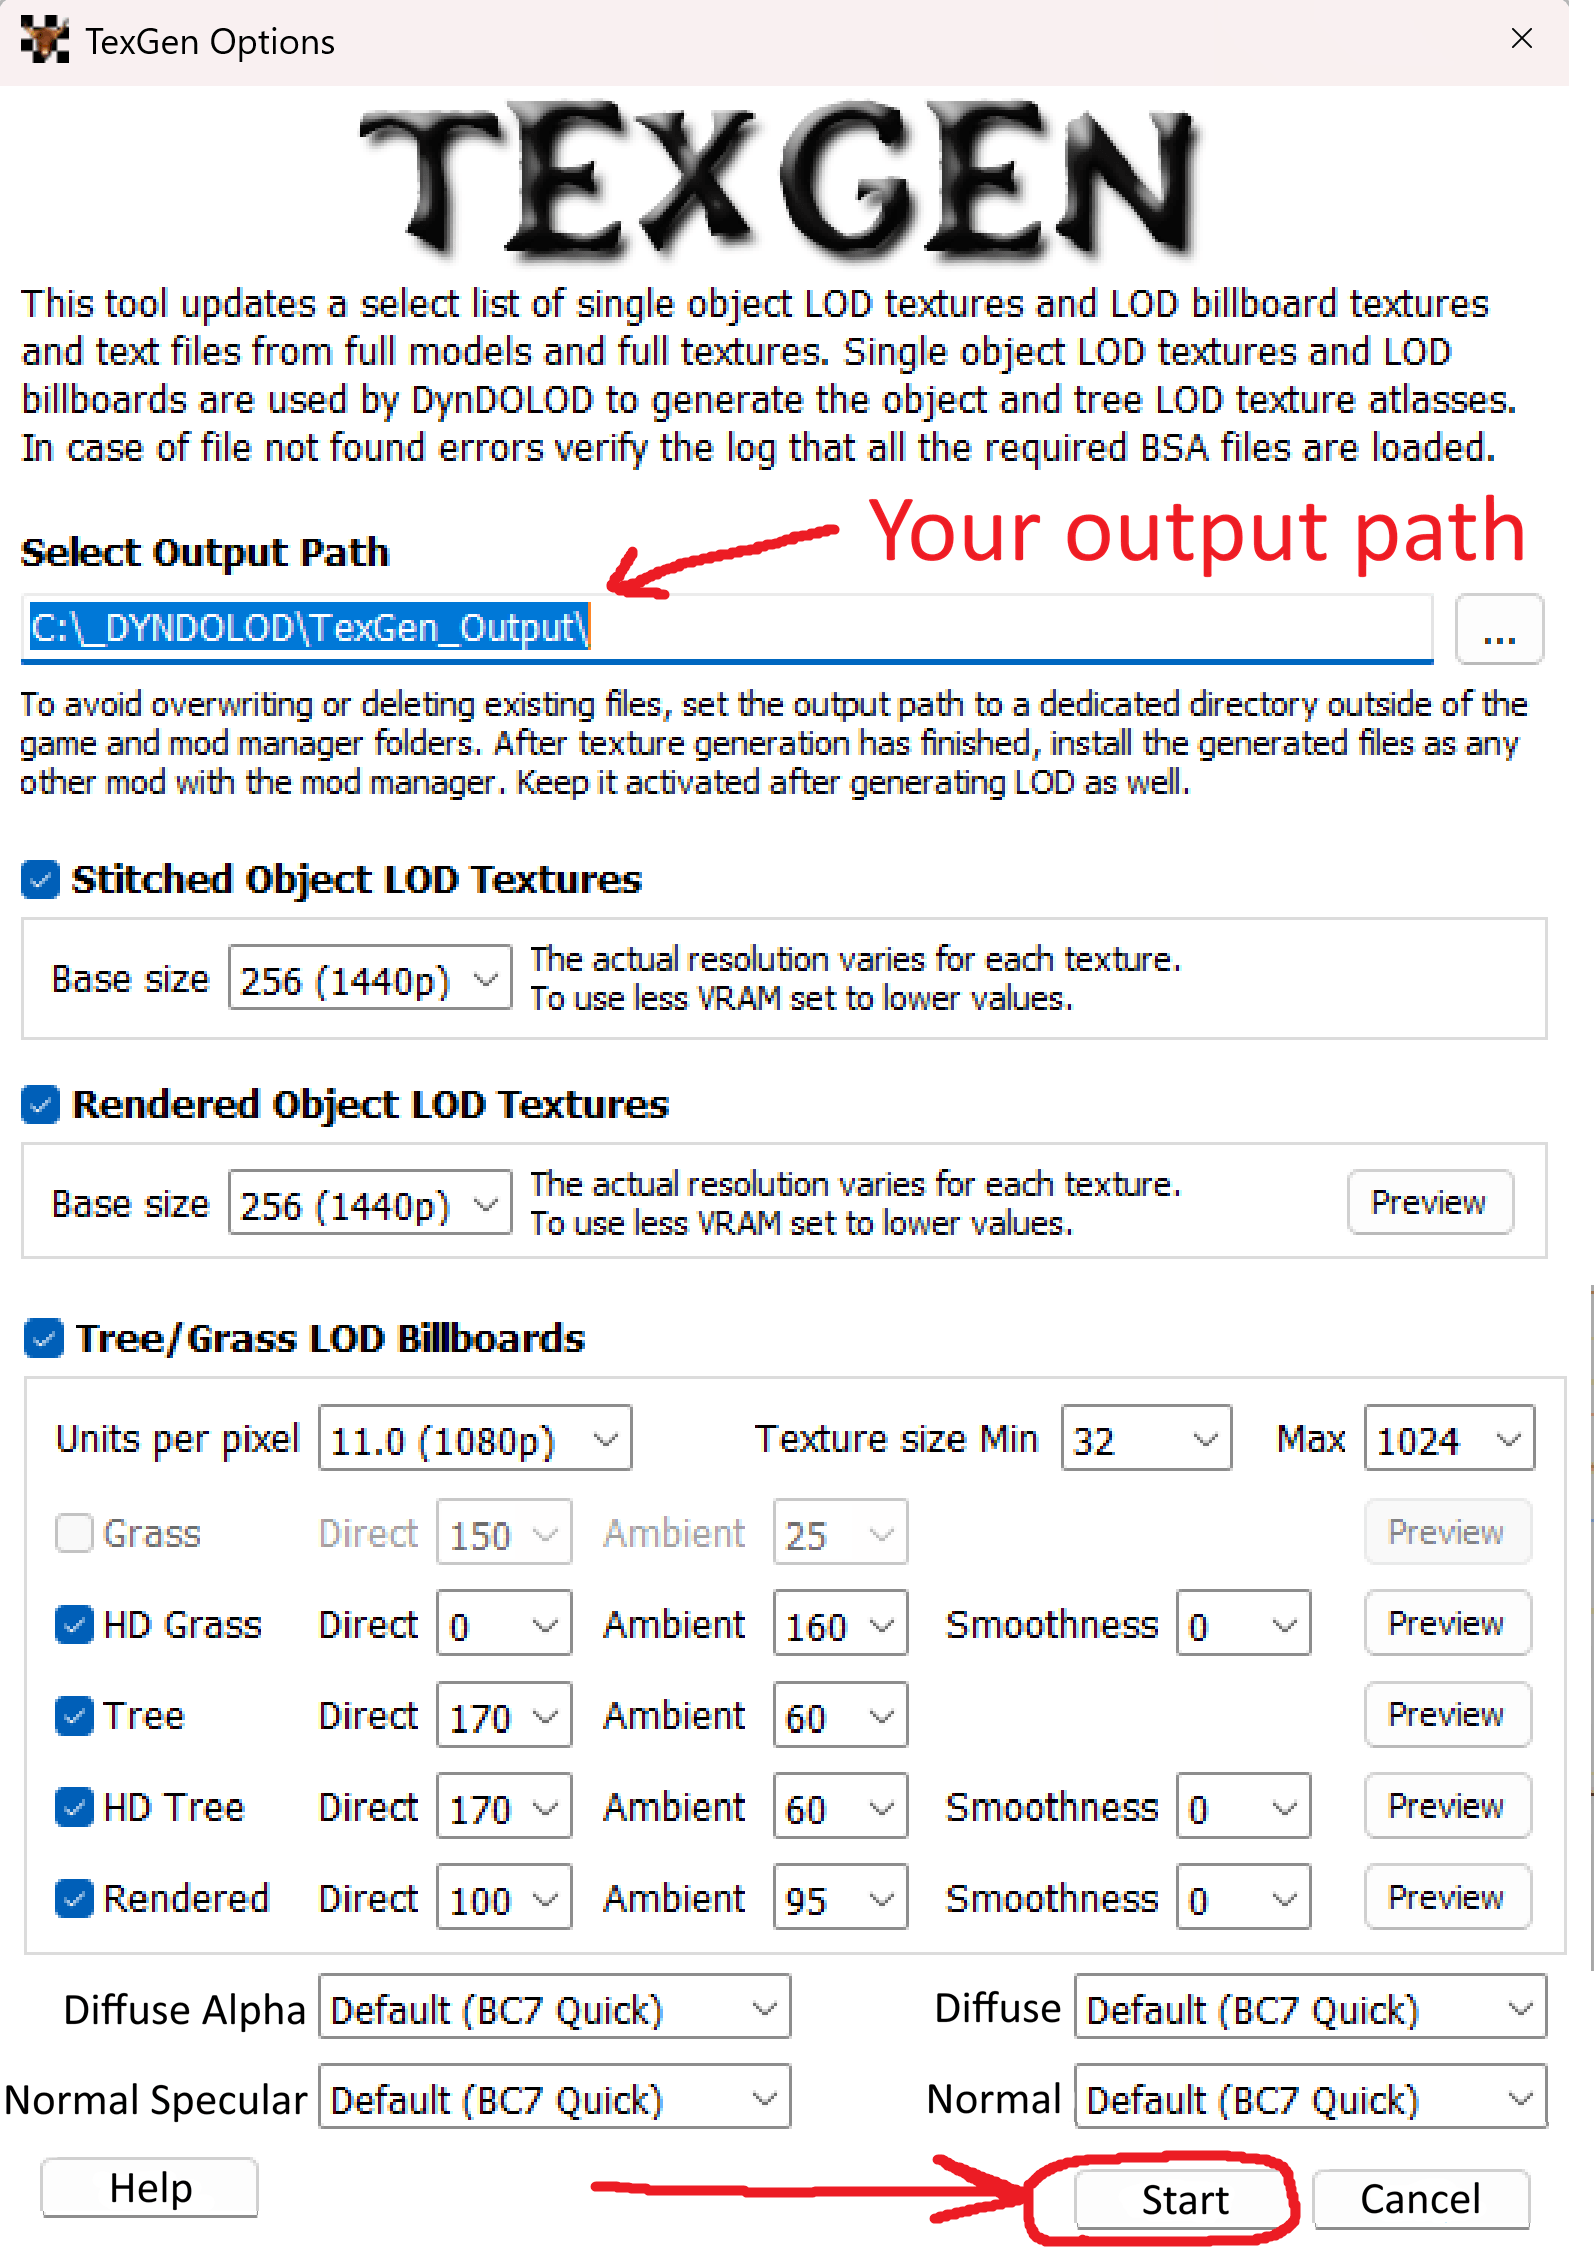
Text version of TexGen settings
From left to right, top to bottom:
Select Output Path- choose your output folder we've created during the General Preparation stepStitched Object LOD Textures- CheckedBase size- 256 (1440p)
Rendered Object LOD Textures- CheckedBase size- 256 (1440p)
Tree/Grass LOD Billboards- CheckedUnits per pixel- 11.0 (1080p)Texture size Min- 32Texture size Max- 1024Grass- NOT checkedHD Grass- CheckedDirect- 0Ambient- 160Smoothness- 0
Tree- CheckedDirect- 170Ambient- 60
HD Tree- CheckedDirect- 170Ambient- 60Smoothness- 0
Rendered- CheckedDirect- 100Ambient- 95Smoothness- 0
Diffuse Alpha- Default (BC7 Quick)Diffuse- Default (BC7 Quick)Normal Specular- Default (BC7 Quick)Normal- Default (BC7 Quick)
TexGenwould run now, it would be fast (around 5 minutes).
Licentia Next, as delivered, will not cause any errors in TexGen. Mods that you have added may cause errors, and any errors will need to be corrected before it can complete. The nature of the error and possible corrections are available from DynDOLOD by clicking on the links in the error message.
-
When
TexGenfinishes running, you'd be presented with this popup - clickExit TexGen(the program would close after):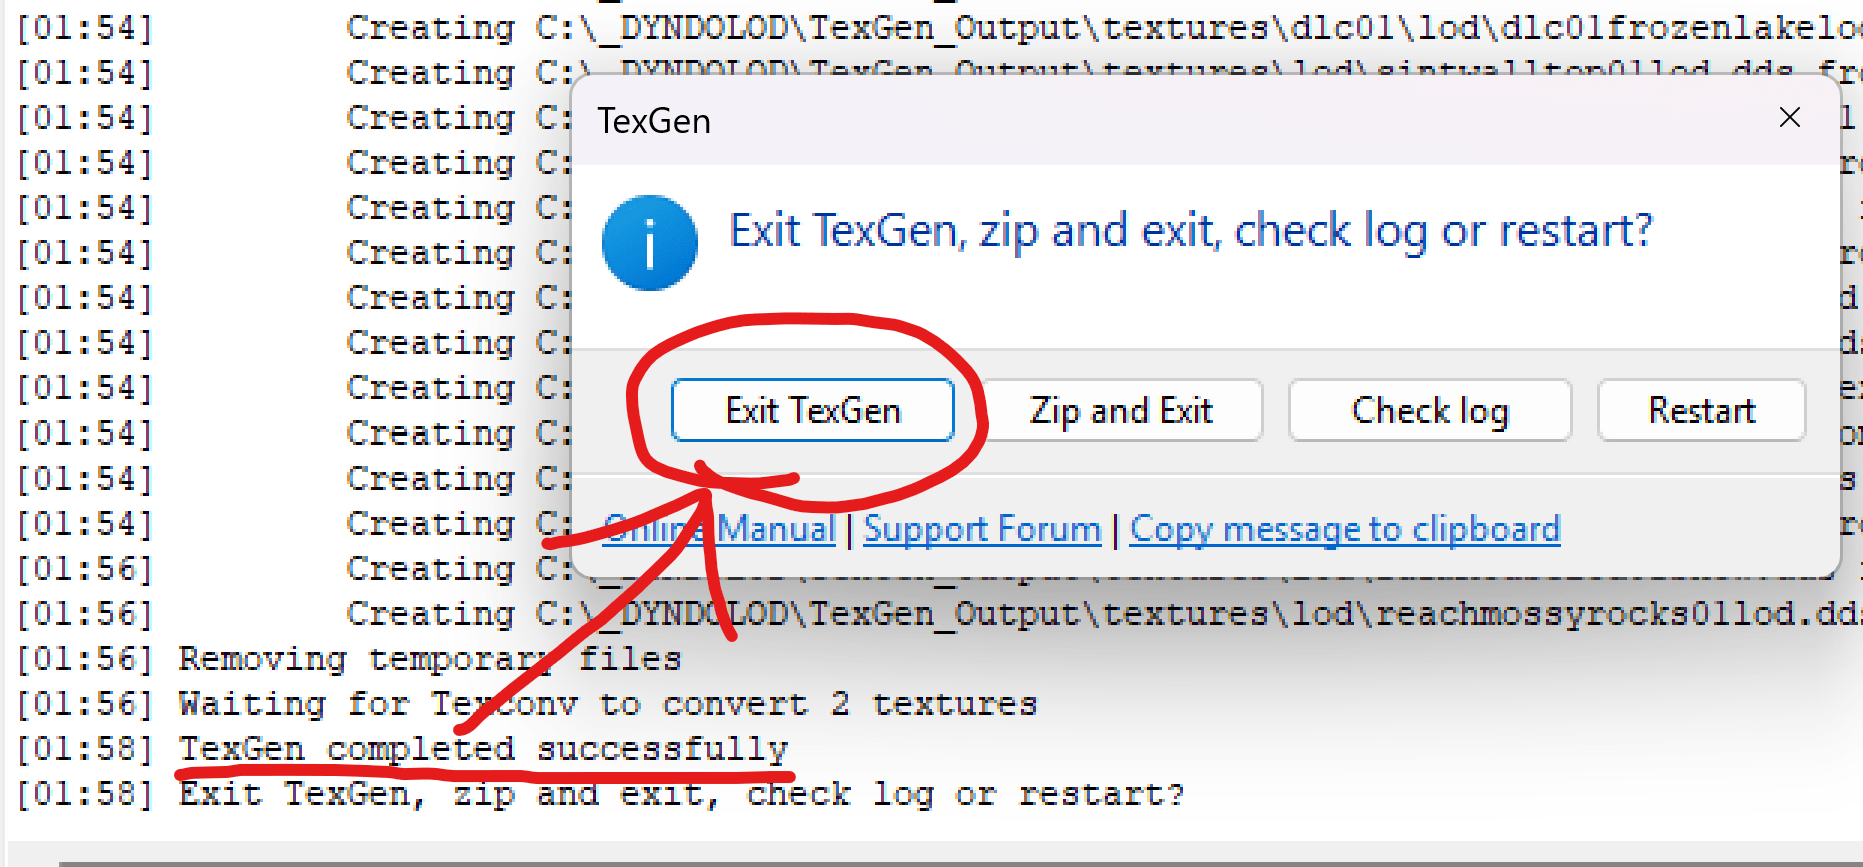
-
Done! Proceed to installing its output below.
Install TexGen Output
-
Navigate to your
C:\_DYNDOLOD\TexGen_Outputfolder, you would see thetexturesfolder there. -
Now:
- Add the
texturesfolder (not theTexGen_Outputfolder itself) to archive (via 7zip or any other tool) in.zipformat - Copy the resulting archive to your Licentia downloads folder (for example
C:\Licentia NEXT\Downloads).
- Add the
-
In the
Mod Organizer 2, you would see theTexGen_Output.zipat theDownloadssection on the right. If you don't see it - clickRefreshon the left.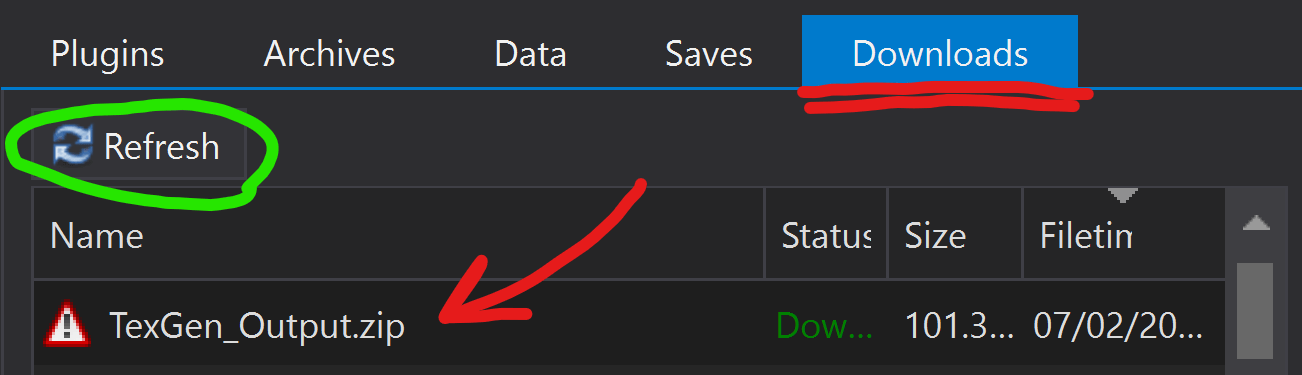
-
Double-click the
TexGen_Output.zip, and when prompted forQuick Install- just pressOk: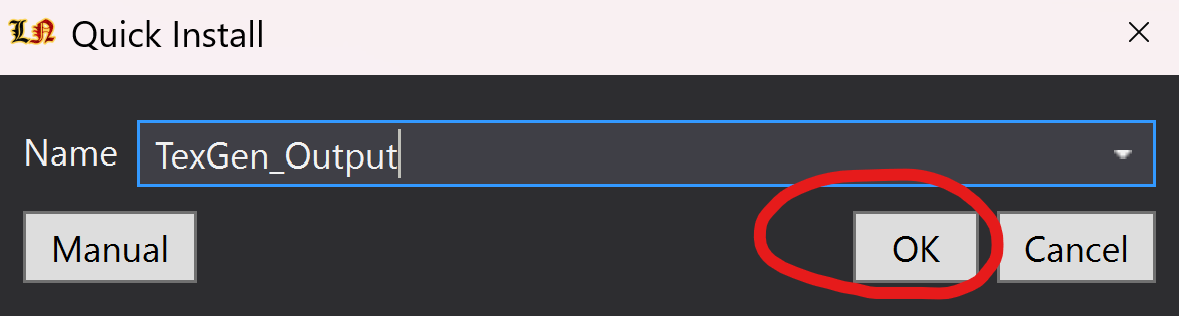
It would take a minute, so just wait.
-
The mod would appear at the bottom of the mods' list on the left:
-
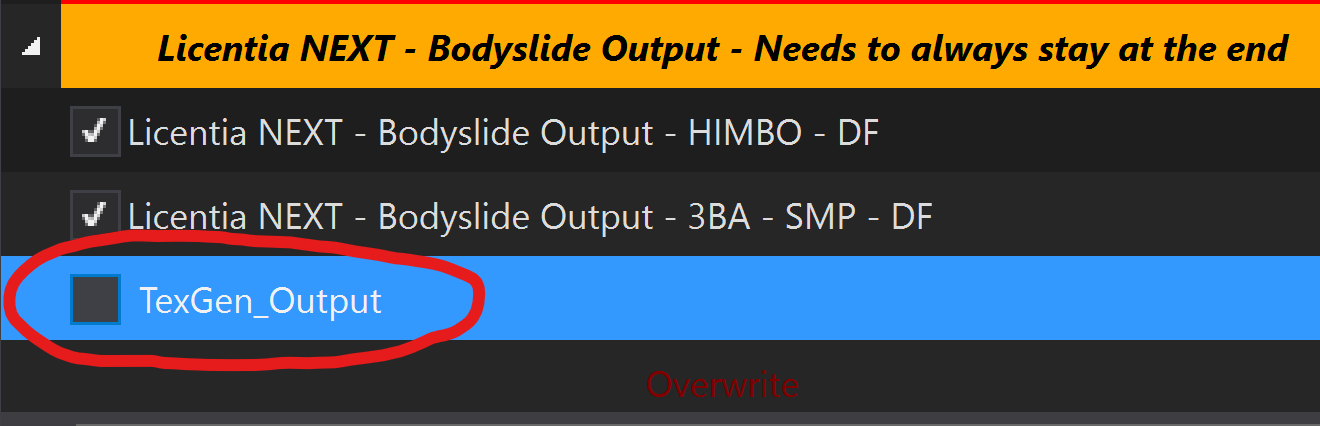
Drag it to the
Licentia NEXT - LOD Outputseparator, put it under the disabledLicentia NEXT - TexGen Outputmod, and enable it. The result would look like this: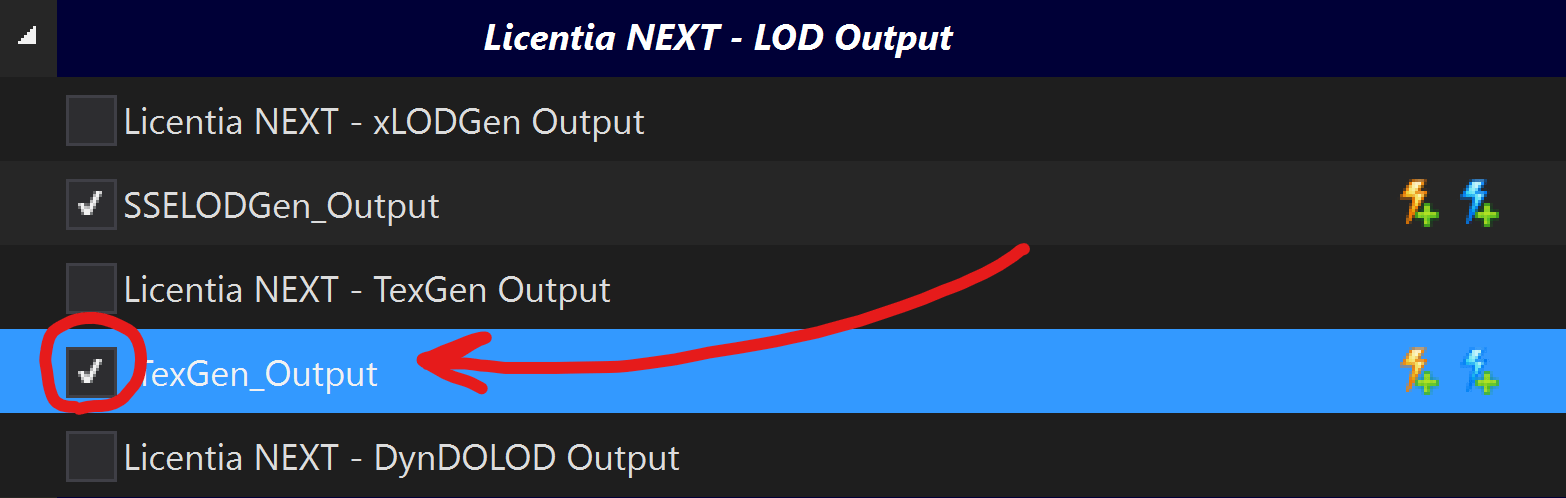
Done! Proceed to the next step.
Run DynDOLOD
🕐 Expected time: 50 minutes
-
In
Mod Organizer 2at top-right selectDynDOLODx64from the executable dropdown and hitRun:
Give it a couple of minutes to load.
-
In the top left section of the new
DynDOLOD Expertwindow right-click inside theWorldspacesbox and chooseSelect All: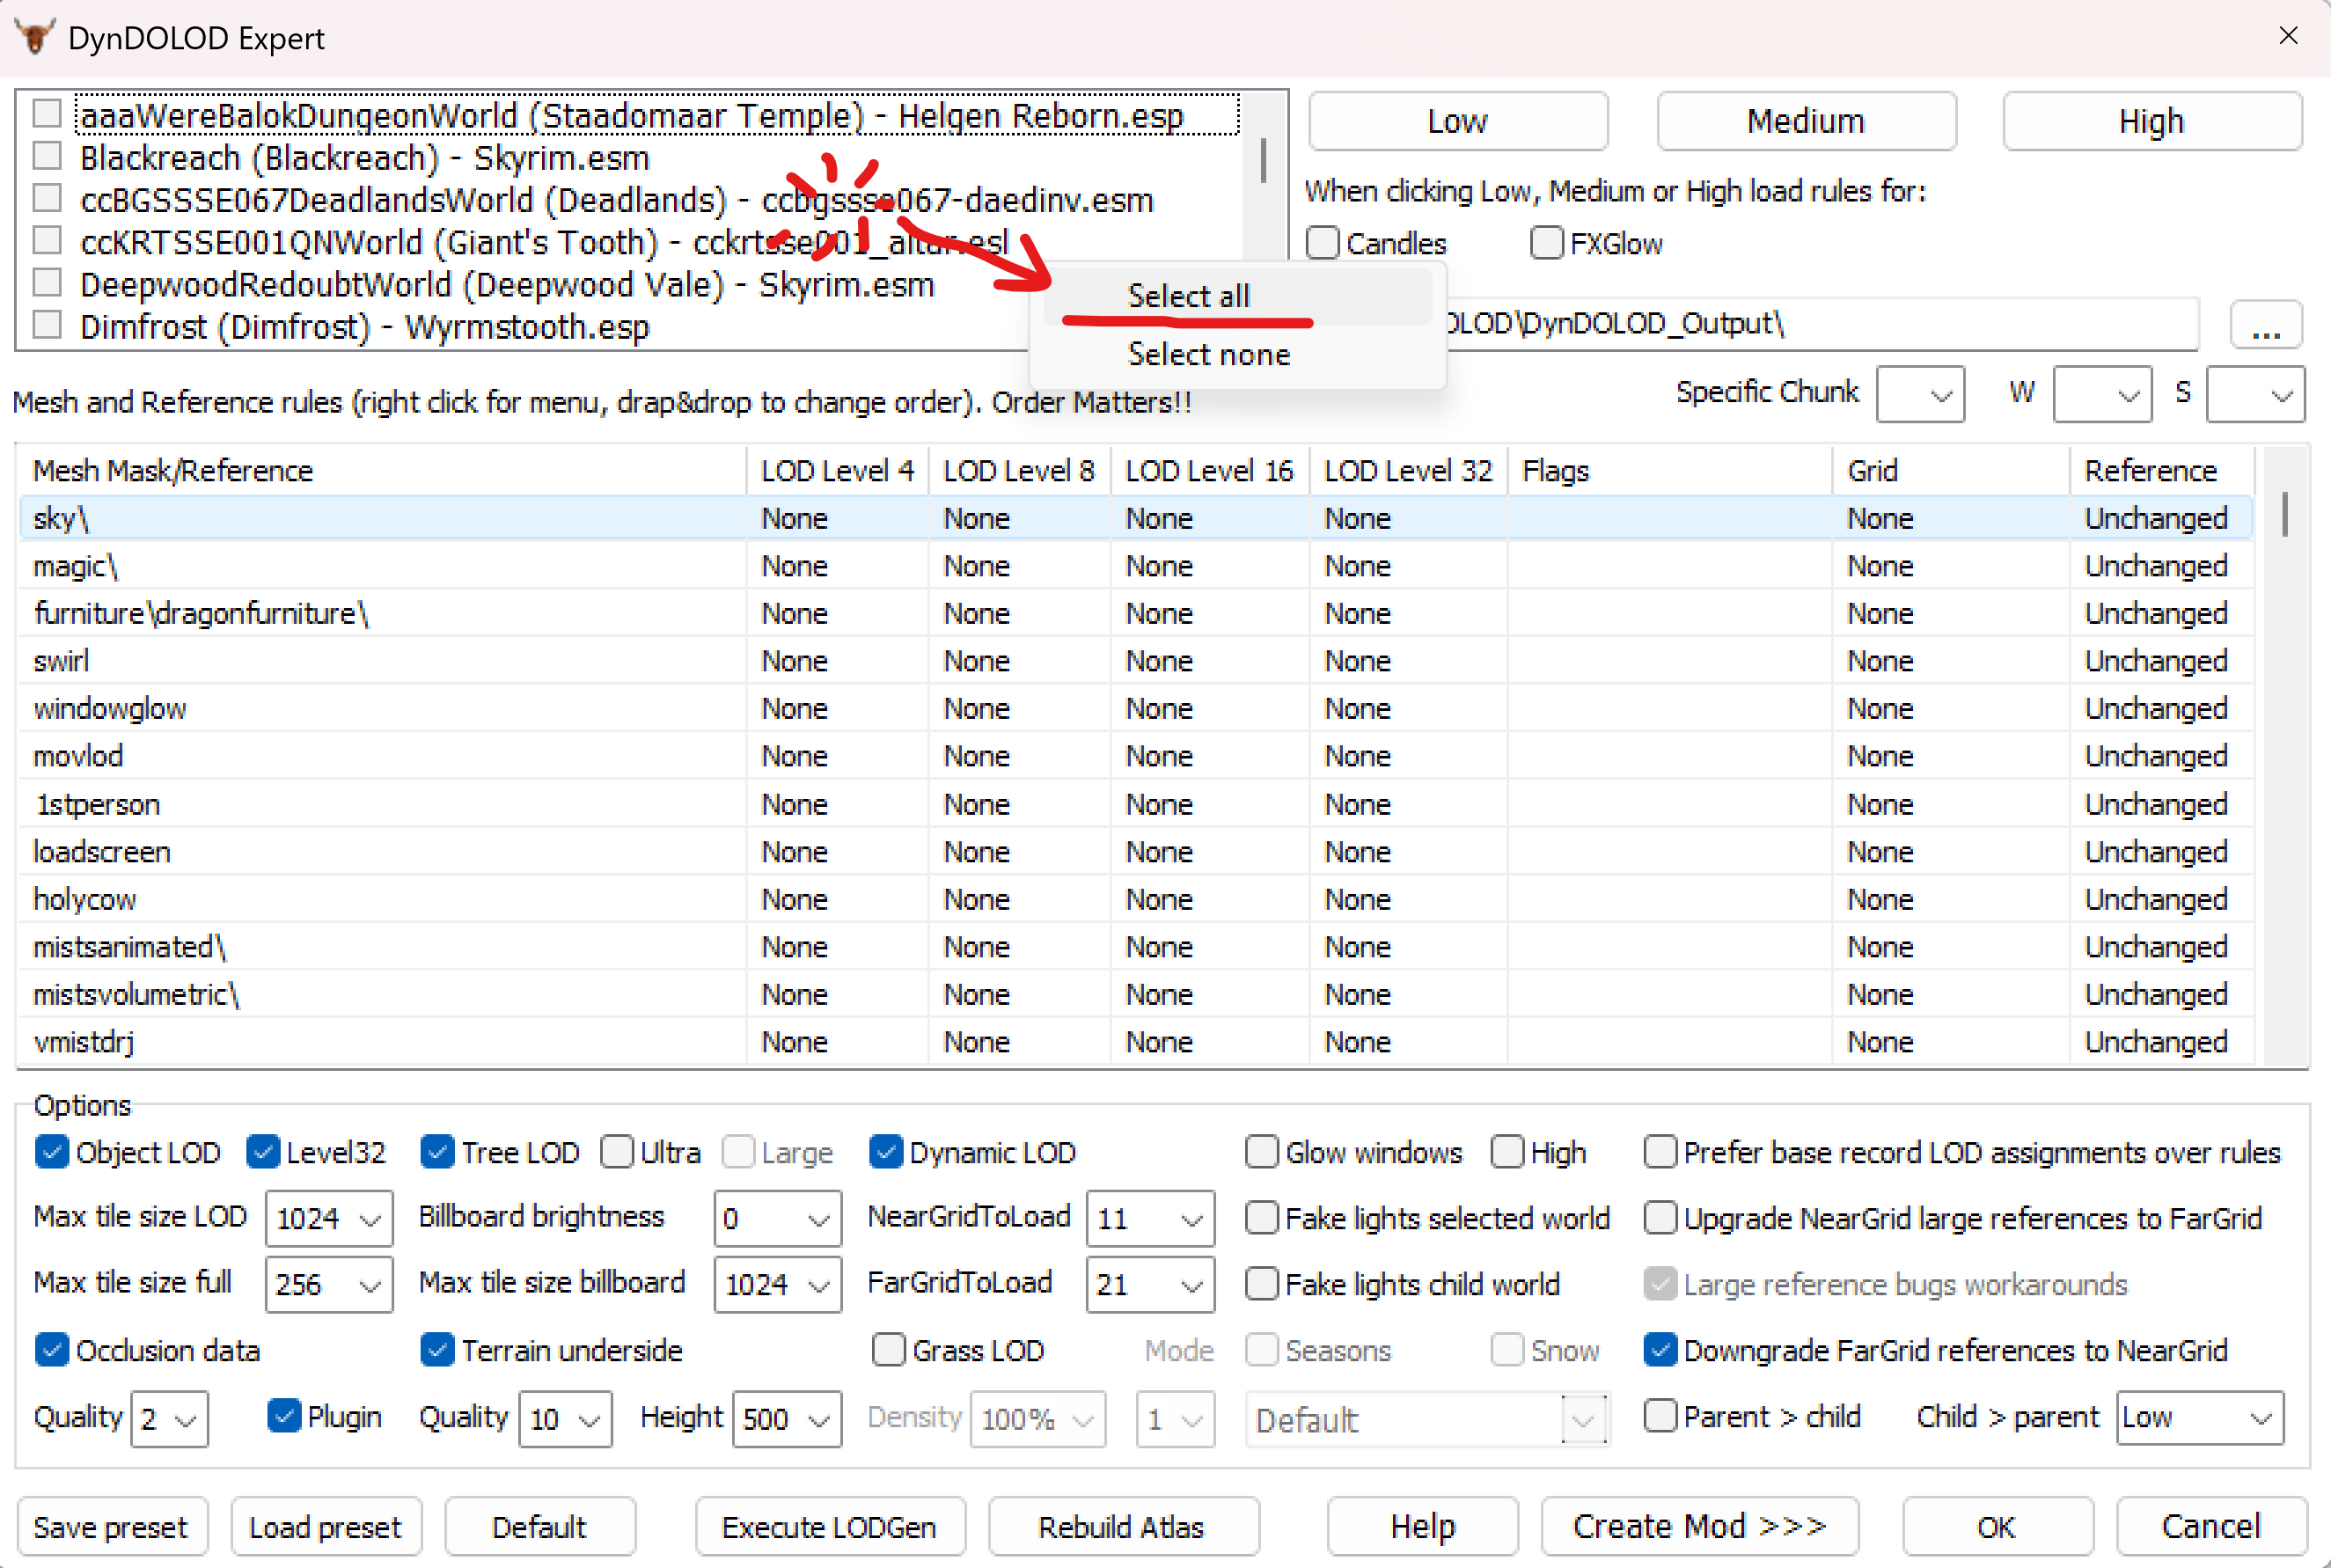
-
In the top right section check
Candles(1) andFXGlow(2), then clickHigh(3). Don't forget to make sure that you've set the output path to the folder we've prepared in General Preparation step above (4) - you can click...to select the folder: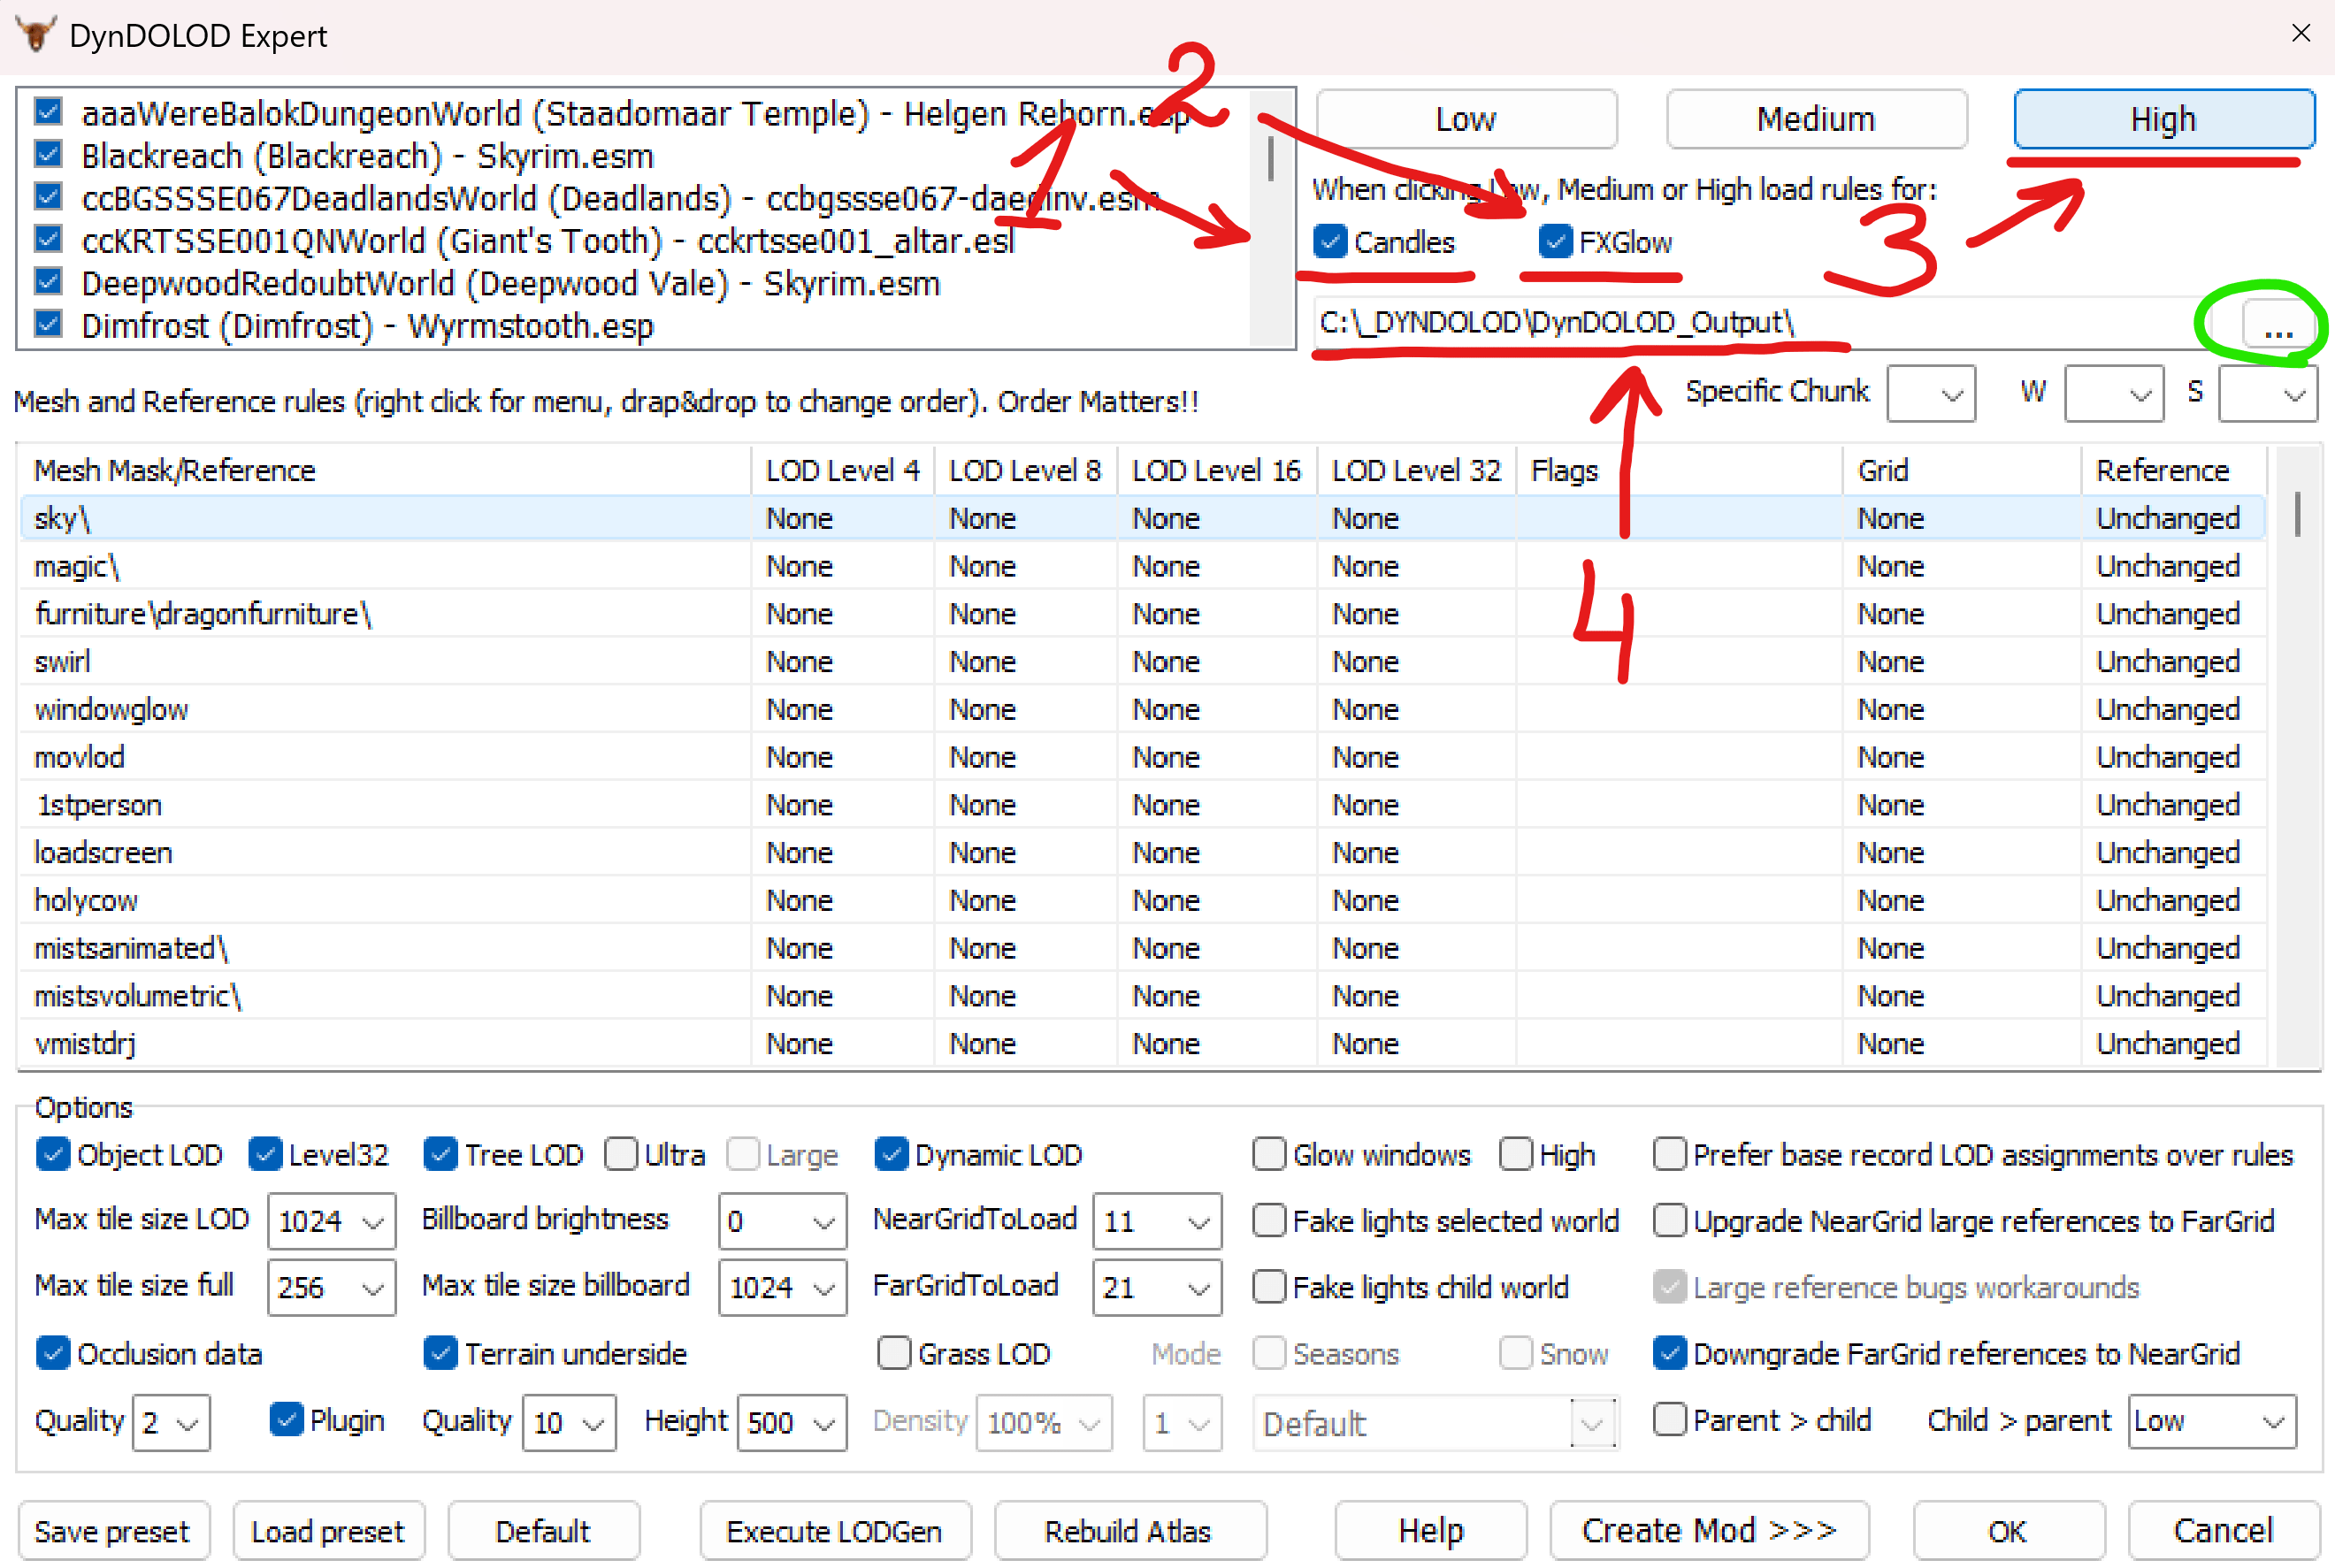
-
Now we'd work on the
Optionscategory at the bottom of the screen. We'd go line by line, left to right, top to bottom (the list will be numbered continuously):-
Line 1:
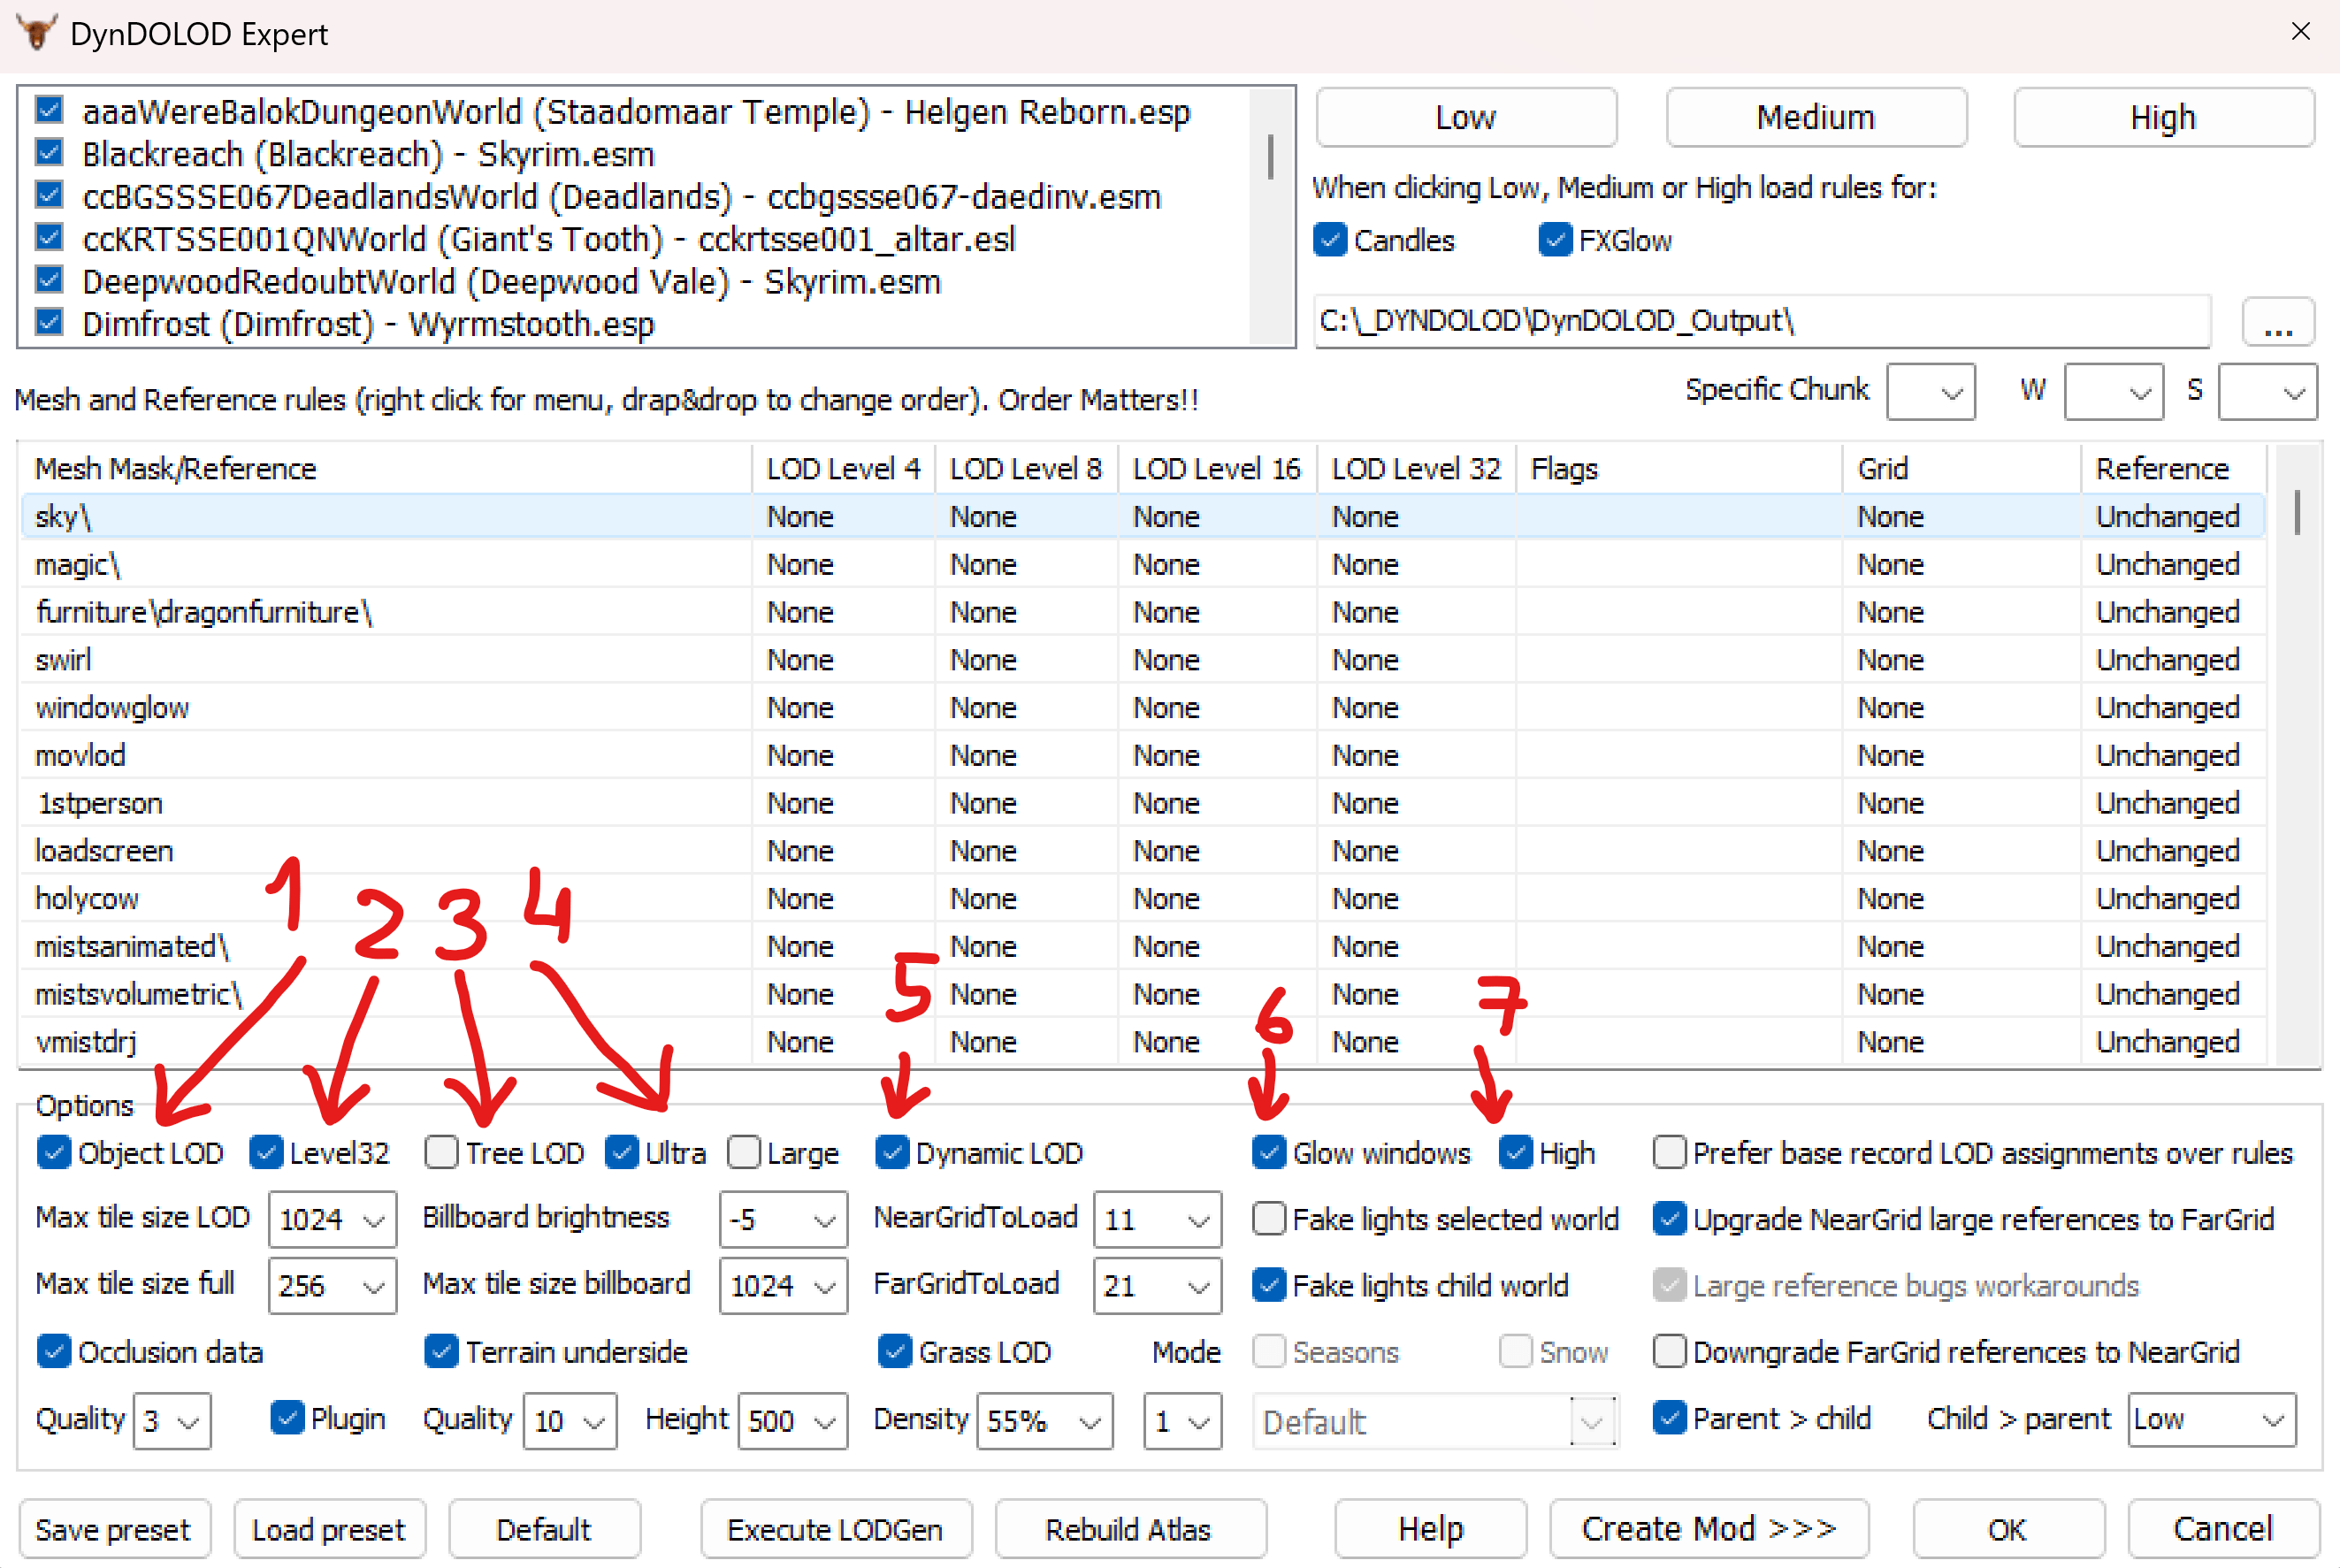
Text version of Options block - Line 1
1.
Object LOD- Checked2.
Level32- Checked3.
Tree LOD- NOT checked (would uncheck automatically whenUltrais checked)4.
Ultra- Checked5.
Dynamic LOD- Checked6.
Glow windows- Checked7.
High- Checked -
Line 2:
Text version of Options block - Line 2
8.
Max tile size LOD- 10249.
Billboard brightness--510.
Upgrade NearGrid large references to FarGrid- Checked -
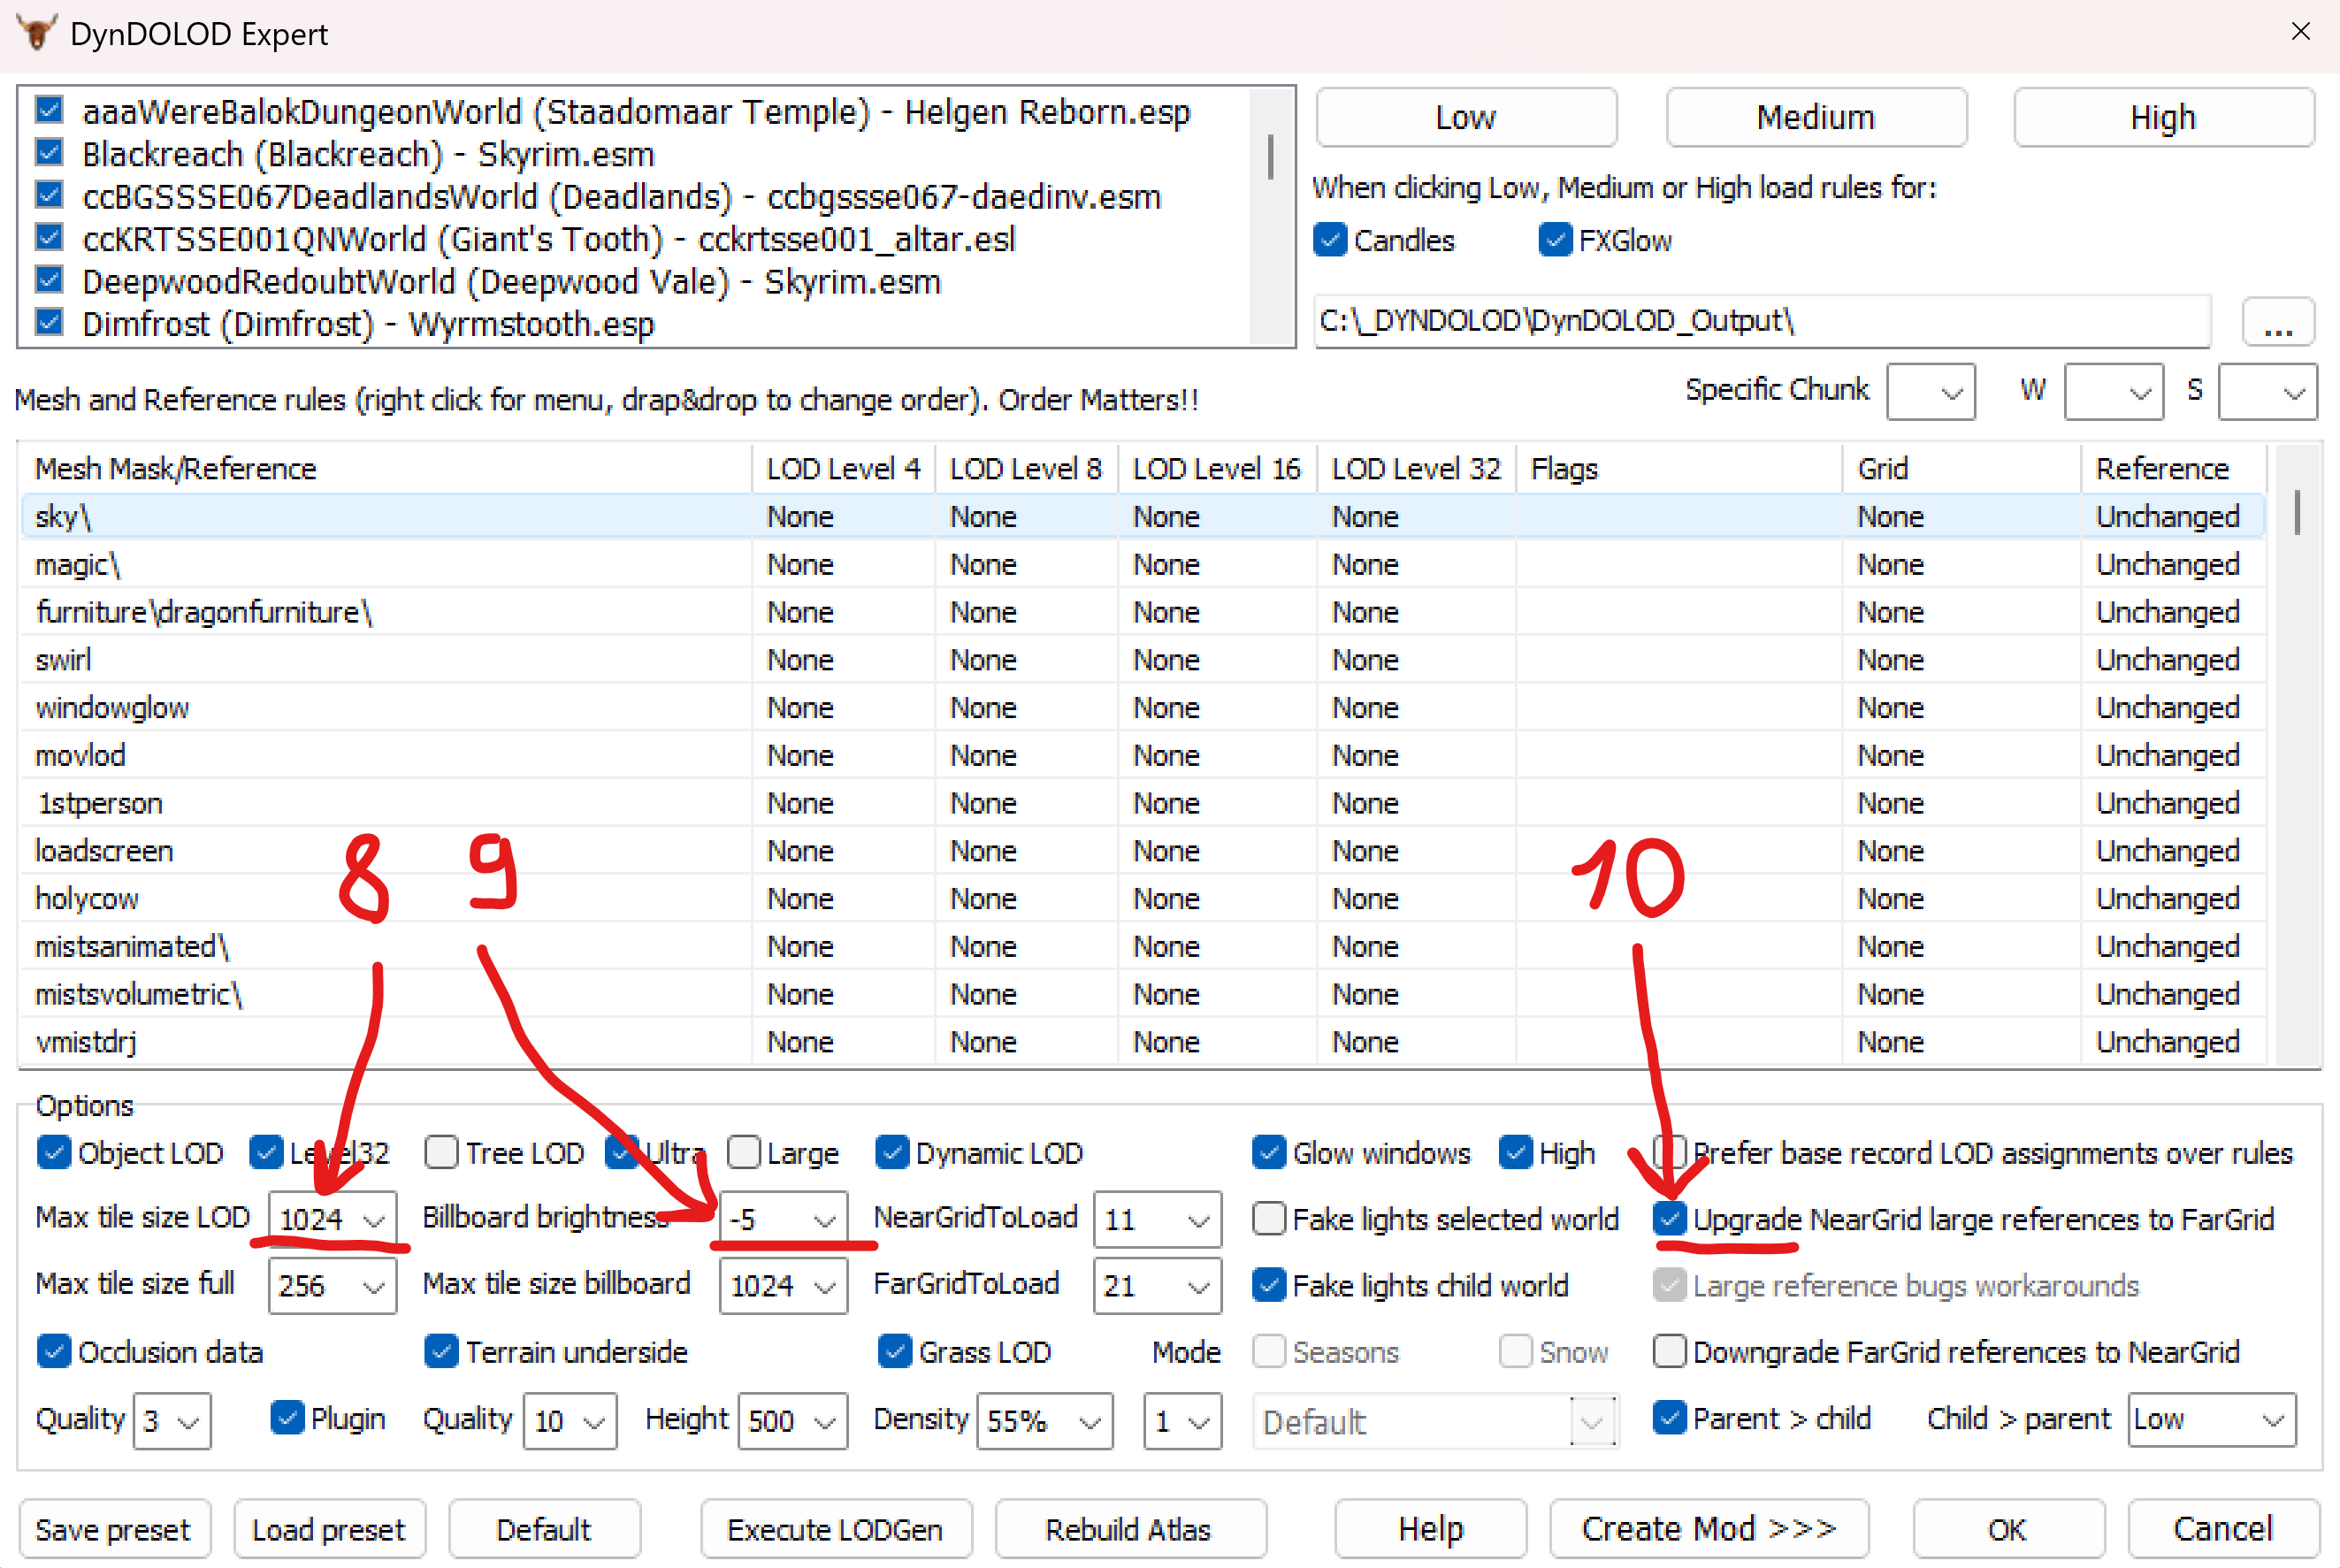
Line 3:
Text version of Options block - Line 3
11.
Max tile size full- 25612.
Max tile size billboard- 102413.
Fake lights child world- Checked -
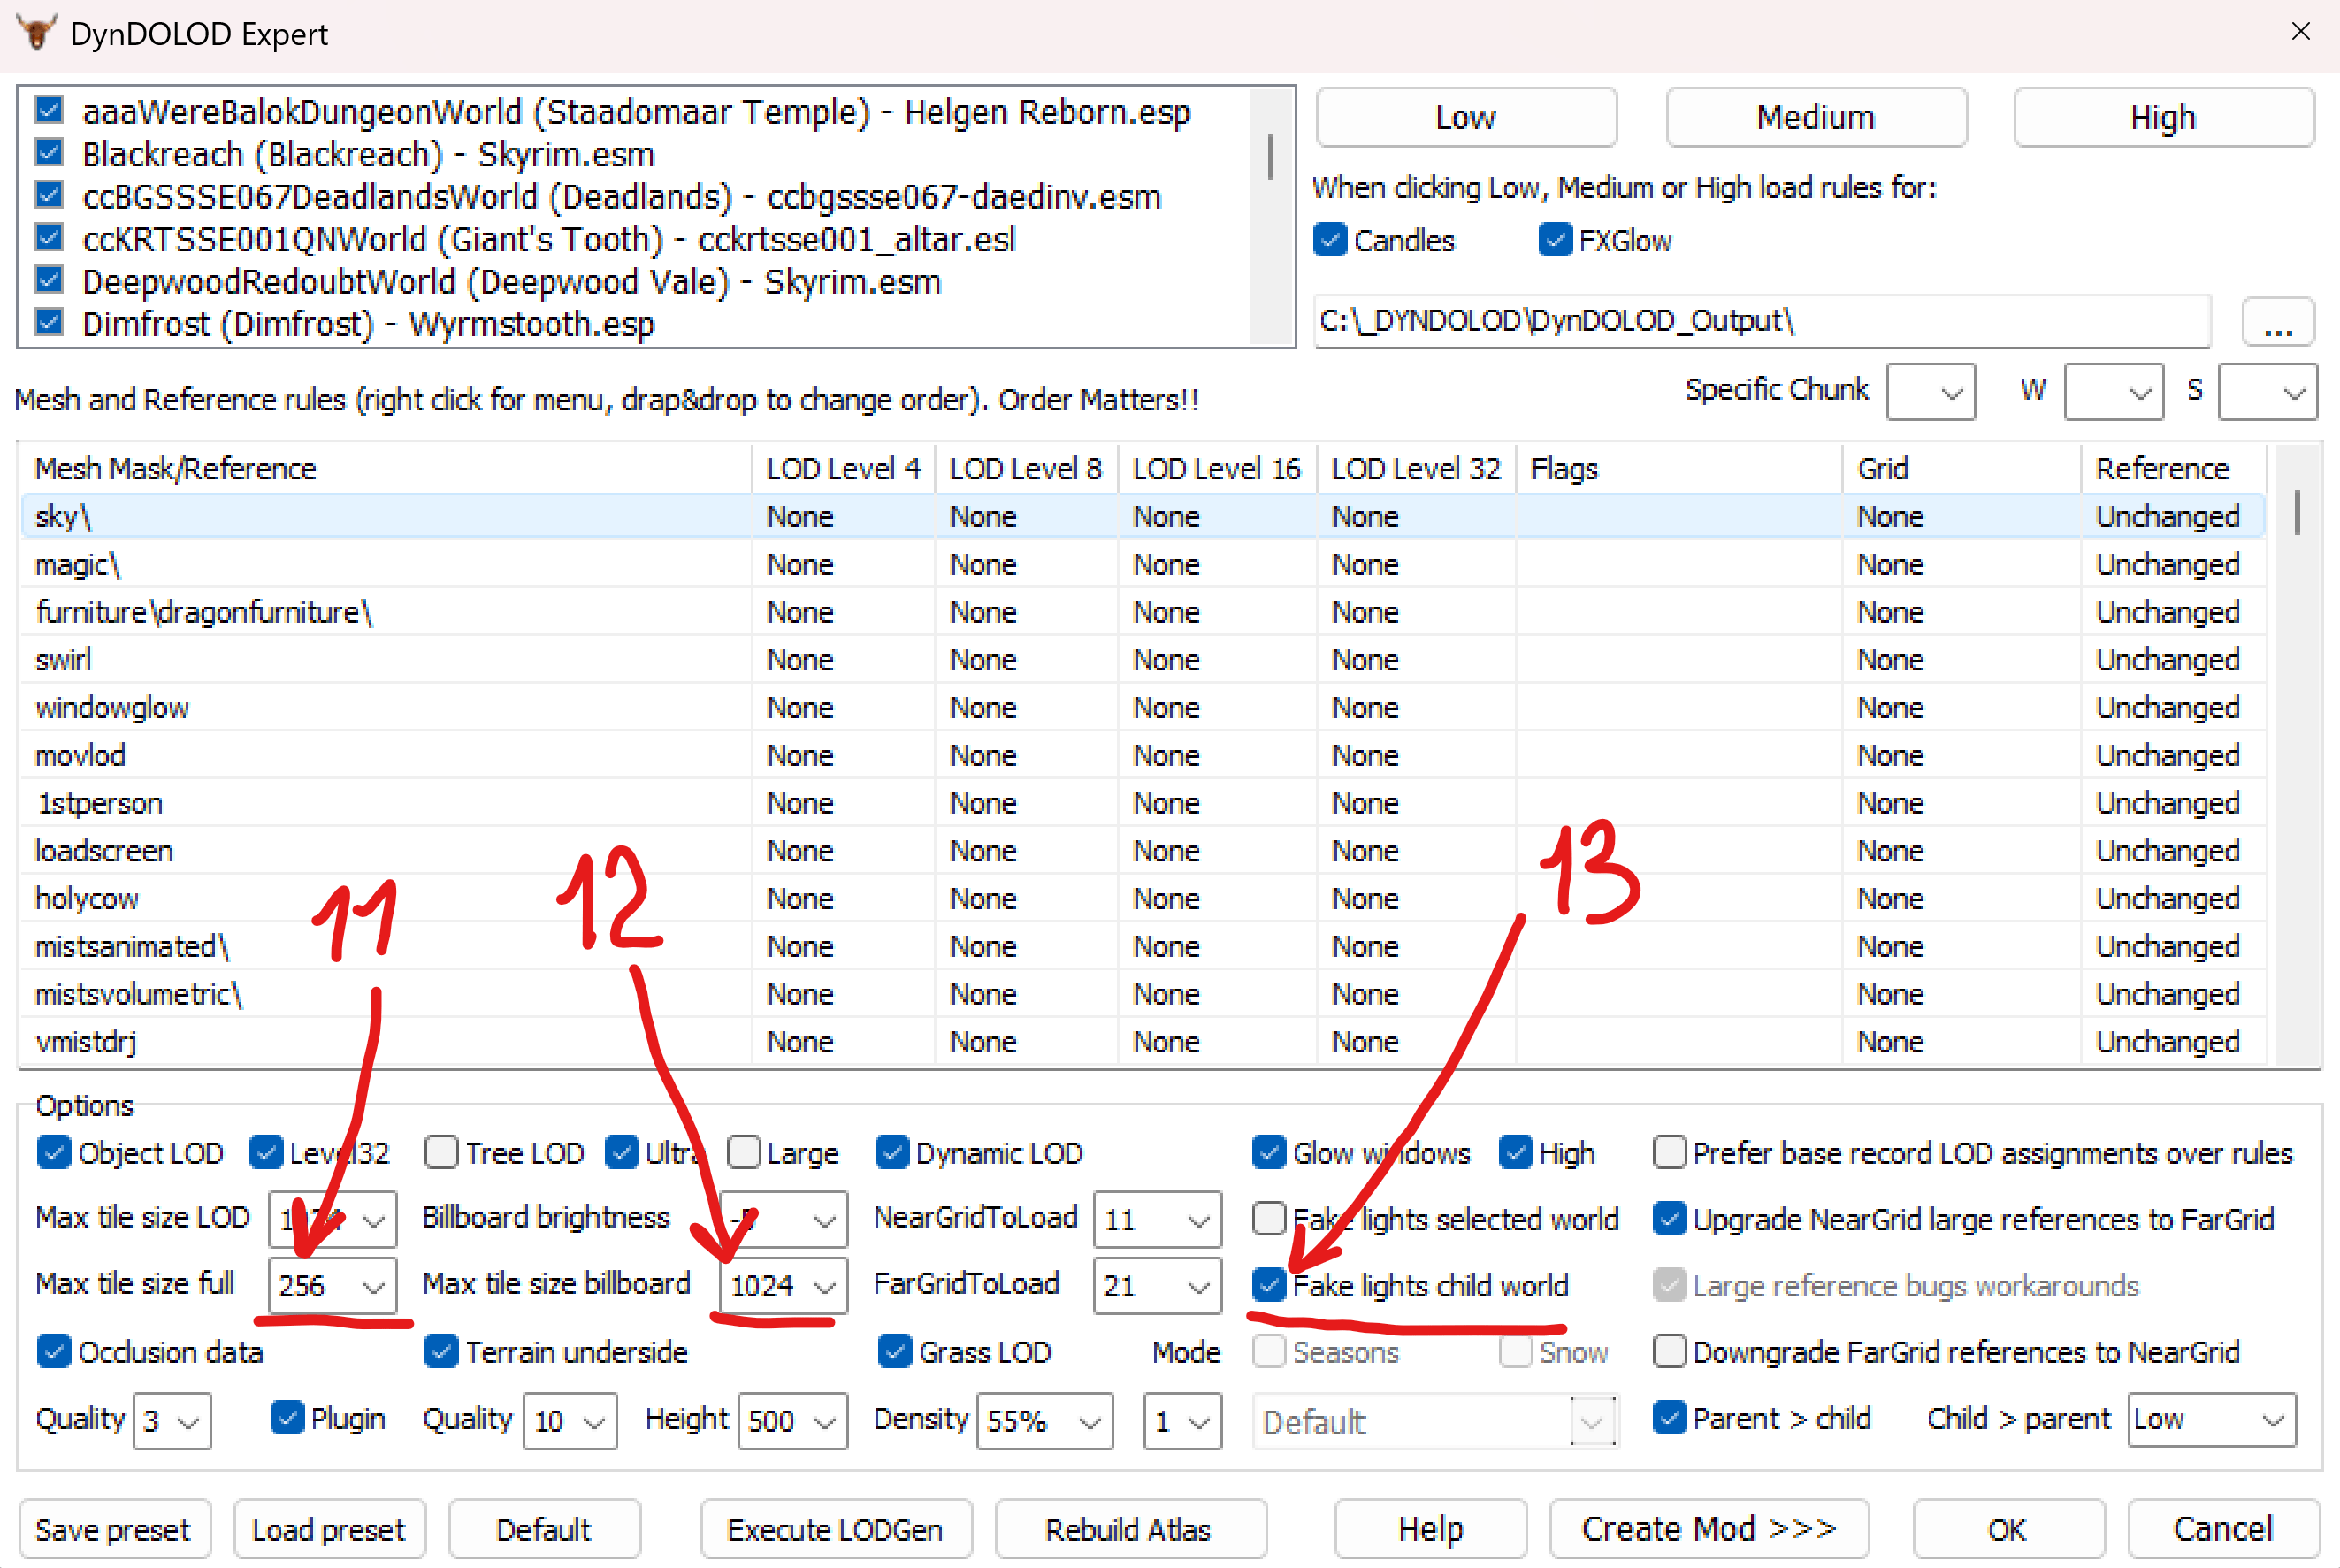
Line 4:
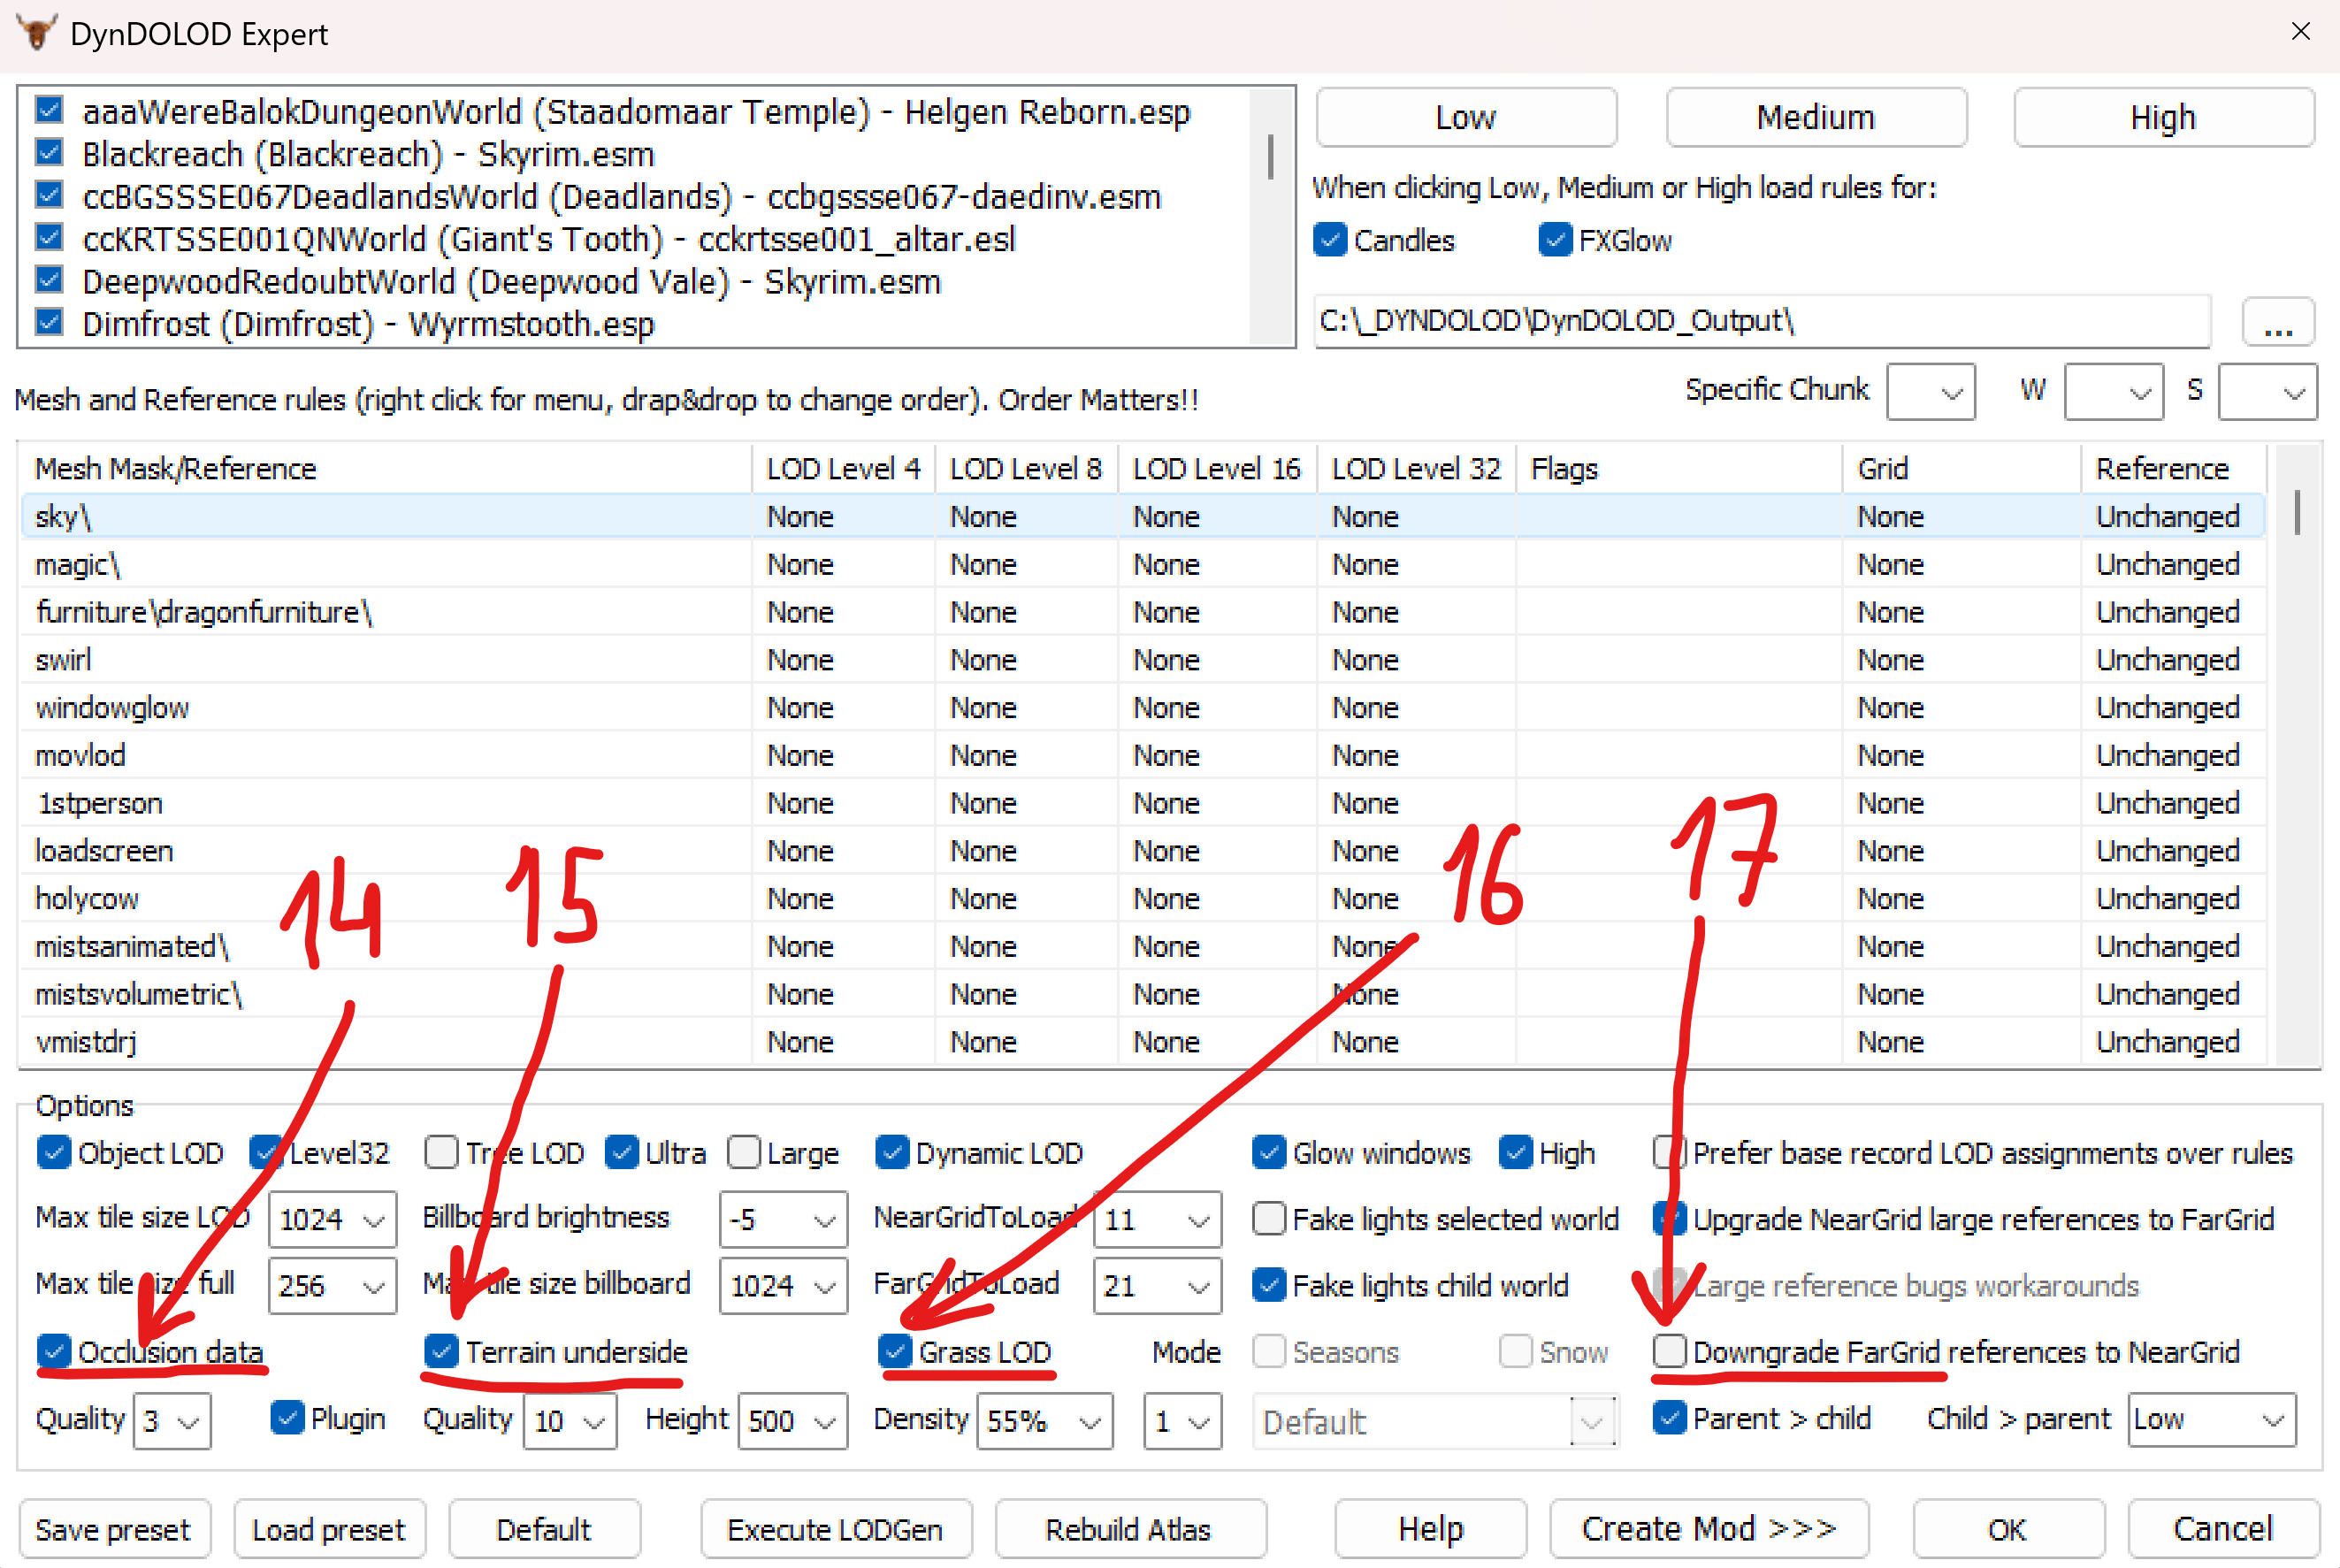
Text version of Options block - Line 4
14.
Occlusion data- Checked15.
Terrain underside- Checked16.
Grass LOD- Checked17.
Downgrade FarGrid refrences to NearGrid- NOT checked -
Line 5:
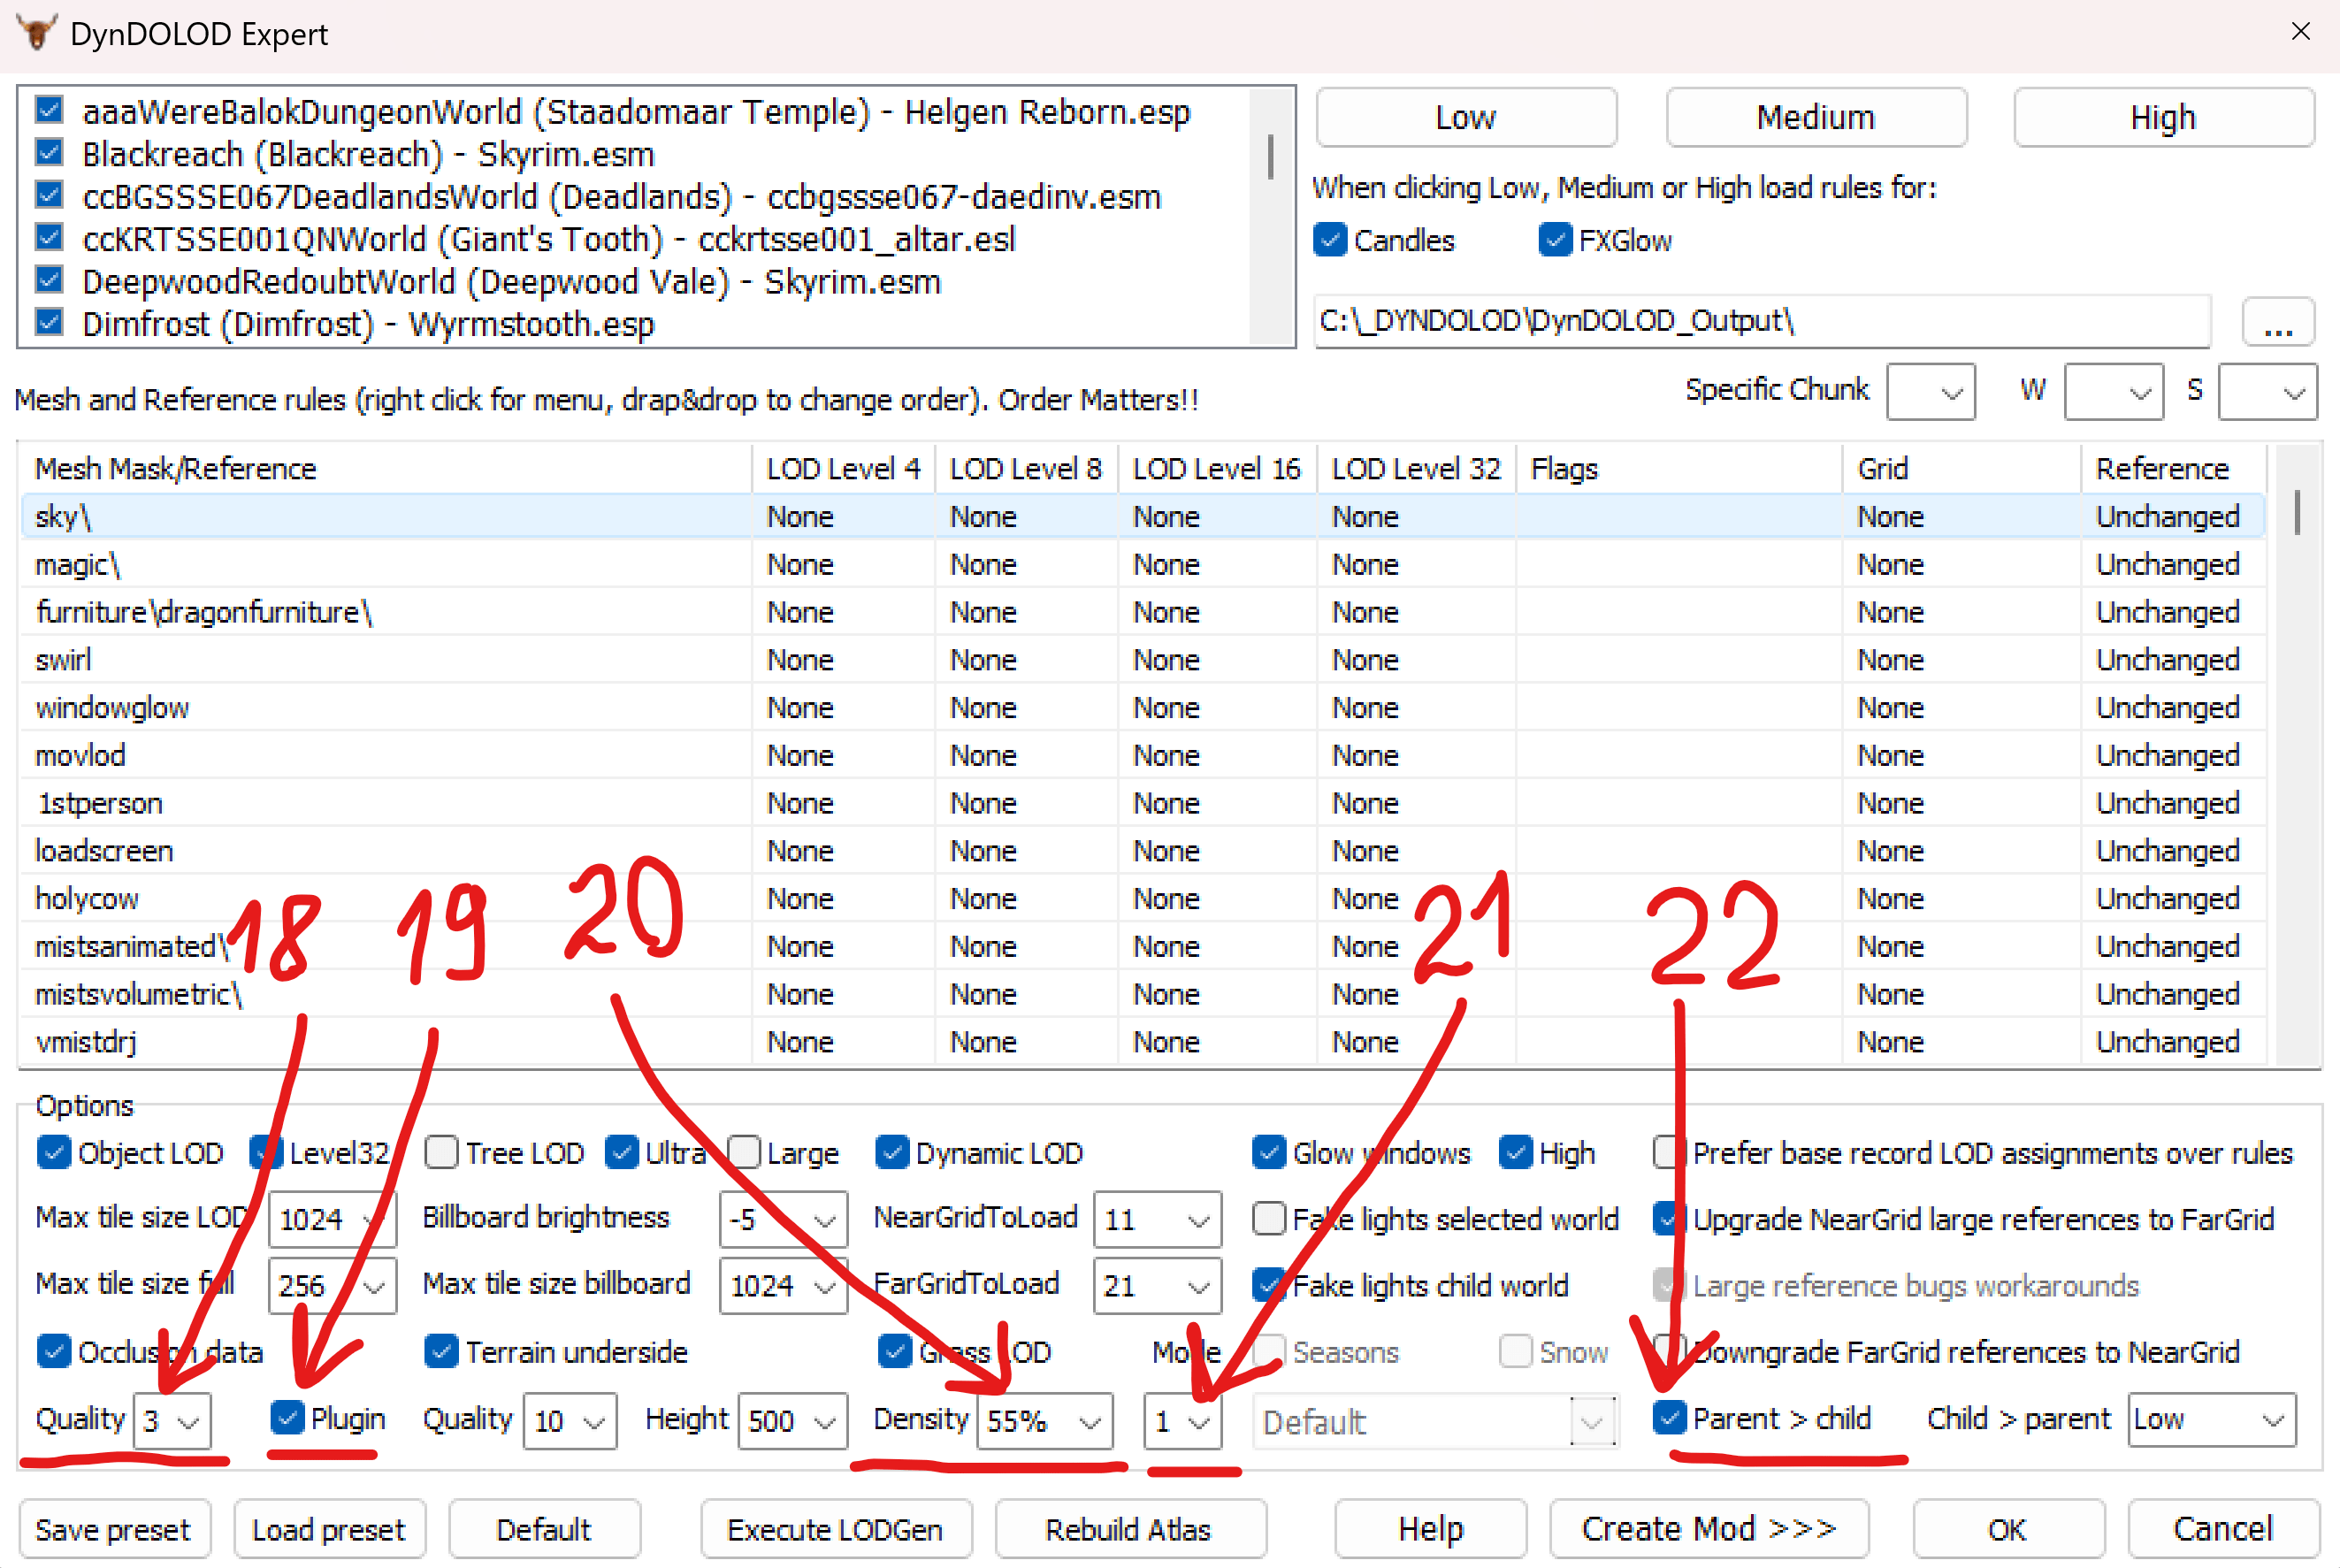
Text version of Options block - Line 5
18.
Quality- 319.
Plugin- Checked20.
Density- 55%21.
Mode- 122.
Parent > child- Checked
-
-
Now in the main window's
Mesh and Reference rulesblock: scroll down to thetreerecord, double-click it (1), then in the newly opened window changeLOD Level 8toBillboard4andLOD Level 32toBillboard6(2), and clickOkat the bottom right (3):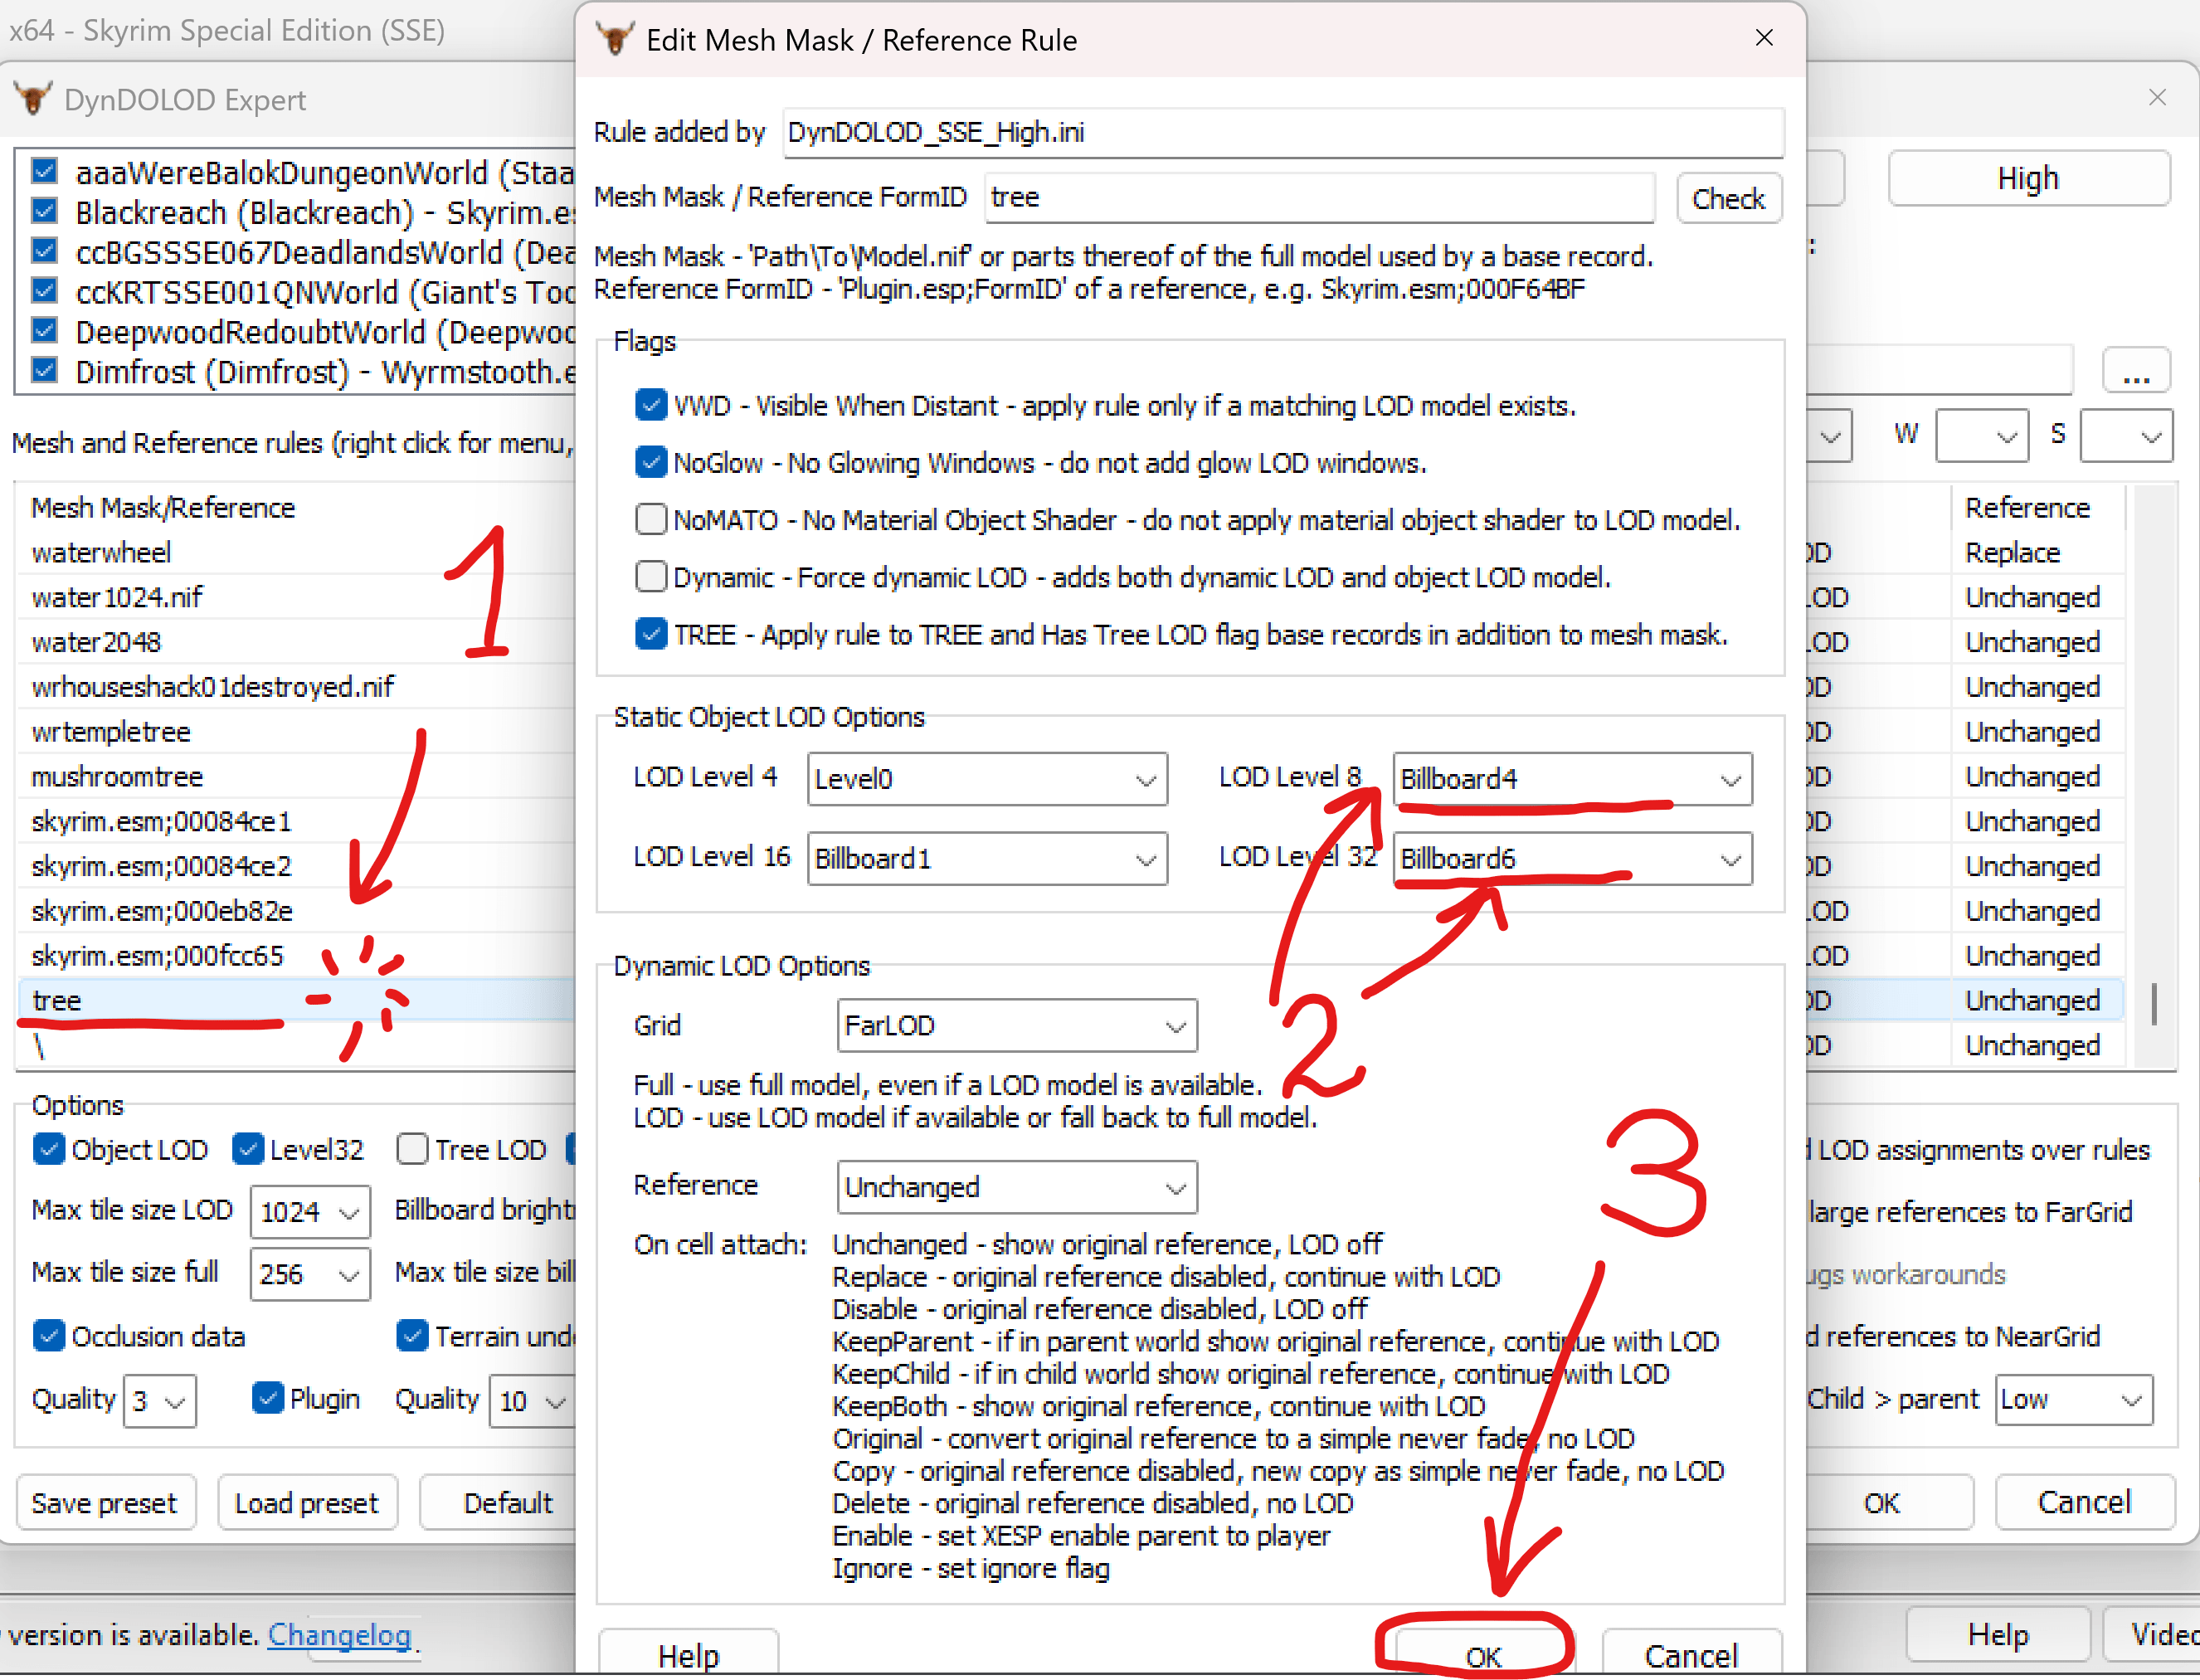
-
In the same main window right under
treerecord there is a\recod: double-click it (1), then in the newly opened window changeLOD Level 32toLevel0(2), and clickOkat the bottom right (3):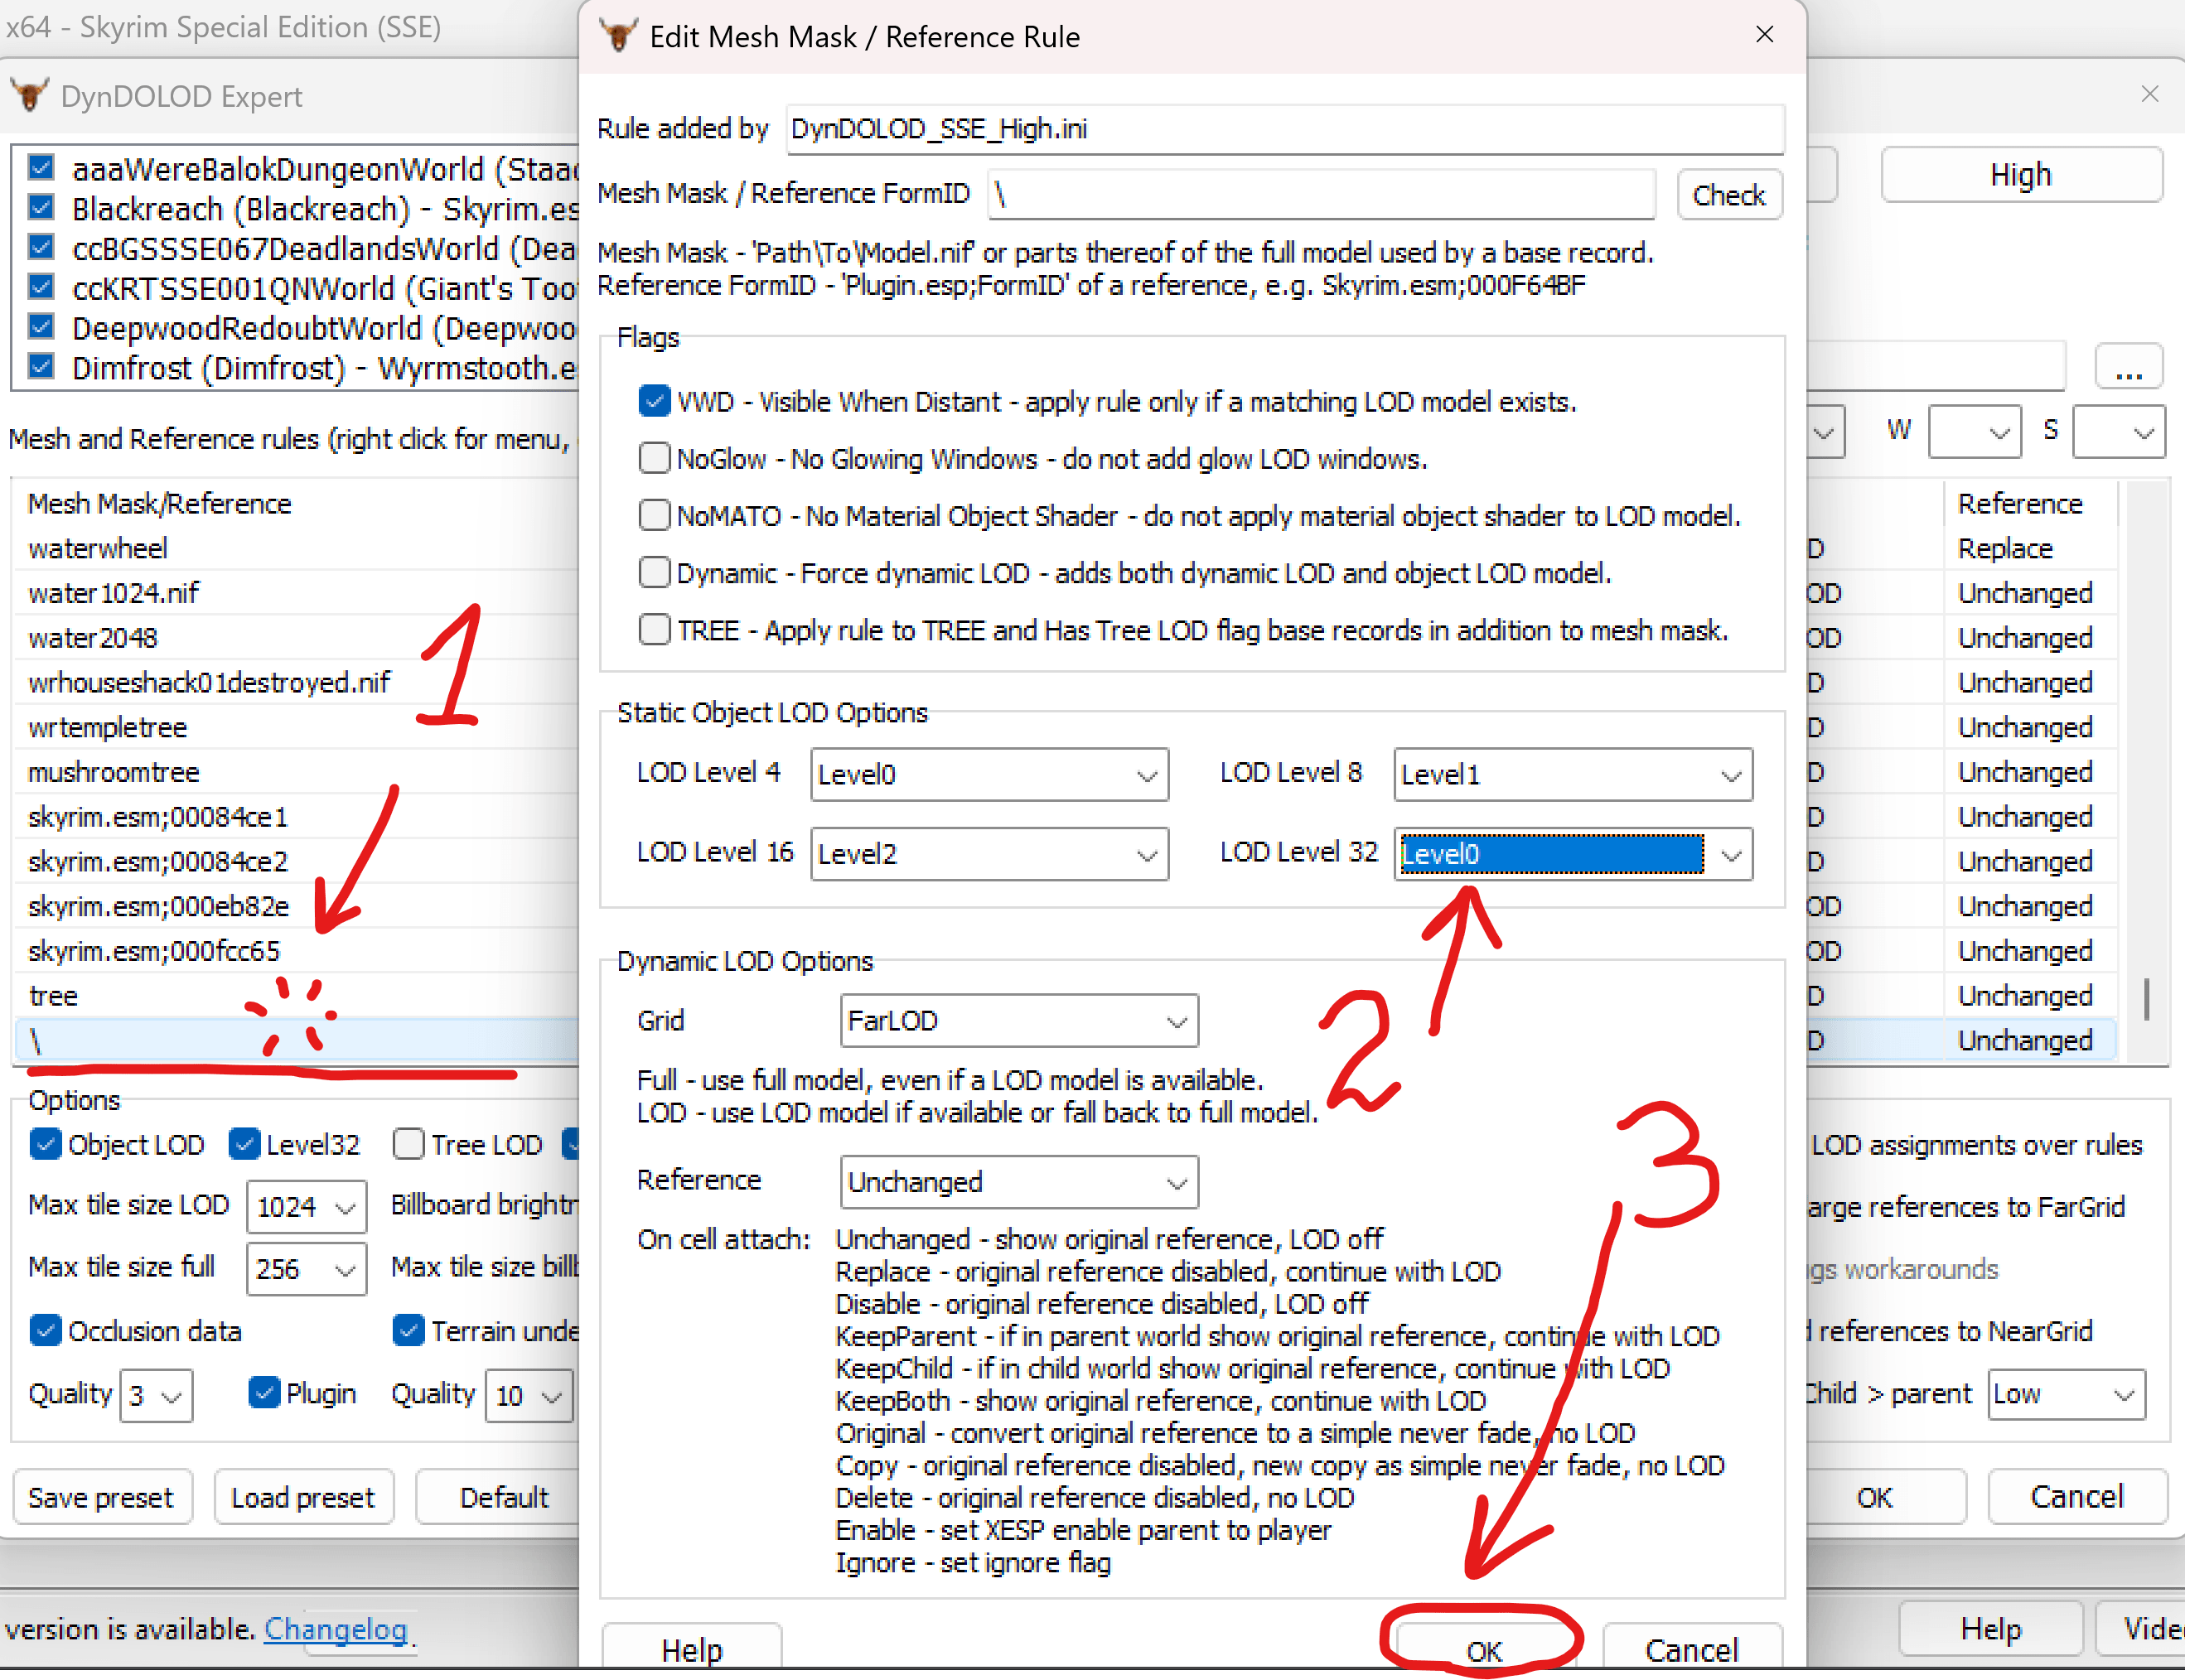
-
Now, just double check that
treeand\records are updated for all LOD levels (basically it'sLevel0 -> Billboard4 -> Billboard1 -> Billboard6fortreeandLevel0 -> Level1 -> Level2 -> Level0for\) (1), and clickOkto start theDynDOLODgeneration!: warning
🕐 This would take A LONG TIME!
Sit back, relax. It would be around an hour.
noteAs is the case with TexGen, Licentia Next will not have any critical errors that will stop DynDOLOD. Any mods that you added may! TexGen doesn't catch all errors, but DynDOLOD will and those critical errors will need to be addressed. A critical error is one that actually stops DynDOLOD and it won't go on until it is fixed.
-
When the
DynDOLODis done generating, you'd see this message - selectSave and Exit(andDynDOLODwould close after that):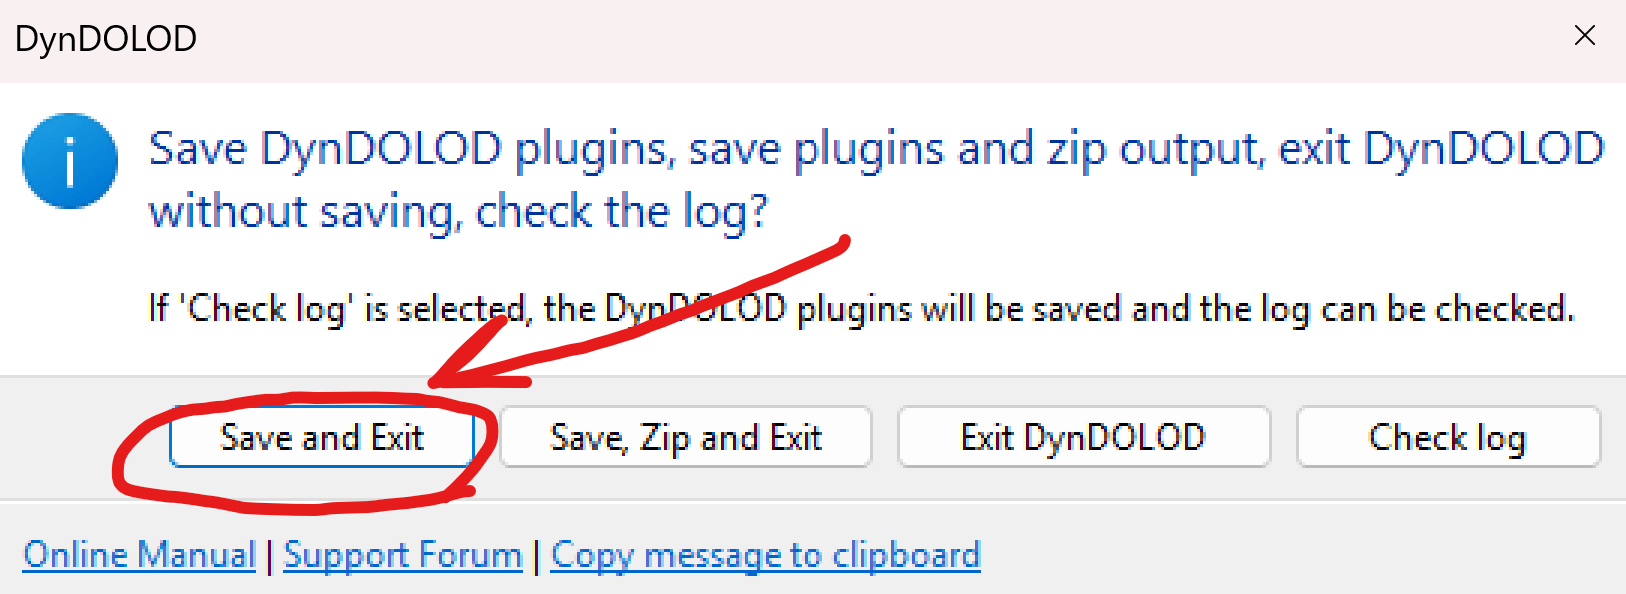 tip
tipDynDOLODwill open a pageDynDOLOD_Index.htmlin your browser with notes to read its output report containing warnings/errors/etc. - and it can be very useful! Especially if you've added something new.For compeletely vanilla Licentia there are no critical issues there, so you can skip this report.
-
In
Mod Organizer 2, disable the modDynDolod - Darken texture for generation - The good one last one.Great success! You're almost done, proceed to the next step.
Install DynDOLOD Output
-
Navigate to your
C:\_DYNDOLOD\DynDOLOD_Outputfolder, you would see:- 3 folders:
meshesSKSEtextures
- 4 files:
DynDOLOD.esmDynDOLOD.espDynDOLOD_SWAP.iniOcclusion.esp
- 3 folders:
-
Now:
- Add those files and folders (not the
DynDOLOD_Outputfolder itself) to archive (via 7zip or any other tool) in.zipformat - Copy the resulting archive to your Licentia downloads folder (for example
C:\Licentia NEXT\Downloads).
- Add those files and folders (not the
-
In the
Mod Organizer 2, you would see theDynDOLOD_Output.zipat theDownloadssection on the right. If you don't see it - clickRefreshon the left.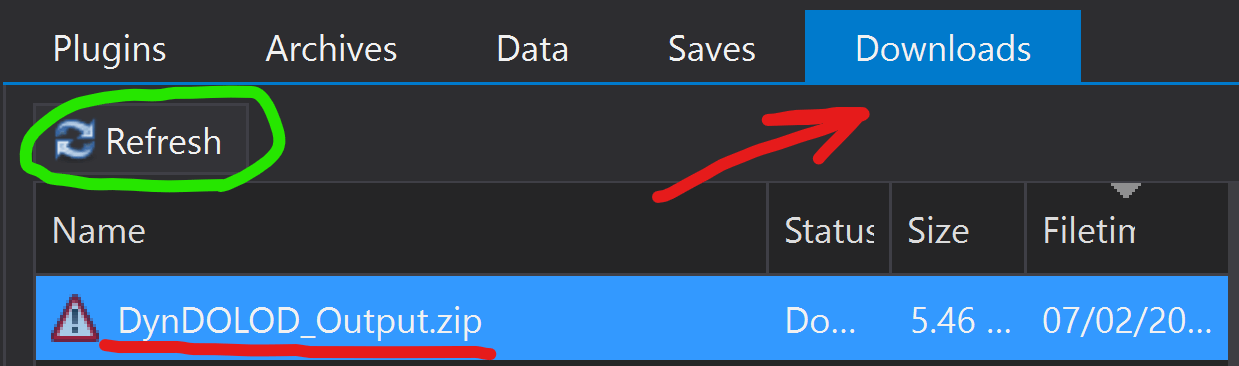
-
Double-click the
DynDOLOD_Output.zip, and when prompted forQuick Install- just pressOk: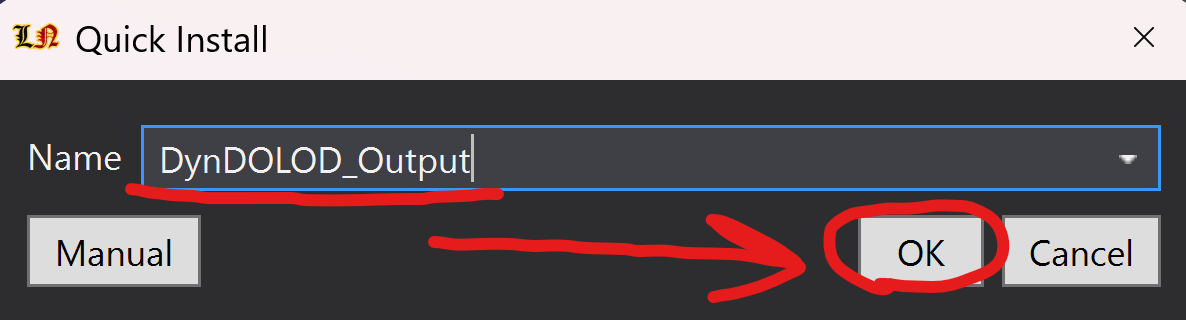
It would take a couple of minutes to install, so just wait.
-
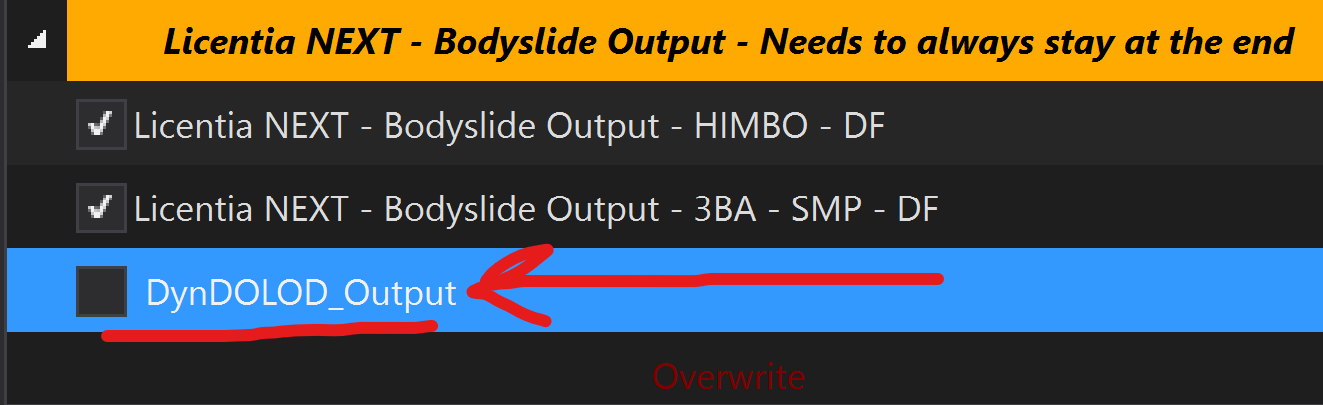
The mod would appear at the bottom of the mods' list on the left:
-
Drag it to the
Licentia NEXT - LOD Outputseparator, put it under the disabledLicentia NEXT - DynDOLOD Outputmod, and enable it. The result would look like this: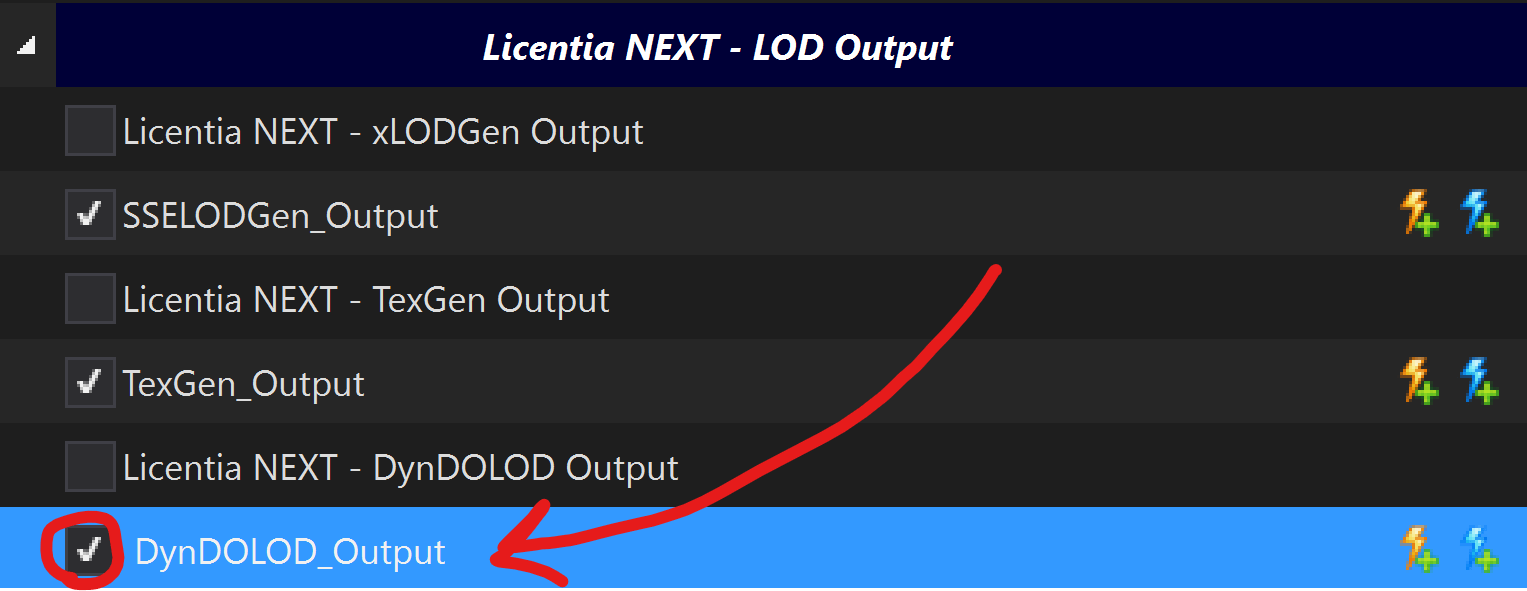
-
In the
Pluginssection on the right, make sure bothDynDOLOD.espandOcclusion.espplugins are sorted like this (they should be loaded last!):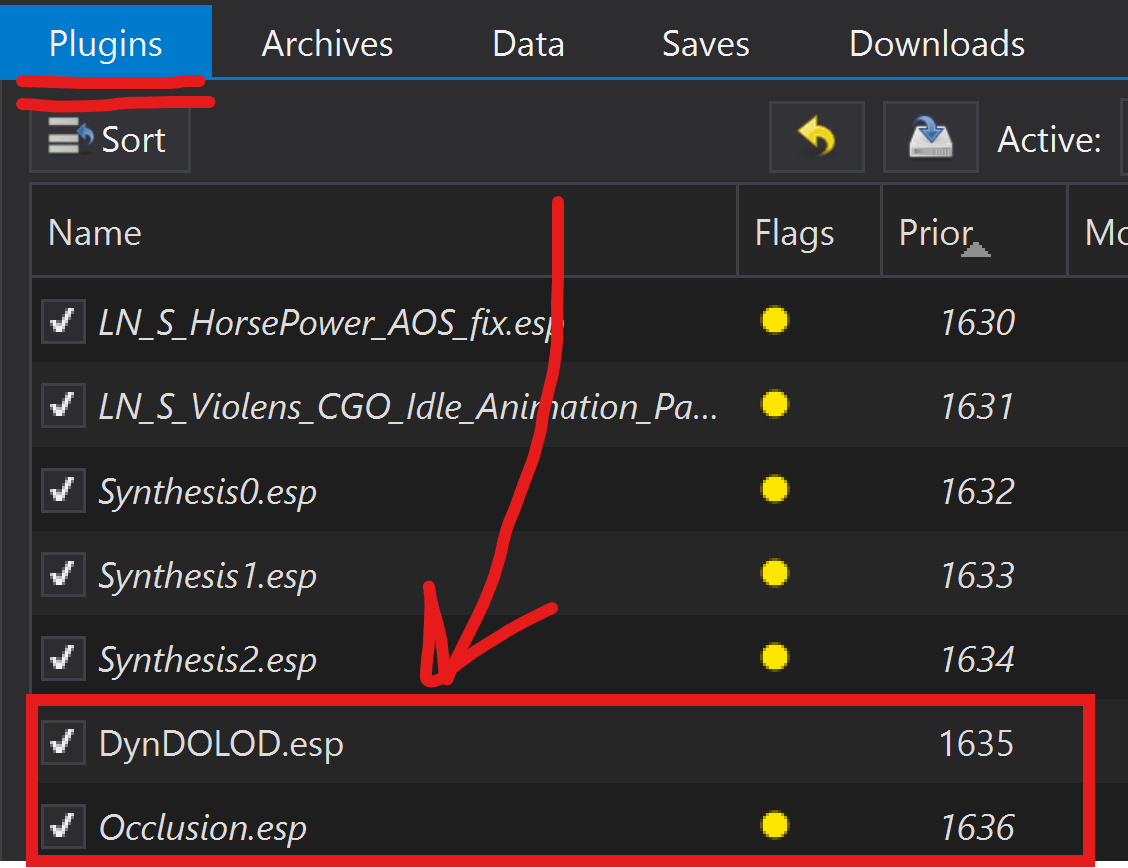
Step 5️⃣ — Finishing Touches
-
In
Mod Organizer 2, in the left pane disable these mods:No Grass In Objects
-
Then enable these mods:
-
Grass Cache Helper NG -
DynDOLOD FX Glow Accurate Disabler - Quality of LifeNote that this mod activates a new plugin
Dyndolod_Glow_Fix.esp, which should be loaded LAST, right afterOcclusion.esp!
-
-
Now find the
Grass FPS Boostermod on the left:- Right-click on it and select
Information - In the newly opened window, select
Filetreetab (1), right click onGrass FPS Booster - ***your grass mod name***.ini.mohidden(2), and clickUnhide(3) (because we've hidden it earlier and it needs to be reverted):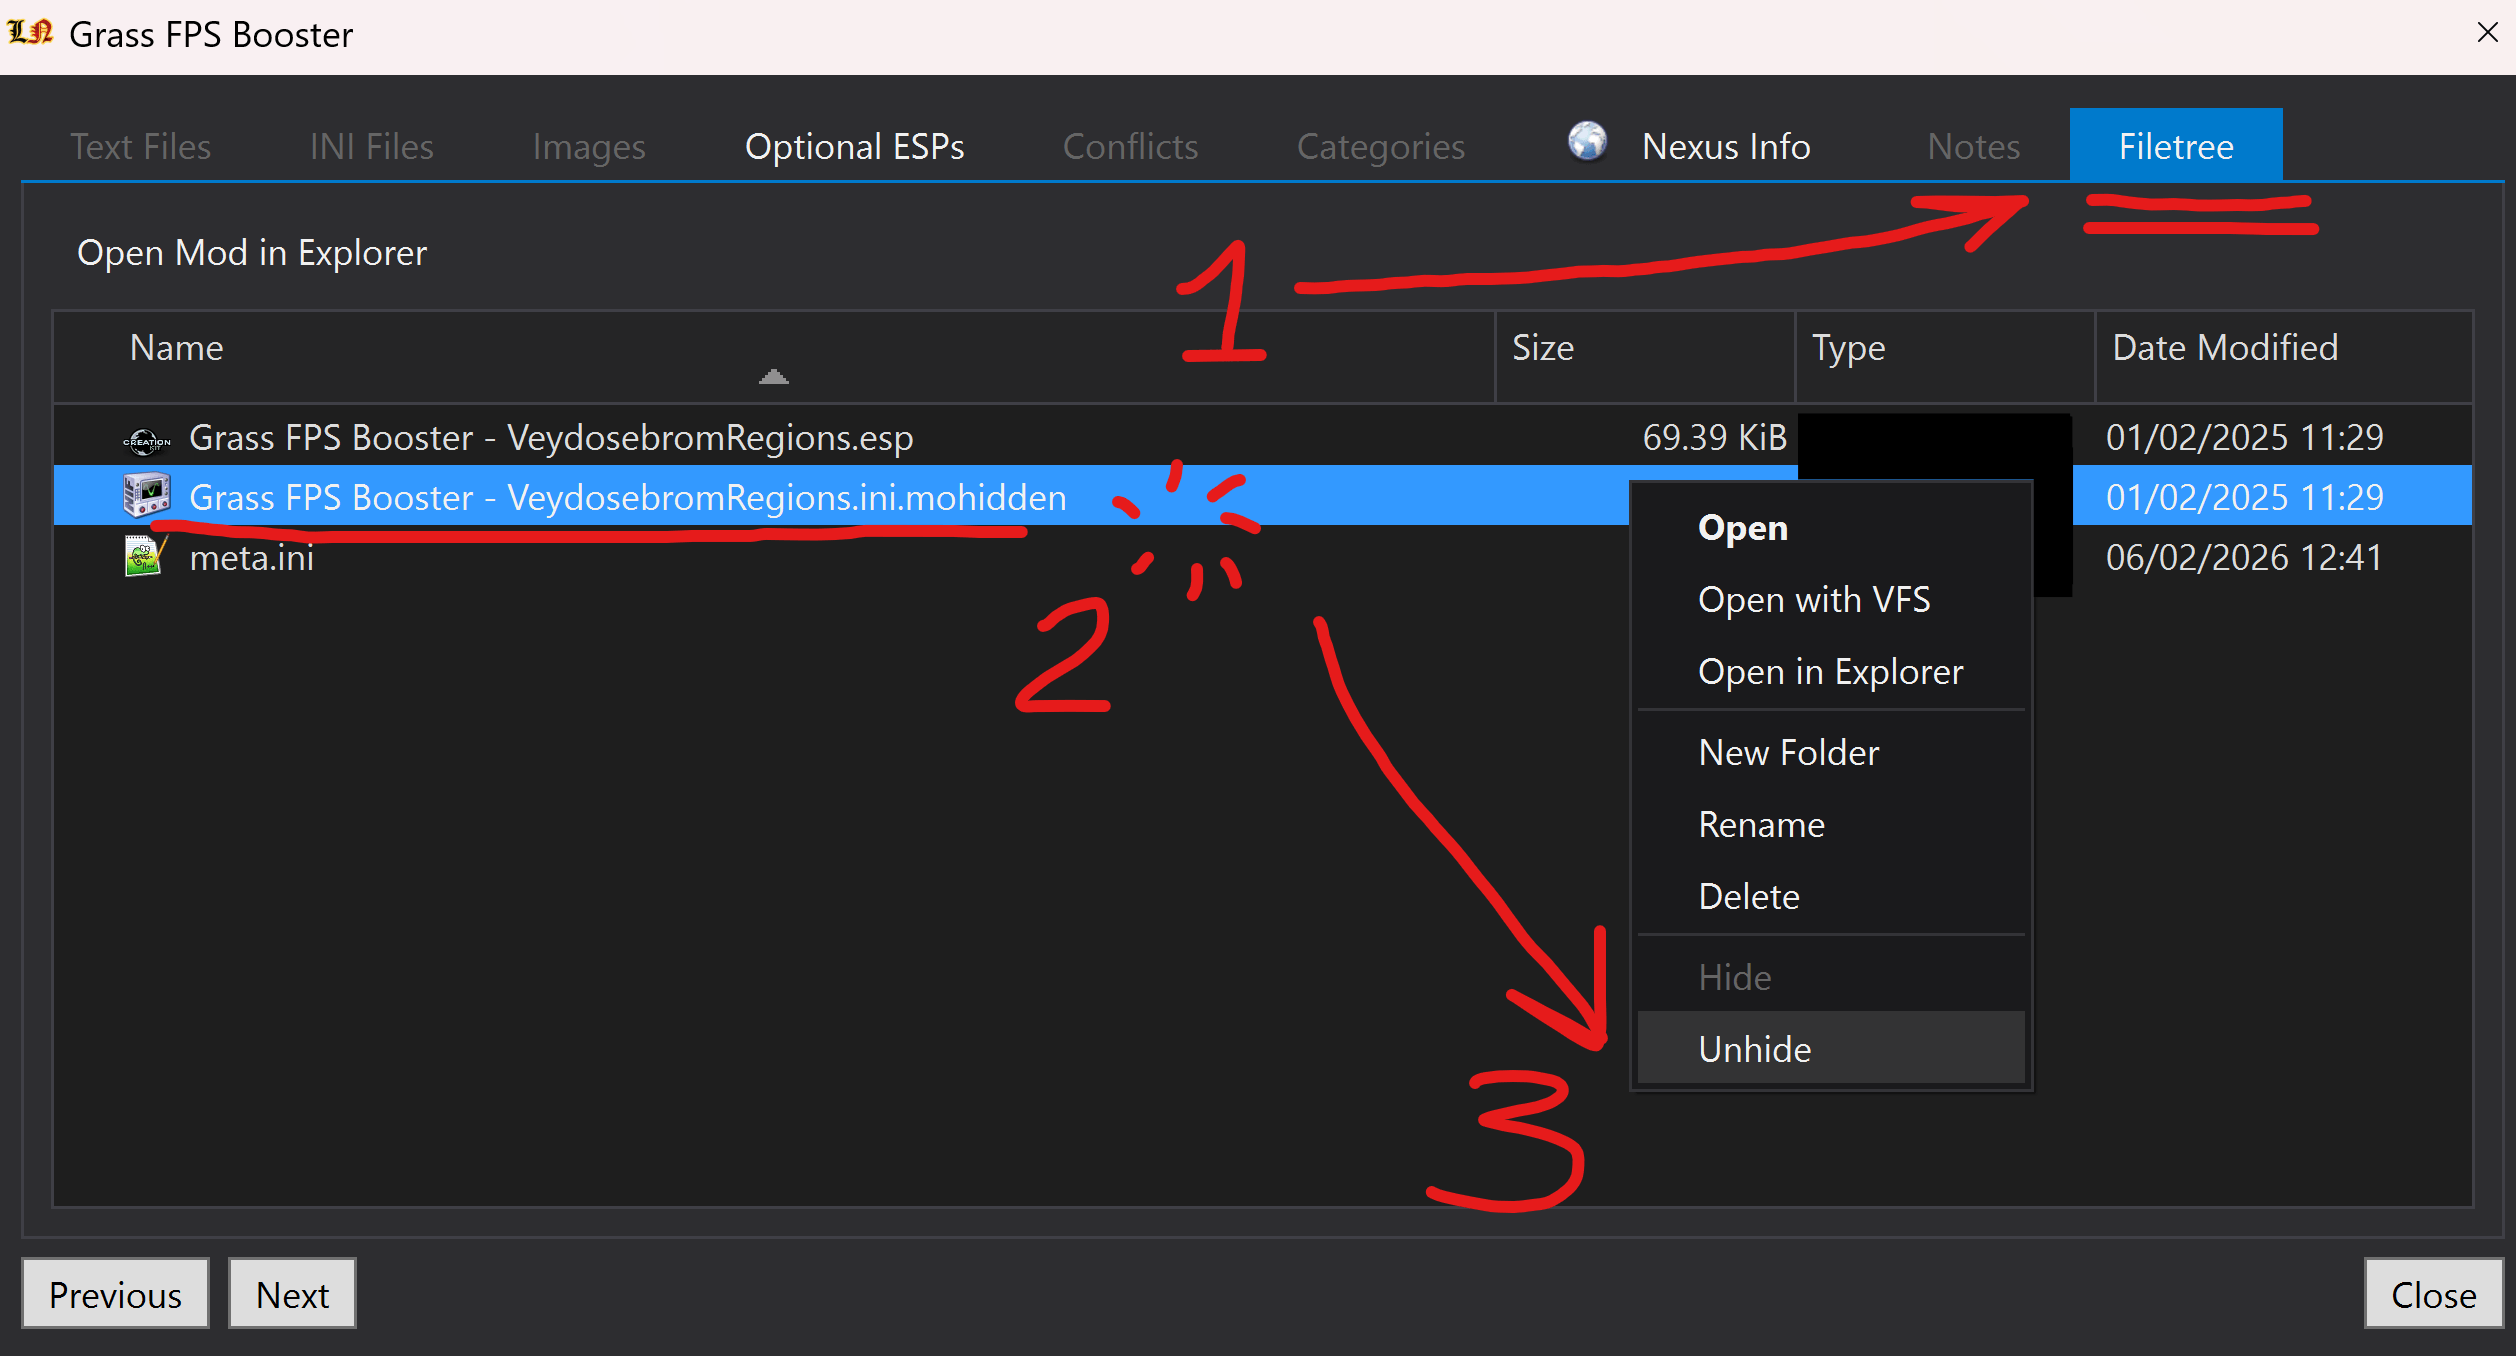
- Right-click on it and select
-
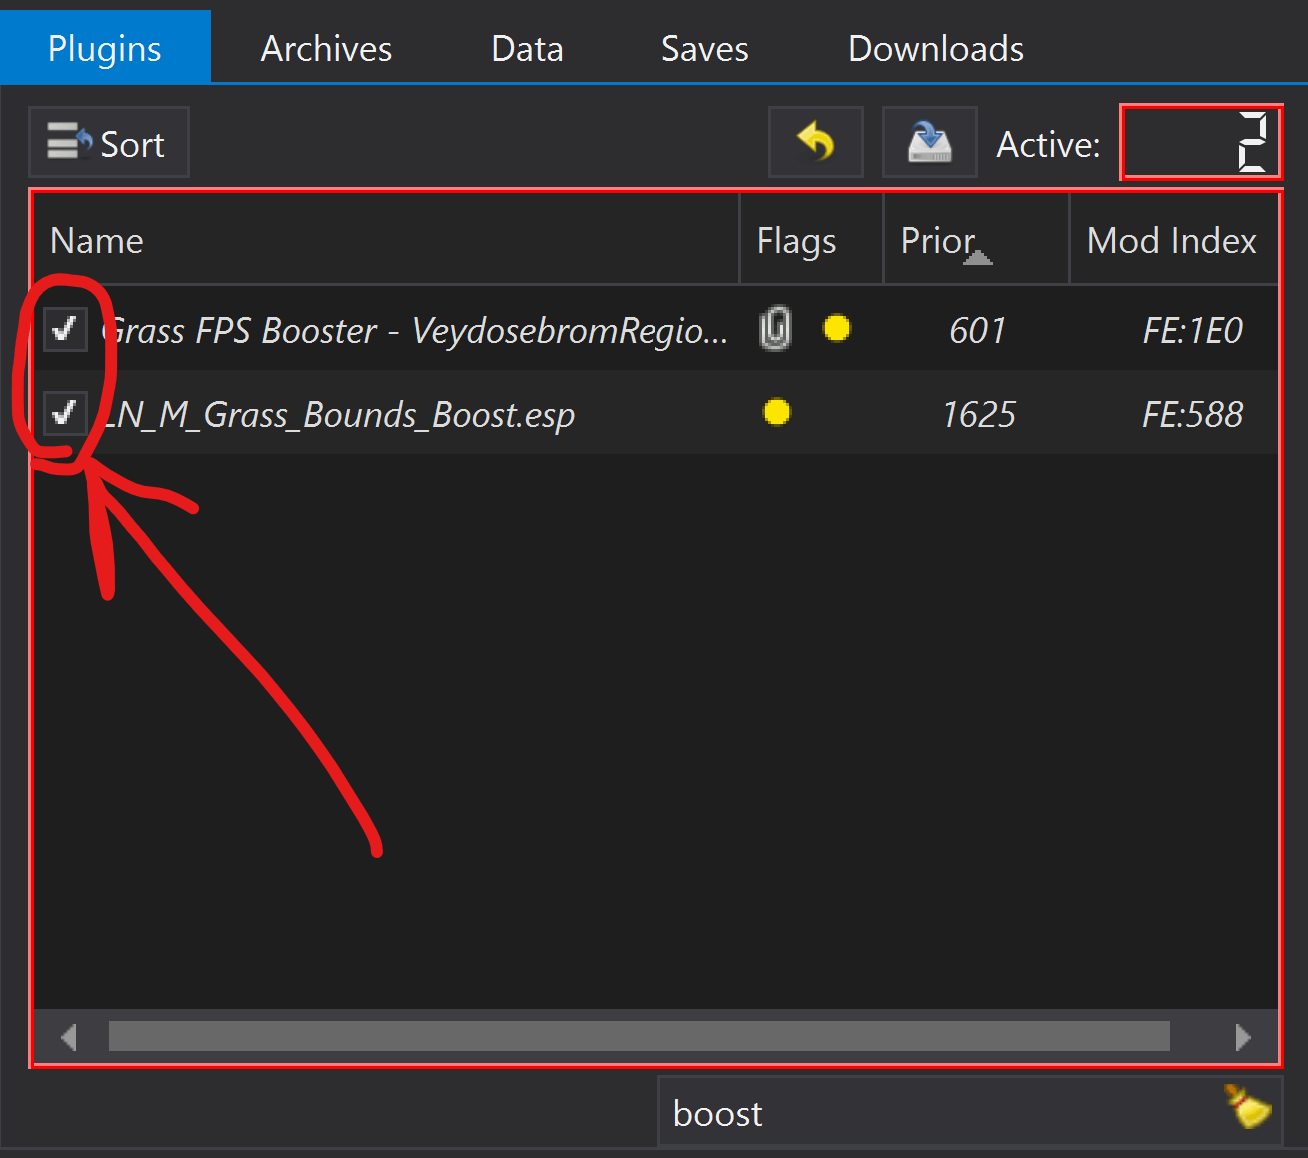
And on the right pane in
Pluginstab ENABLE the following plugins we've disabled earlier:Grass FPS Booster - ***your grass mod name***.espLN_M_Grass_Bounds_Boost.esp(or whatever yourBoostplugin is called after Bounds Recalculation)
It should look like this:
🎉 Done! Your LODs are now fully regenerated!