
👚 How to build Outfits in Bodyslide for Licentia NEXT
WHY YOU MIGHT NEED THIS?
You added/updated any outfit/body mods that require Bodyslide to build its outputs.
You want to rerun Bodyslide for any other reason.
These are the general steps to run Bodyslide for Licentia NEXT:
- Create an Empty Mod for Outputs
- Run Bodyslide
- Select your respective Outfits and Preset
- Batch Build Outfits to the Output Mod
🕐 This process takes around 20 minutes. Let's dive into the details!
If you are going to be building both Male and Female, you will need to do Steps 3-4 twice for both body types otherwise you only need to do the process for your desired body type.
Since version 13.4.1 OBody has returned to Licentia NEXT, allowing random distribution of body presets to NPCs.
This guide is primarily intended for re-running BodySlide as it is provided with the list OR adding new outfit mods to your NEXT installation.
If you want to remove OBody from your installation, there is a small tutorial at the bottom of this guide following the same process with your selected preset instead of Zeroed Sliders.
Step 1️⃣ — Create an Empty Mod
At the top of the Mod Organizer 2 Window on the icon row next to Profile there is a button with a Wrench and Screwdriver icon, click it.
There will be a list of options available, select Create Empty Mod.
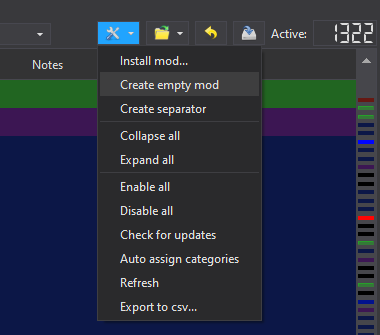
You will now be prompted to name your custom mod, this can be named however you want.
Adding [NoDelete] before the name will make the mod not be removed upon updating the list.
Upon updating the mod will be deactivated and moved to the bottom of the last separator, and you can simply move it into place and enable it.

The new empty mod you made will be created under the Bodyslide Outputs Separator, as long as your custom mod is below Licentia NEXT Bodyslide Output your changes will override default outfits.
Step 2️⃣ — Run Bodyslide
Once you have created your Output mod head over to the Top Right of MO2 to the launch section. Open the dropdown and select BodySlide x64, then run the program.
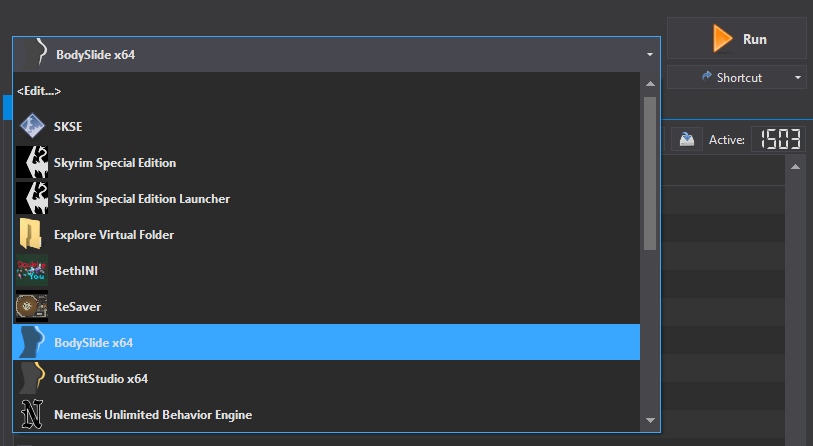
Upon opening the program for the first time you will be prompted to select the respective game and Game Data Path.
By default SkyrimSE will have it's data checking the default Steam Installation Directory.
This will cause BodySlide to not access the files properly and you will see errors with textures, missing files, etc.
In your Licentia NEXT Installation folder there will be a folder named Stock Game. Inside the folder you can Right Click /Data, and choose Copy as Path.
Paste your Installation Path in the Game Data path for Skyrim SE, then hit OK to continue to the main interface.
Step 3️⃣ — Select your respective Outfits and Preset
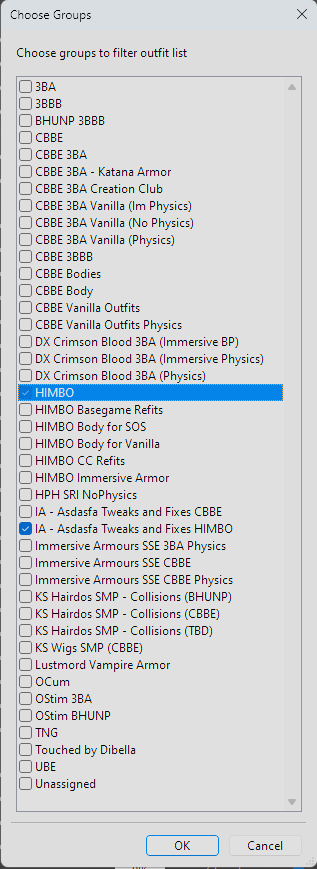
On the top right of the interface there will be two search bars for Filter Groups and Filter Outfits, select the search icon for Filter Groups and select Choose Groups.

In the Outfit/Body dropdown list you will have two main sets of body types, 3BBB/3BA/CBBE for Female and HIMBO for Male.
You will need to select the respective groups for which body you want to build, since you cannot build Male and Female simultaneously due to different presets.
A list will open with various groups to choose outfits for. For Female select both 3BBB and 3BA, and the related groups such DX Crimson Blood 3BA. For Male select HIMBO and it's applicable groups.
Here are example group selections for Female and Male outfits:

As of version 13.4.1 Dismemberment Framework has been added, and you will need to manually build outfits [DF] [CBBE 3BBB/Himbo] Naked Female/Male Dismembered Addons to Zeroed Sliders/HIMBO Zero for OBody. These two outfits will be found at the bottom of the Unassigned Group.
You do not need to select every group for building purposes, if you have the base groups selected for example 3BA or HIMBO, Bodyslide will automatically use all the groups containing the names of your selected groups.
However, the group Unassigned is excluded from this search as previously detailed with building Dismemberment Framework and there is a small range of outfits for CBBE/3BBB and Himbo that must be manually selected in Unassigned. You can easily do this process by using the Filter Outfits search bar at the very top right next to Groups, and search for CBBE, then 3BBB and build those two sets with Zeroed Sliders, then search for Himbo and build those with Himbo Zero for OBody.
Unassigned Group Example
Note for building Himbo Groups
Building Himbo will open the conflict resolution window for IA Asdafa Tweaks, if you batch build with only Himbo selected ignoring conflicts then once that is finished build with only the Asdafa Overrides group selected you can build the overrides without needing to resolve conflicts.
Once you have your Outfits selected for the body you wish to build, you will need to select a Preset from the dropdown at the top of the interface to build your outfits with. Due to the list containing OBody you will need to use the following presets respsectively for Female or Male. - Zeroed Sliders - for Female characters, or Himbo Zero for OBody for Male characters.
You can use any preset in the list or one you have downloaded, make sure you build all respective outfits to the same preset.
For example here are the default Female Presets available in Licentia NEXT, with the default preset selected:

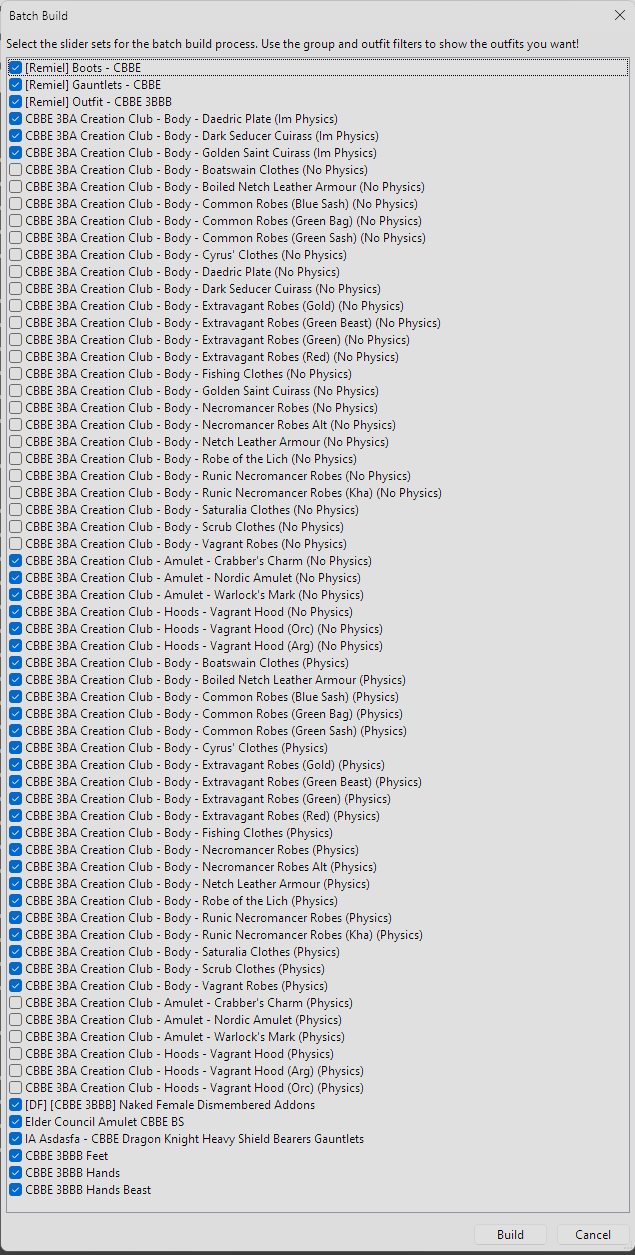
Step 4️⃣ — Batch Build Outfits to the Output Mod
Once you have chosen your desired outfits to build for your selected body and preset, it is time to Batch Build the outfits to your output.
On the bottom left of the Interface there is the button to Batch Build, Build Morphs, and select alternatives.
Tick the checkbox for the previewed outfit path, and tick Build Morphs.

- After you have ticked the checkbox next to the preview, hold
Left CTRLand select Batch Build. - A list of outfits will pop up, scroll through and verify everything is correct then press Build.
- File Explorer will now open in the Stock Game/Data directory. In the address bar click the root folder of your installation and open /Mods.
- Find the folder for your Empty Mod that was created earlier, for example
[NoDelete] Bodyslide Output.
Depending on your selections an additional menu may open for choosing Output Sets. If there is conflicting outputs selected, here you can select which alternative you want to select for example Physics versions of Outfits over Non-Physics.
Make your selections then continue, and Bodyslide will convert all your selections and place them in your output. You can now close Bodyslide.
Back in MO2 once it unlocks right click your Custom Output Mod, after clicking the mod the error for No Valid Game Data should now be resolved and disappear.
Tick your Output Mod to enable it, and you will have successfully built Bodyslide Overrides.
If you have any further questions or problems, stop by the Licentia Next Category in Vermi's Hub Discord Server and we can help you work them out!
♻️ Removing OBody from your Installation
If you want to remove OBody from your installation for whatever reason you will need to follow the subsequent steps for "building out" OBody.
- Disable OBody in MO2. Open the
BODIESSeparator or search forOBodyat the bottom and untickOBody Next Generationand- ORefit JSON Master List. Additionally under theBody Meshes (and physics)separator there is two patch files3BA with OBody Collision Physics Fixand it's OSmp patch, disable both of these. - Open Bodyslide, and repeat Steps 3-4. When it comes to selecting your preset, pick one from the list or use your own and build your outfits with your selected outfit.
You will need to build all outfits used by the list if you remove OBody, as otherwise all outfits will remain zeroed on all sliders.